Create account
Sign up with Cashfree Payments
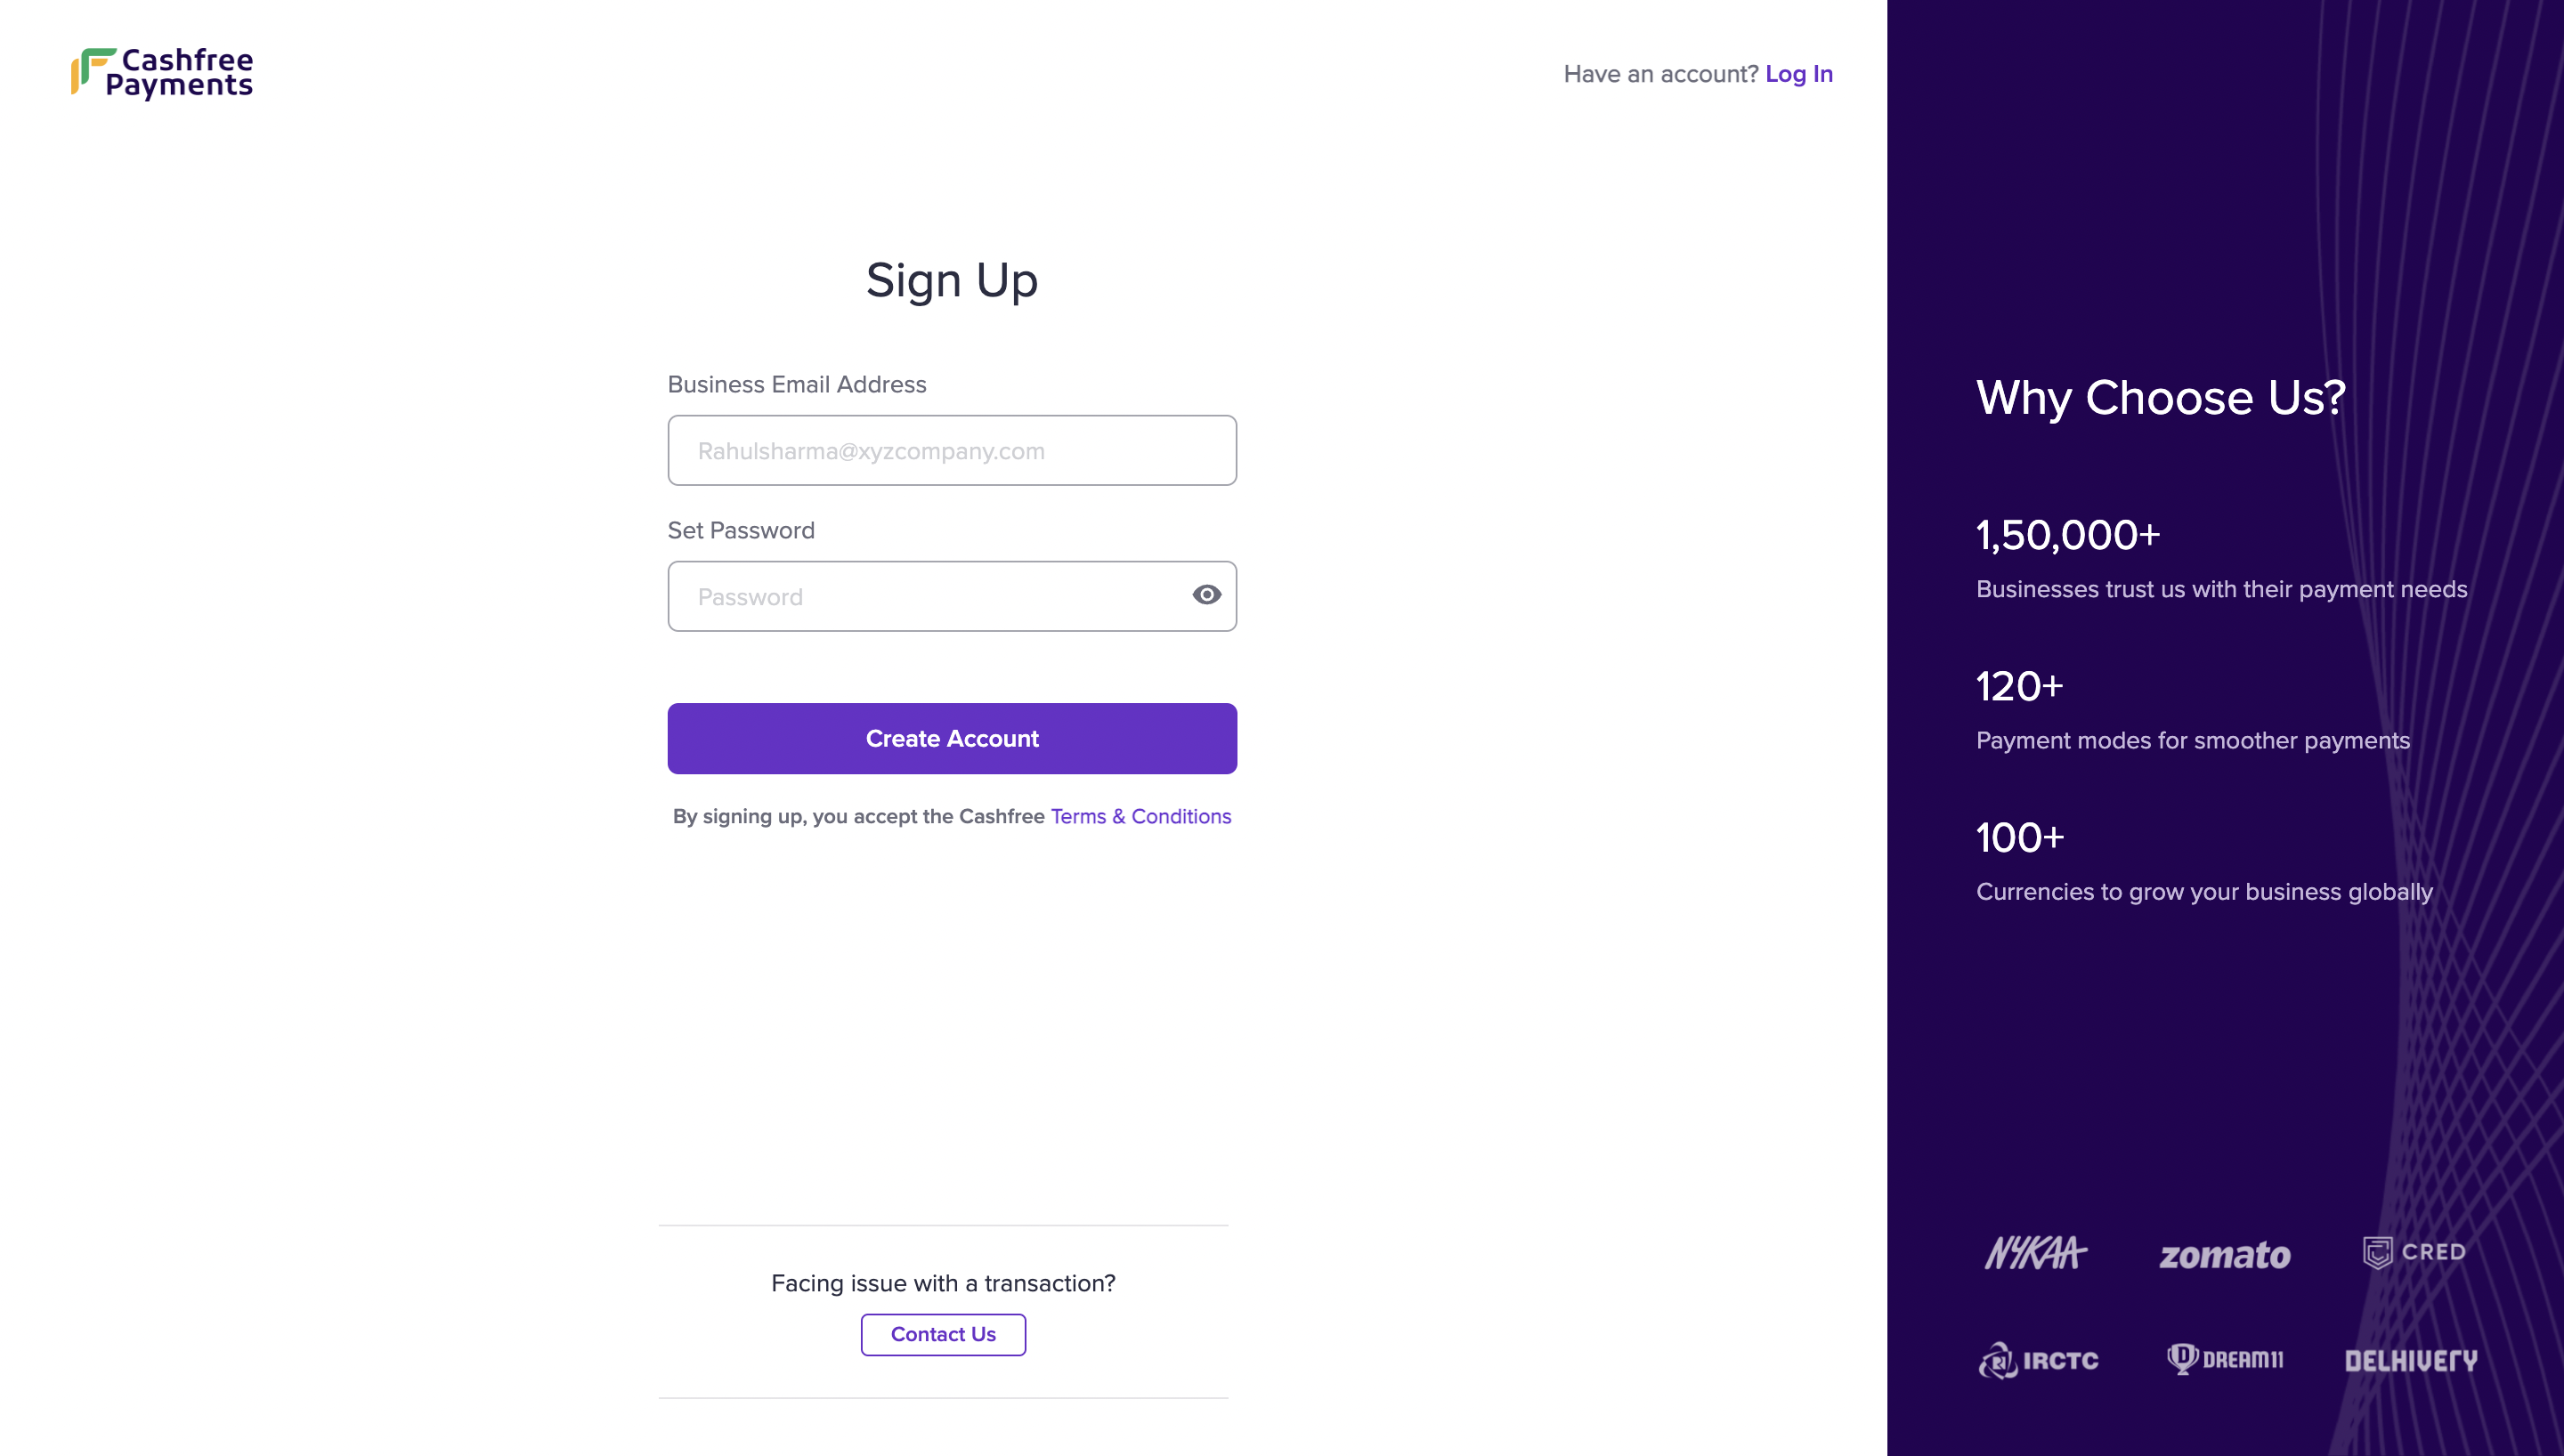
To set up an account:- Go to the Cashfree Payments website and click Create Account.
- Enter the email address of your business and set a password. Use these credentials to sign in to Cashfree Payments.
- Click Continue to proceed.
- Enter the mobile number. We may reach out to you for any clarifications during the onboarding process. If you want to receive account updates on Whatsapp, enable the checkbox.
- Choose Yes if your business has a website or an application and provide the information in the Business info or Facebook/Instagram link.
- Click Create Account.
Explore test environment
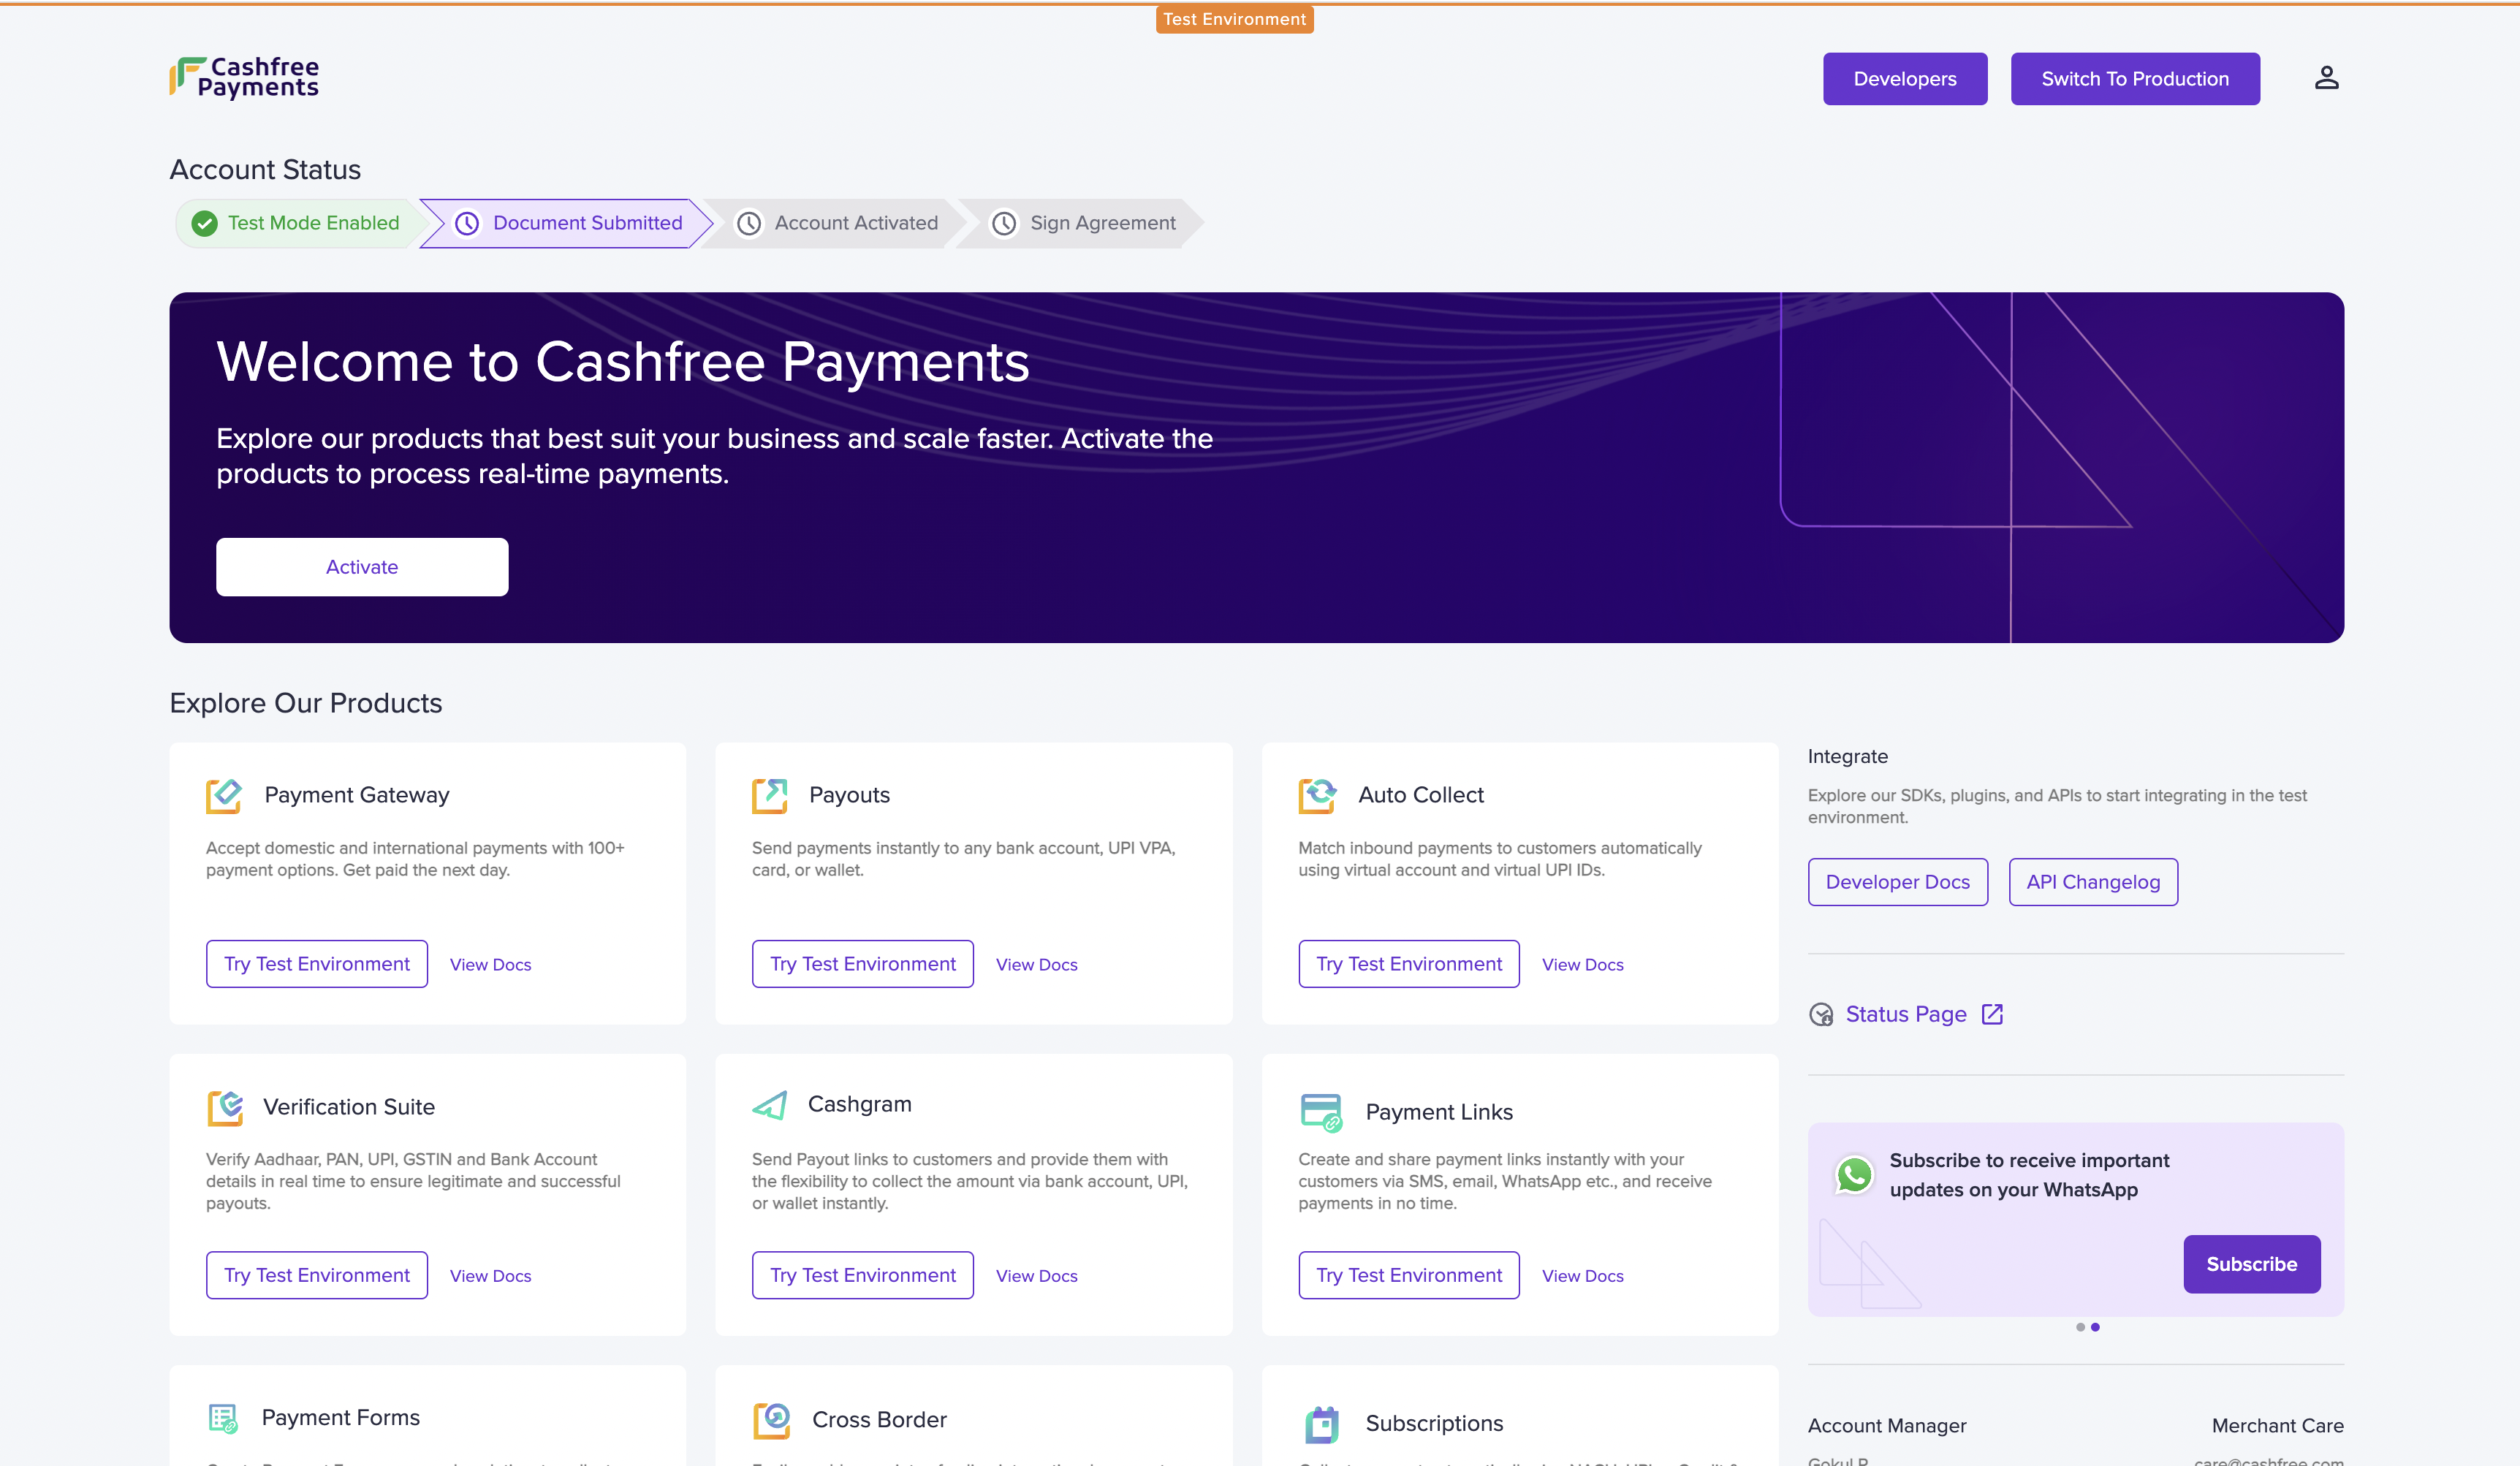
The next step is to activate your account. If you wish to do it later, click Skip and explore dashboard.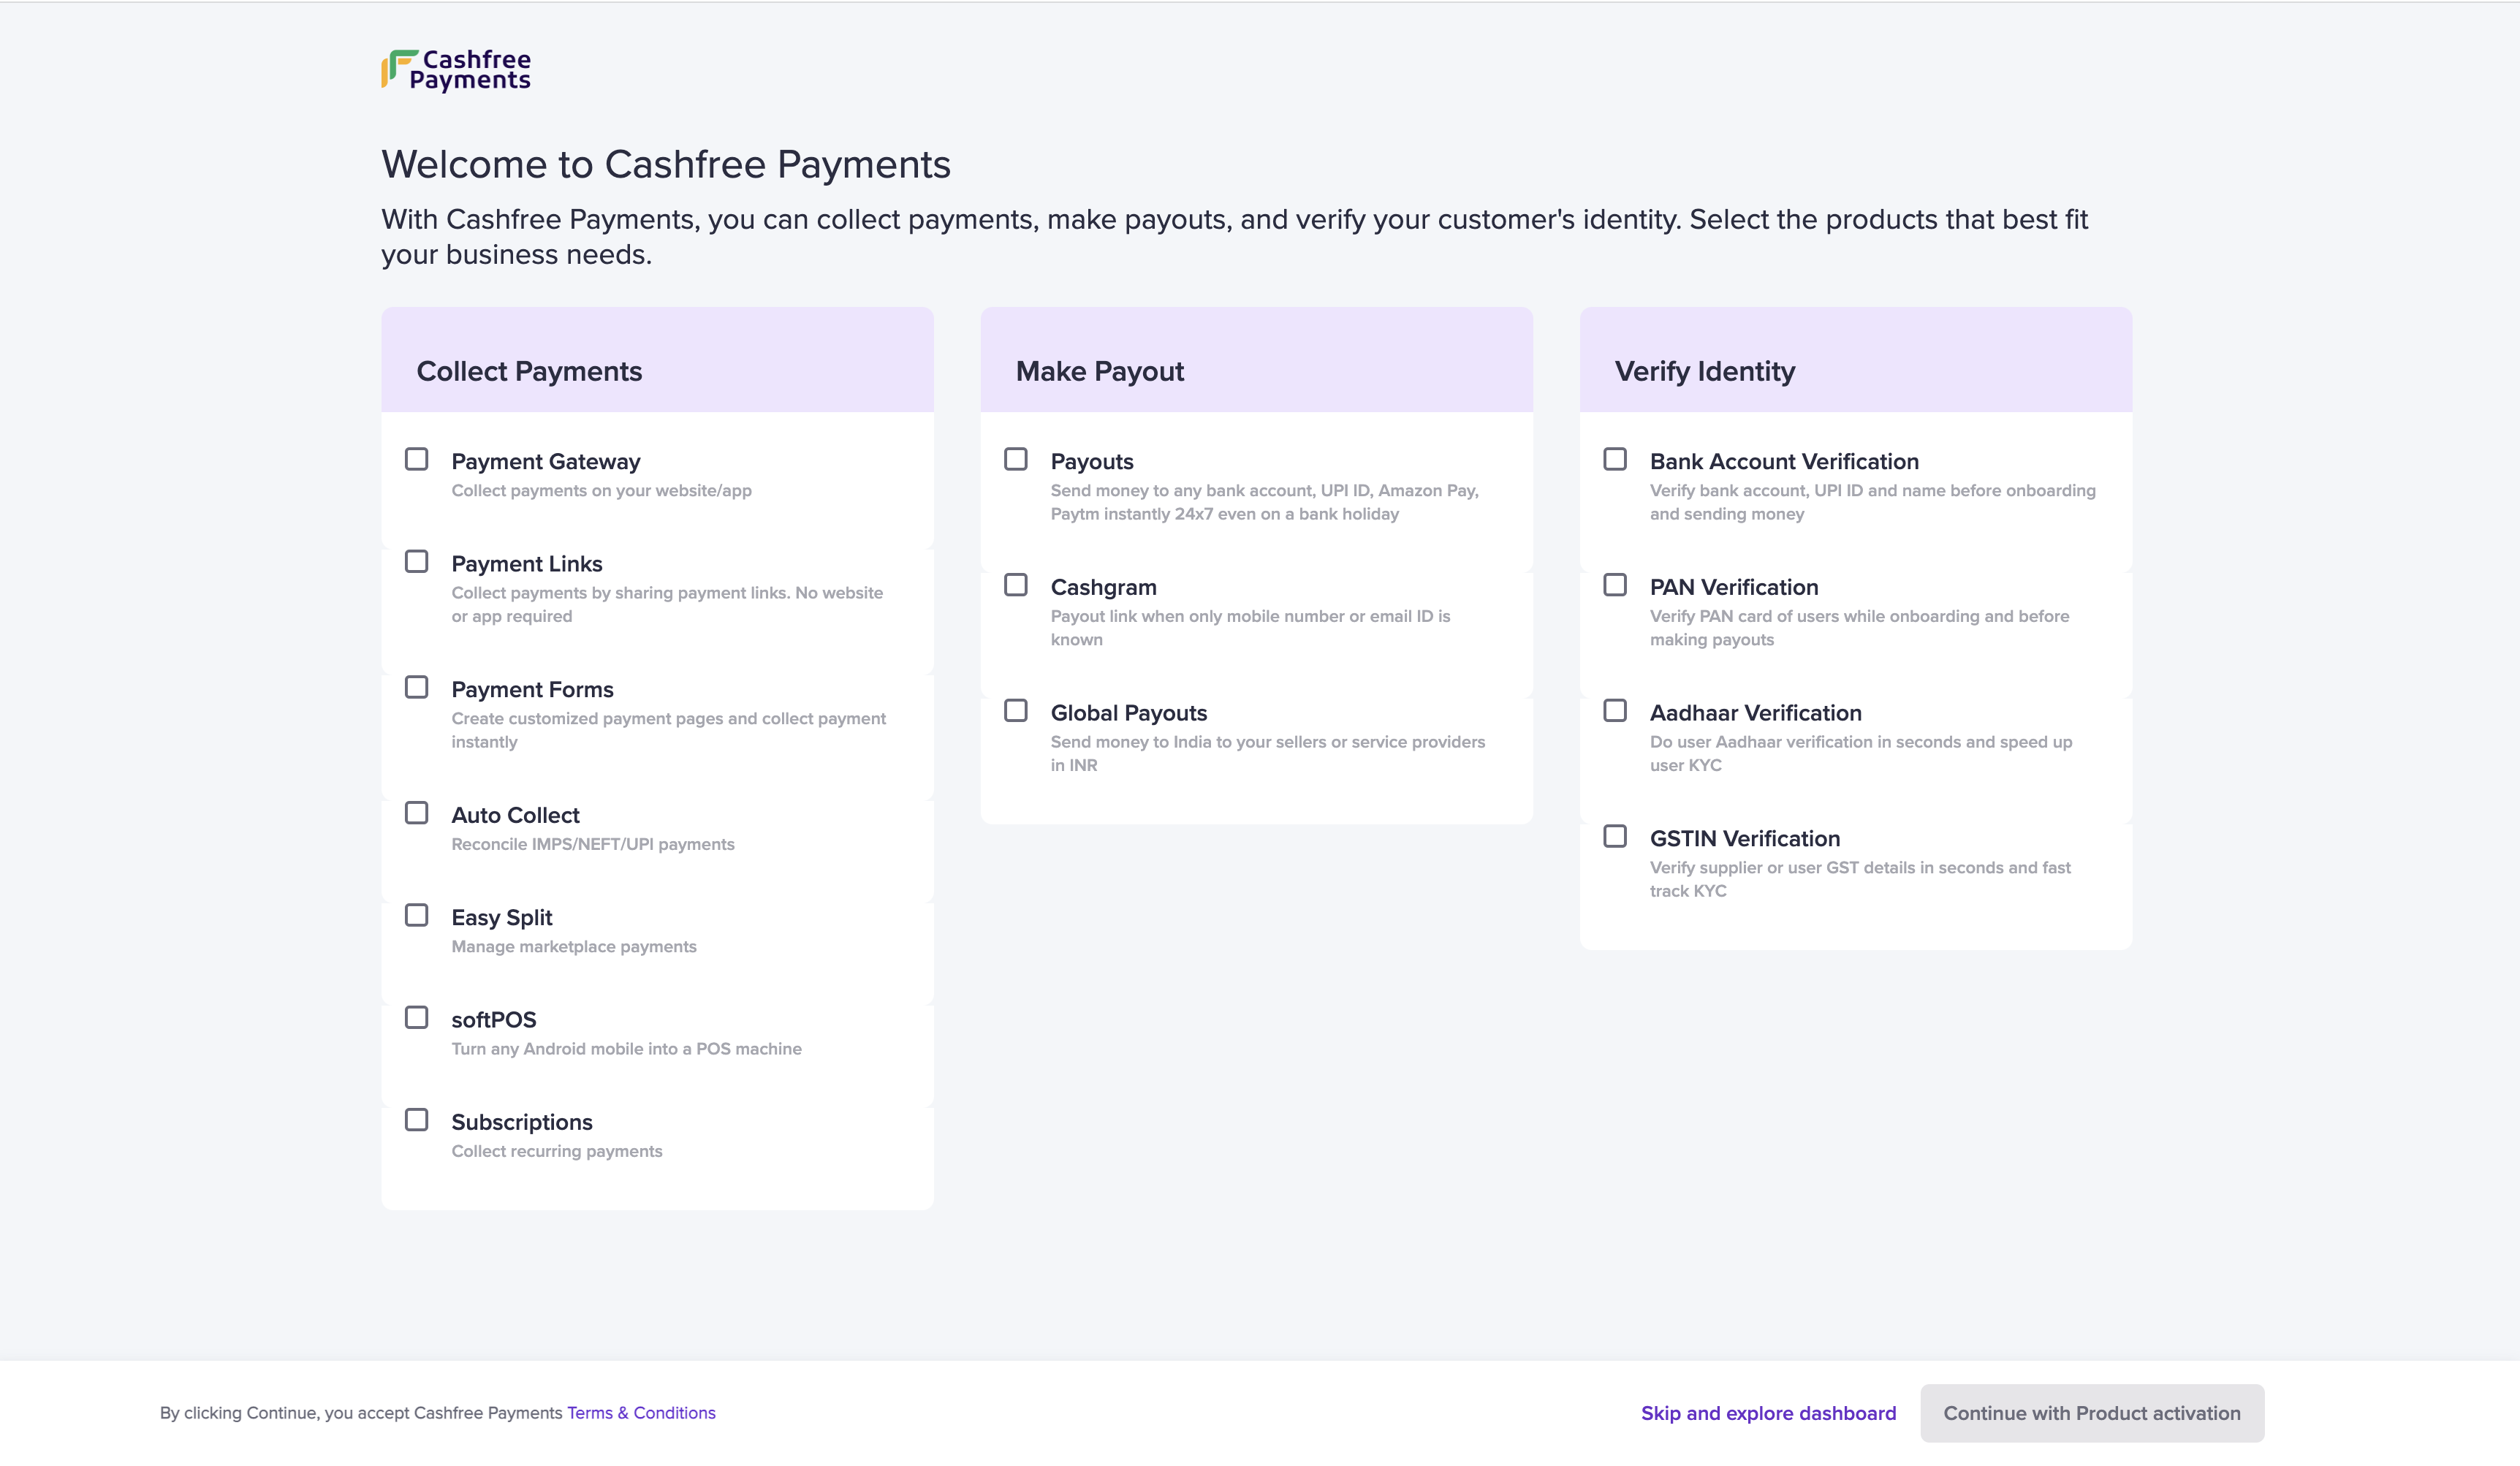 You can access the test environment anytime before activating the account. Use the test environment to familiarise yourself with the dashboard, explore integrations, read product documents, and test the product features. Once you are ready, activate your Cashfree Payments account to process real-time payments.
Activate account
Activating the account allows you to access the production environment where you can collect payments, make payouts, and verify customer’s identity. Once you sign up, select the products and activate your account. In the Welcome to Cashfree Payments screen, select the products you want to activate and click Continue with Product activation.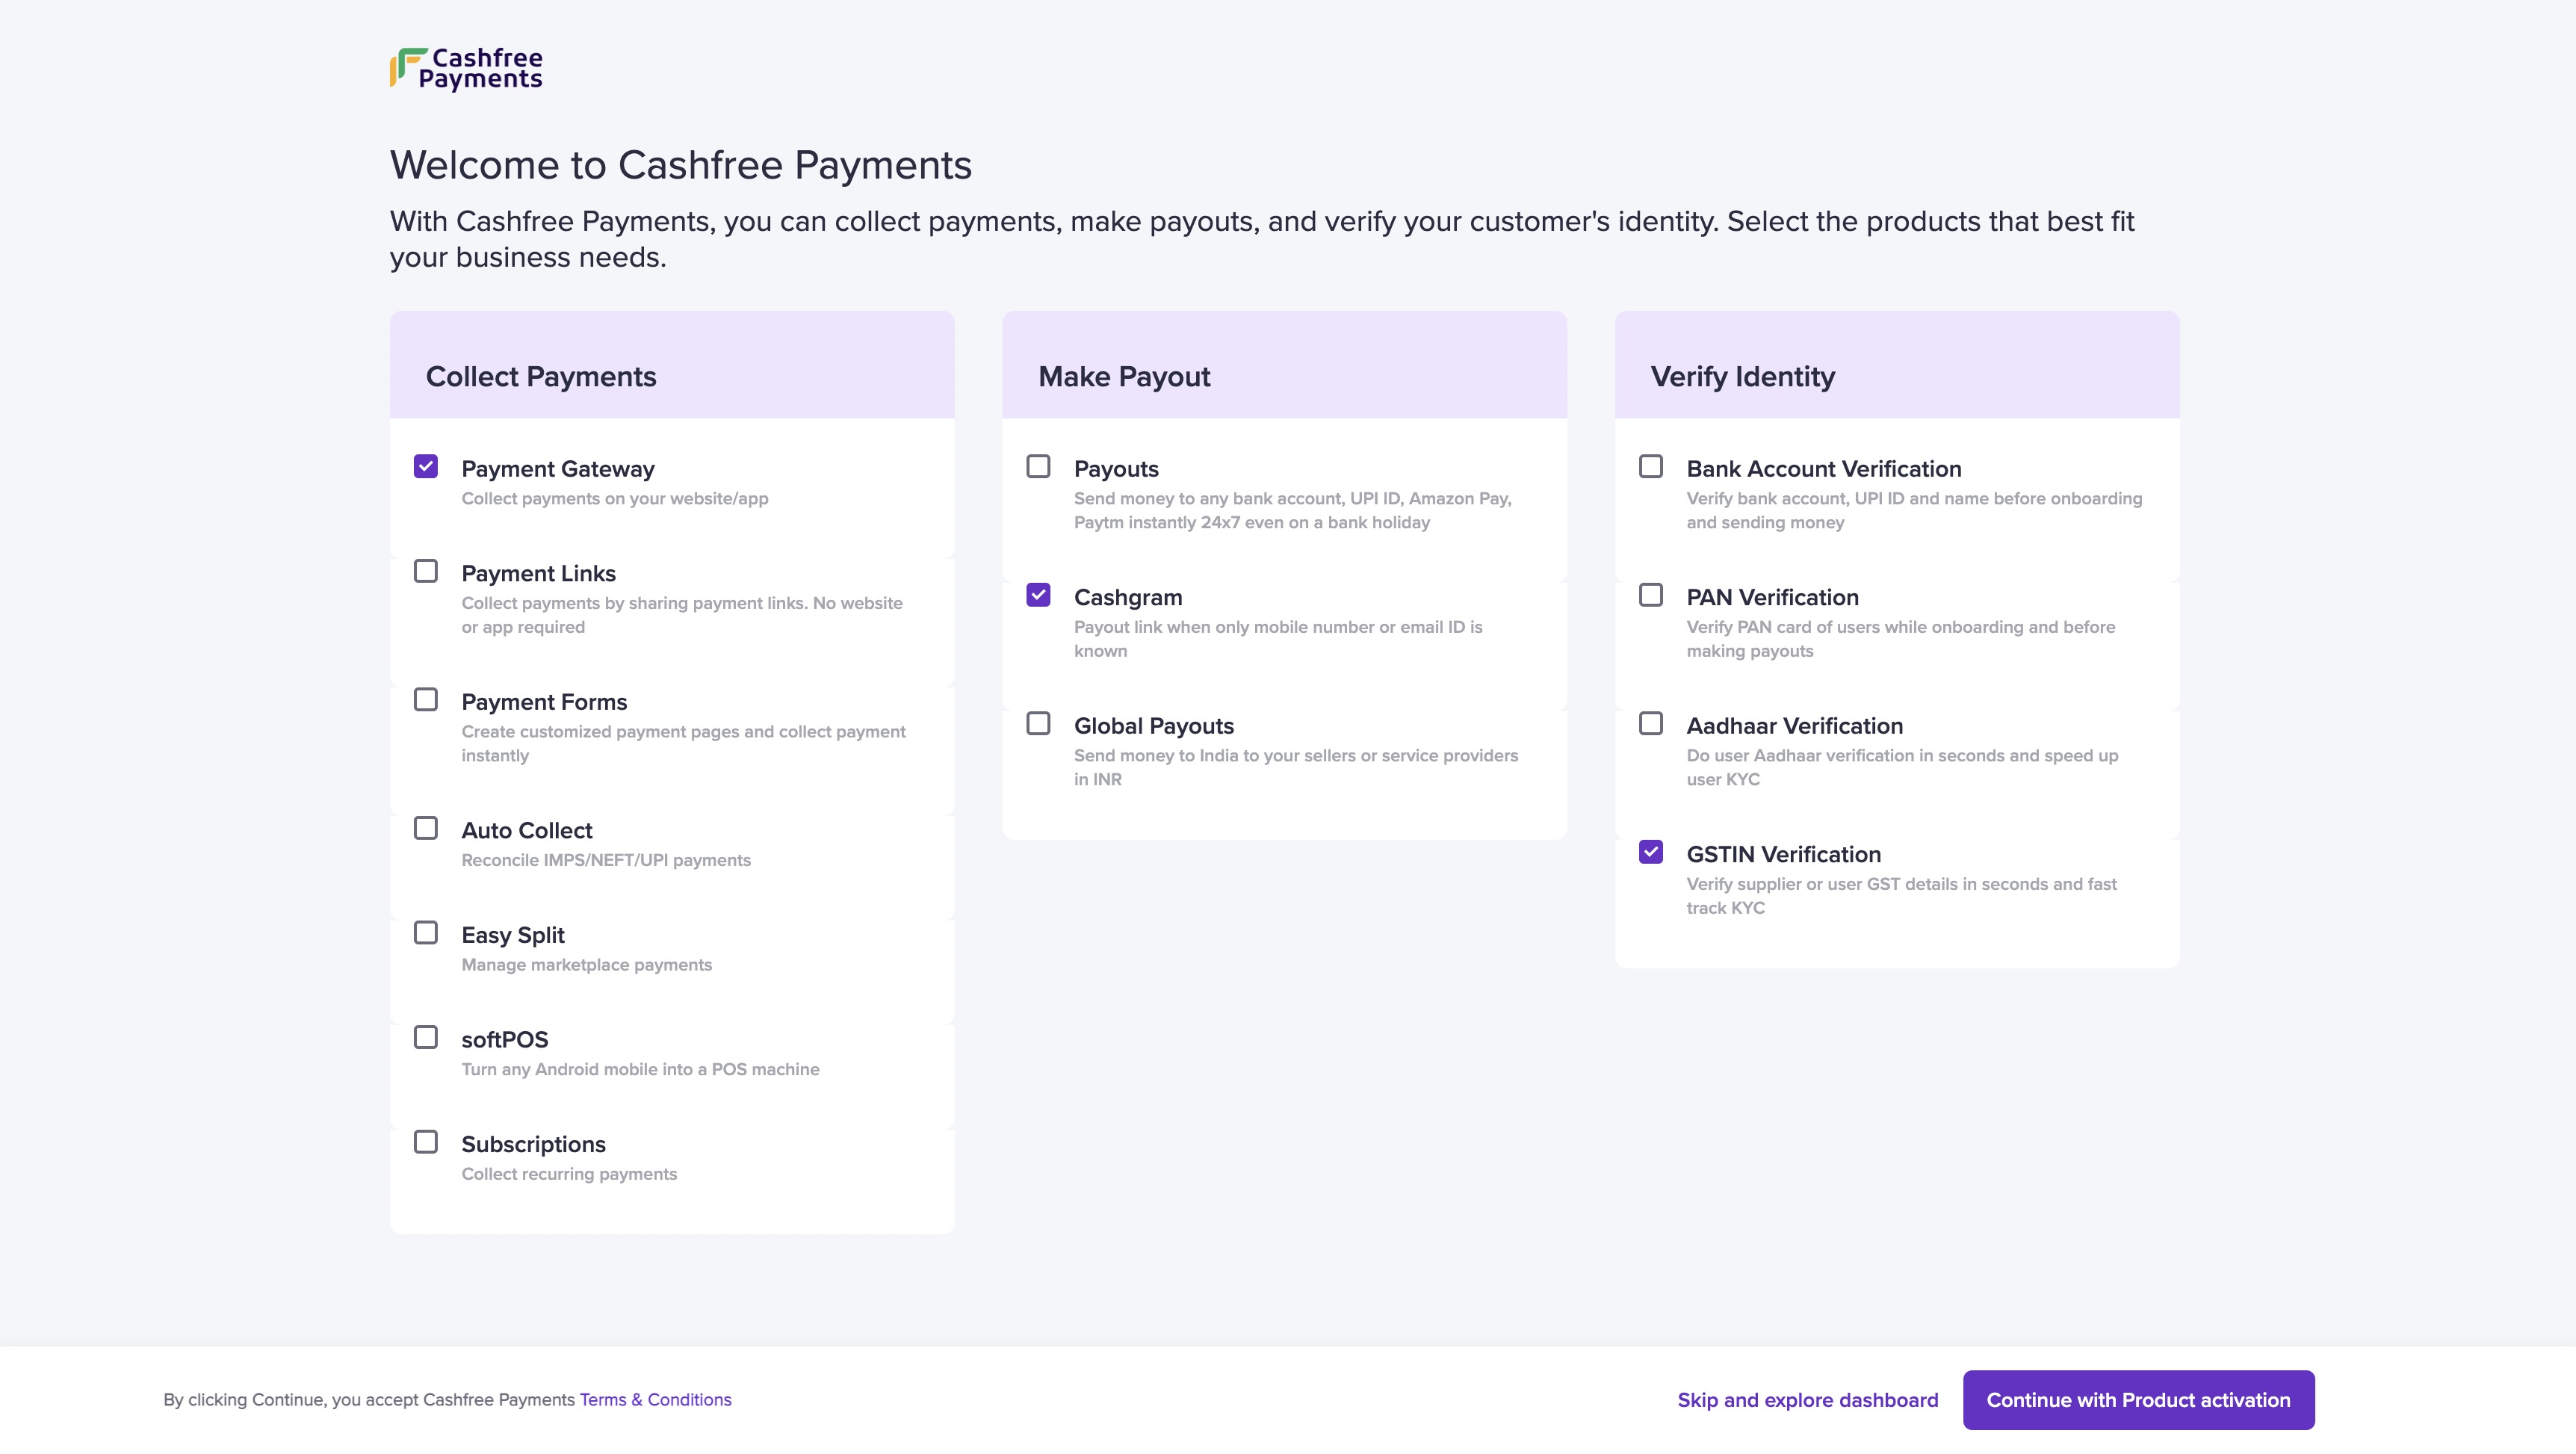 To activate Cashfree Payments account, you need to complete the onboarding process by providing necessary information, uploading mandatory documents, and signing the agreement with us. The details required and the stages might change based on your line of business. This document helps you understand the following stages:
- Contact Information
- Business PAN
- Business Owner PAN
- Business Details
- Business Registration Details
- Website Details
- Bank Account Details
- Business Owner Details
- Upload Documents
- Declaration of Beneficial Ownership
- Service Agreement
Contact information
We need your contact information to reach out to you for anything related to your account. It could be for clarifications on the information provided, missing information or documents.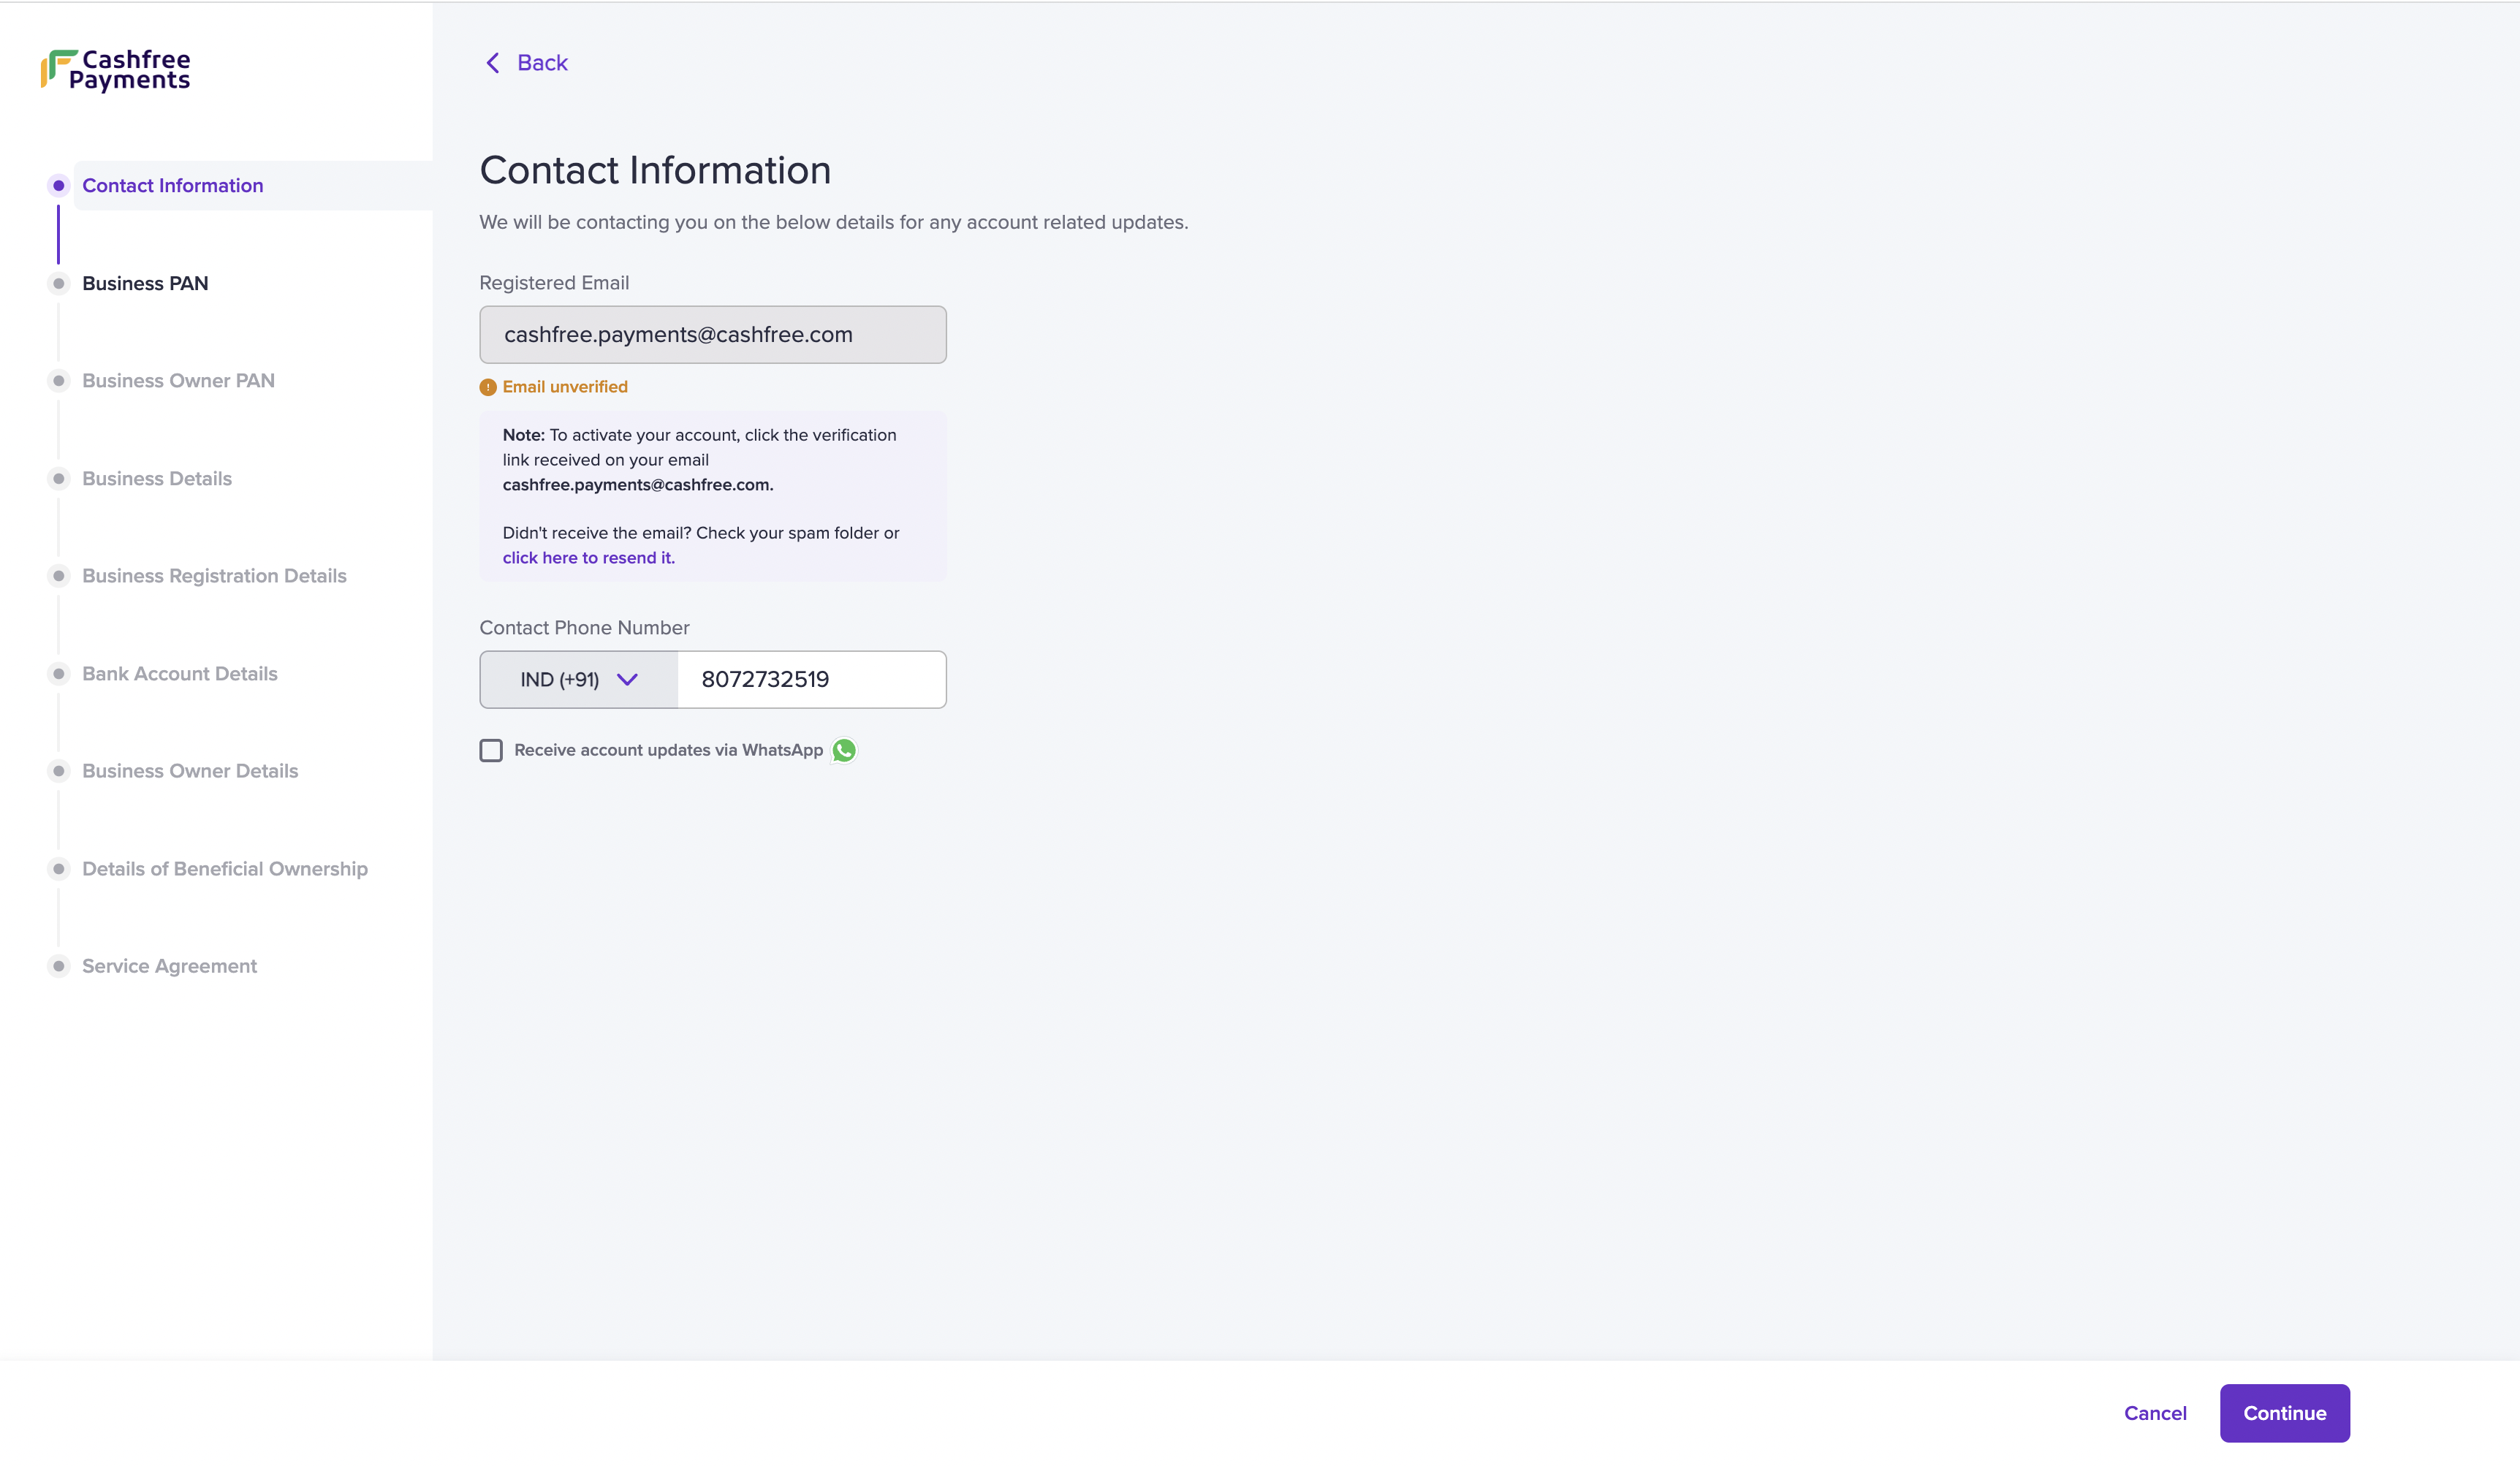
- Fill in the following fields:
- Registered Email: This field is auto-filled with the email address you provided during signup. Fill out the Support Form if you wish to edit the registered email address. The registered email address receives a verification link. If you do not find it in your inbox, check the spam folder. Click the link in the email to verify your email account.
- Contact Phone Number: The phone number is auto filled but you can edit the contact number if required.
- Receive account updates via Whatsapp: Check the box if you want notifications regarding promotions, offers, product and account updates on your Whatsapp.
- Click Continue.
Business PAN
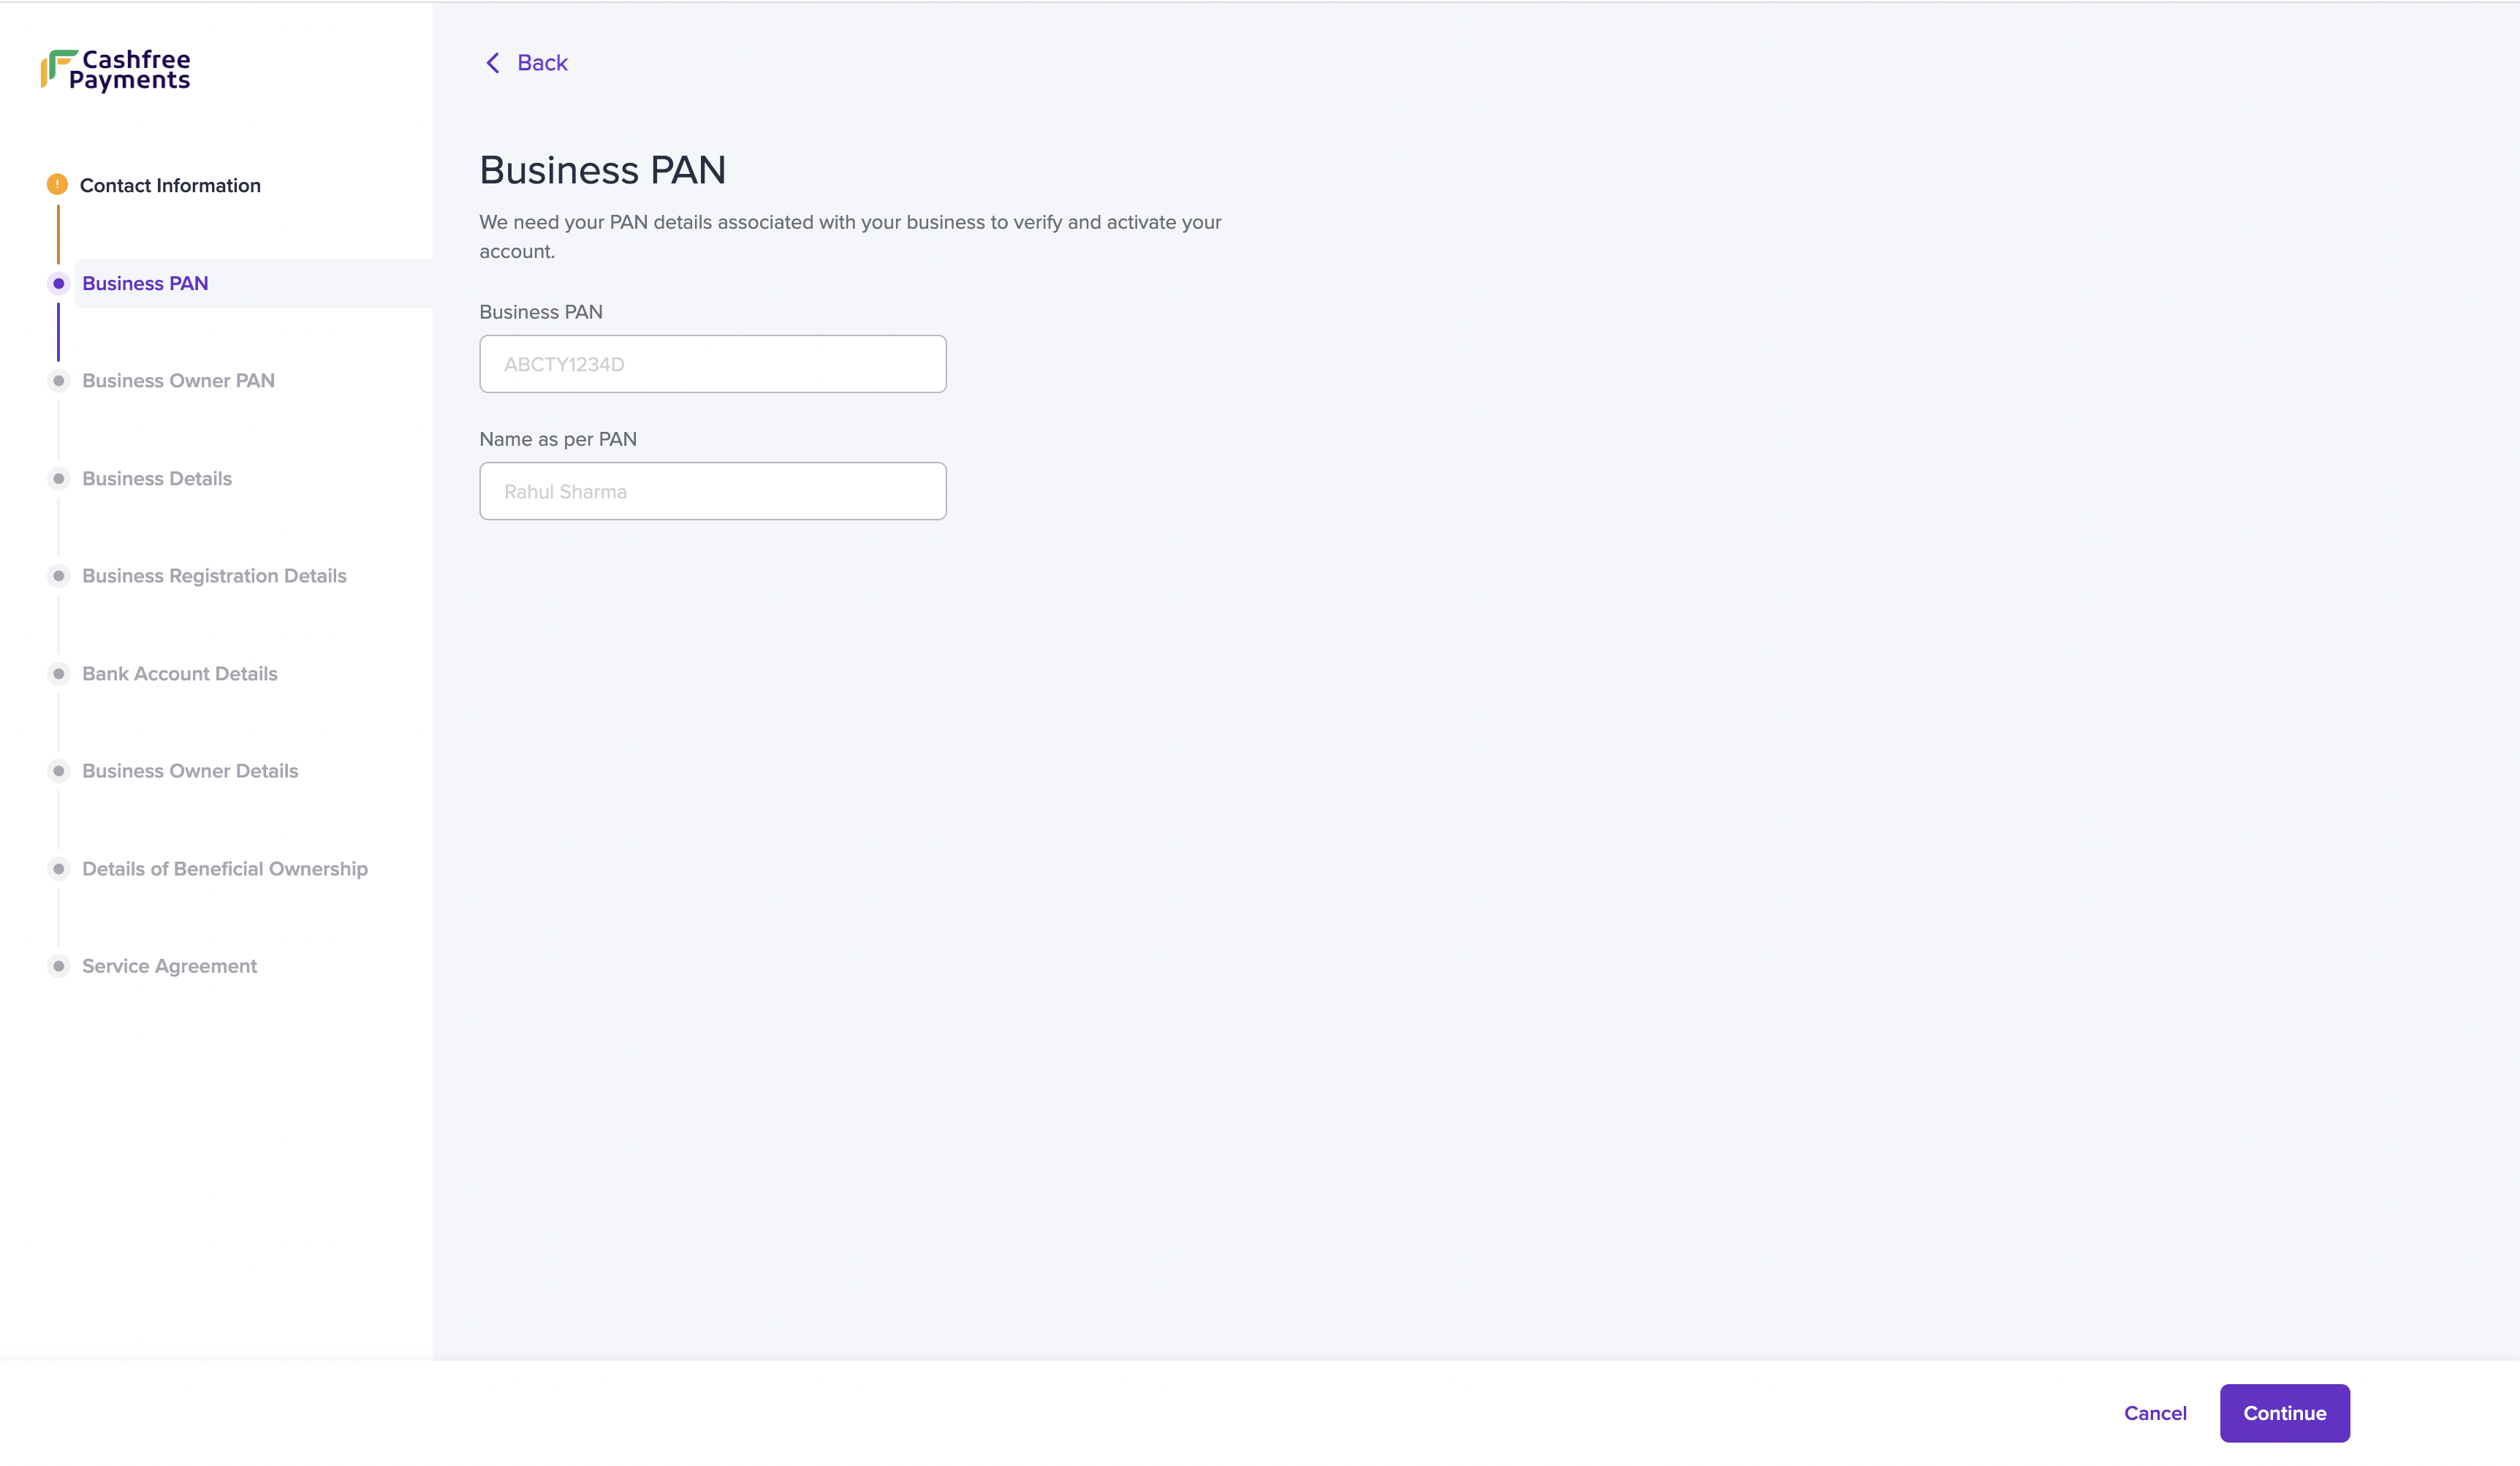 For verification purposes and account activation, we need your business PAN information.
- Enter the information in the following fields:
- Business PAN: Enter your business PAN details. If your business is unregistered or if you are a proprietor, enter your personal PAN information.
- Name as per PAN: Enter the name as per the PAN card.
- Click Continue.
Business Owner PAN
We would require the business PAN details of the business owner or the individual who owns 25% or more of the shares, capital, and company’s profile.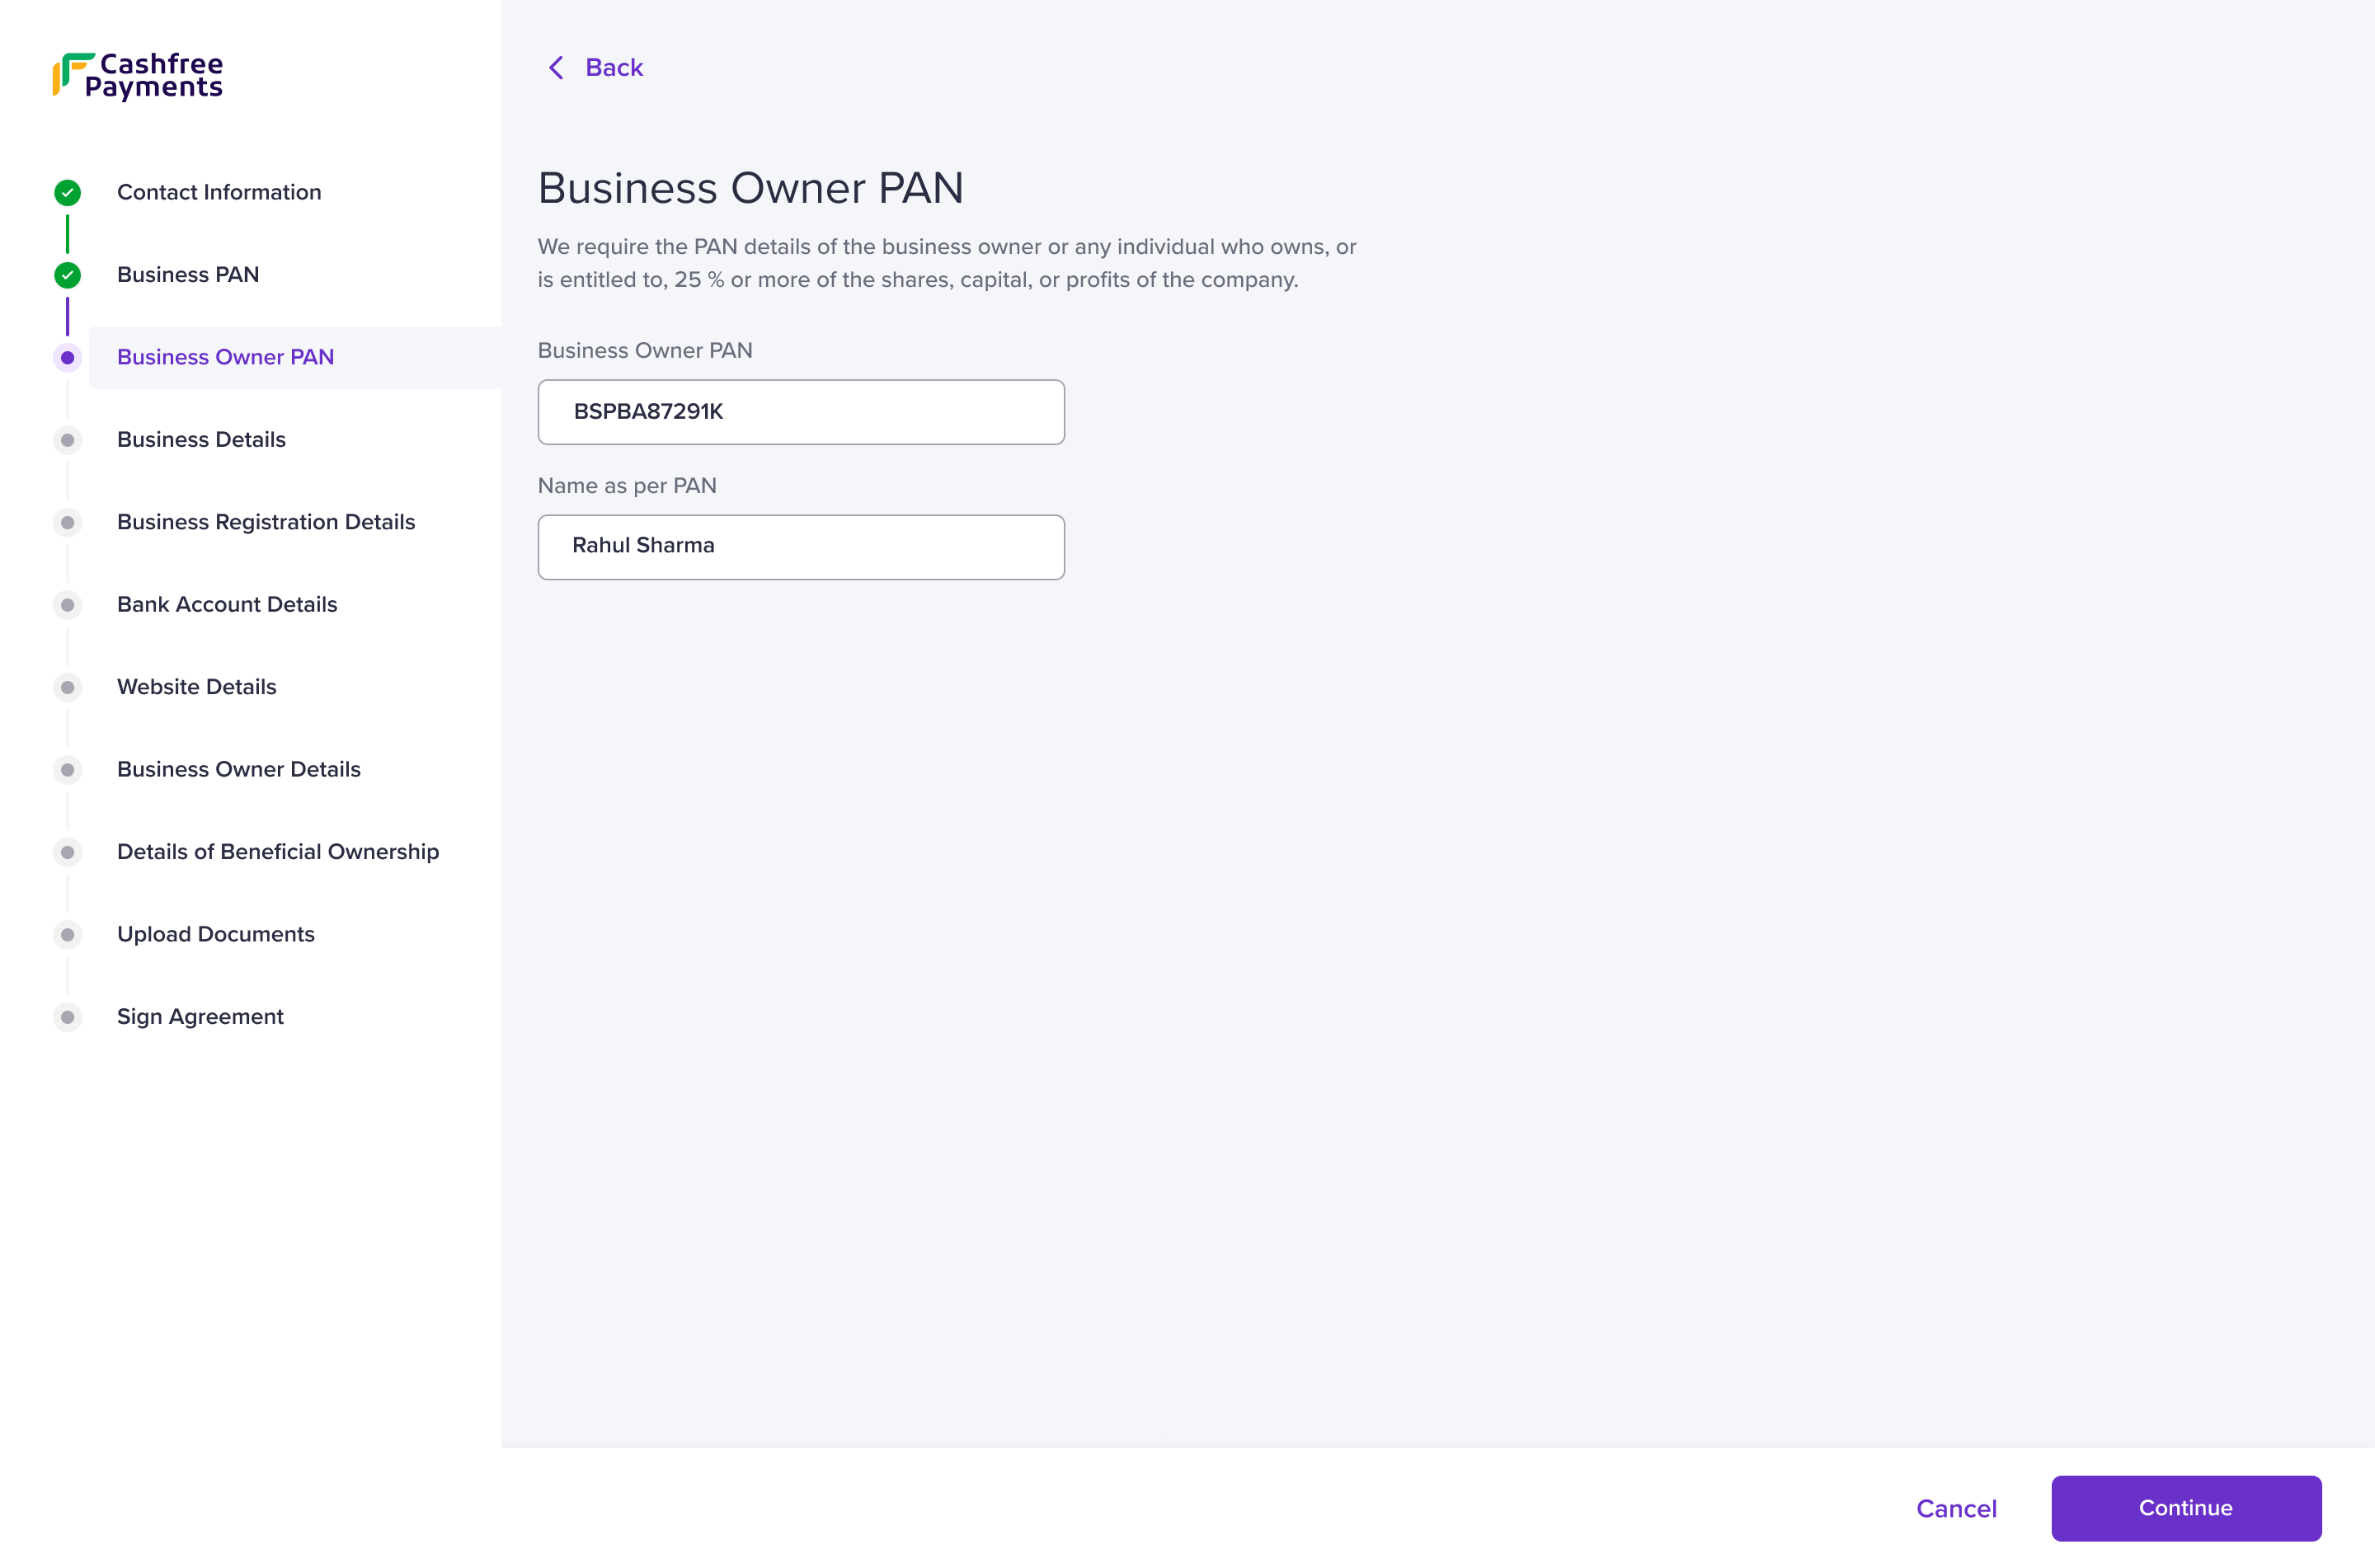
- Enter the information in the following fields:
- Business Owner PAN: Enter the business PAN details of the business owner/individual.
- Name as per PAN: Enter the name as per the PAN card.
- Click Continue.
Business details
Provide the details about your business. It helps us understand the nature of your operations and help cater services that fit your business requirements.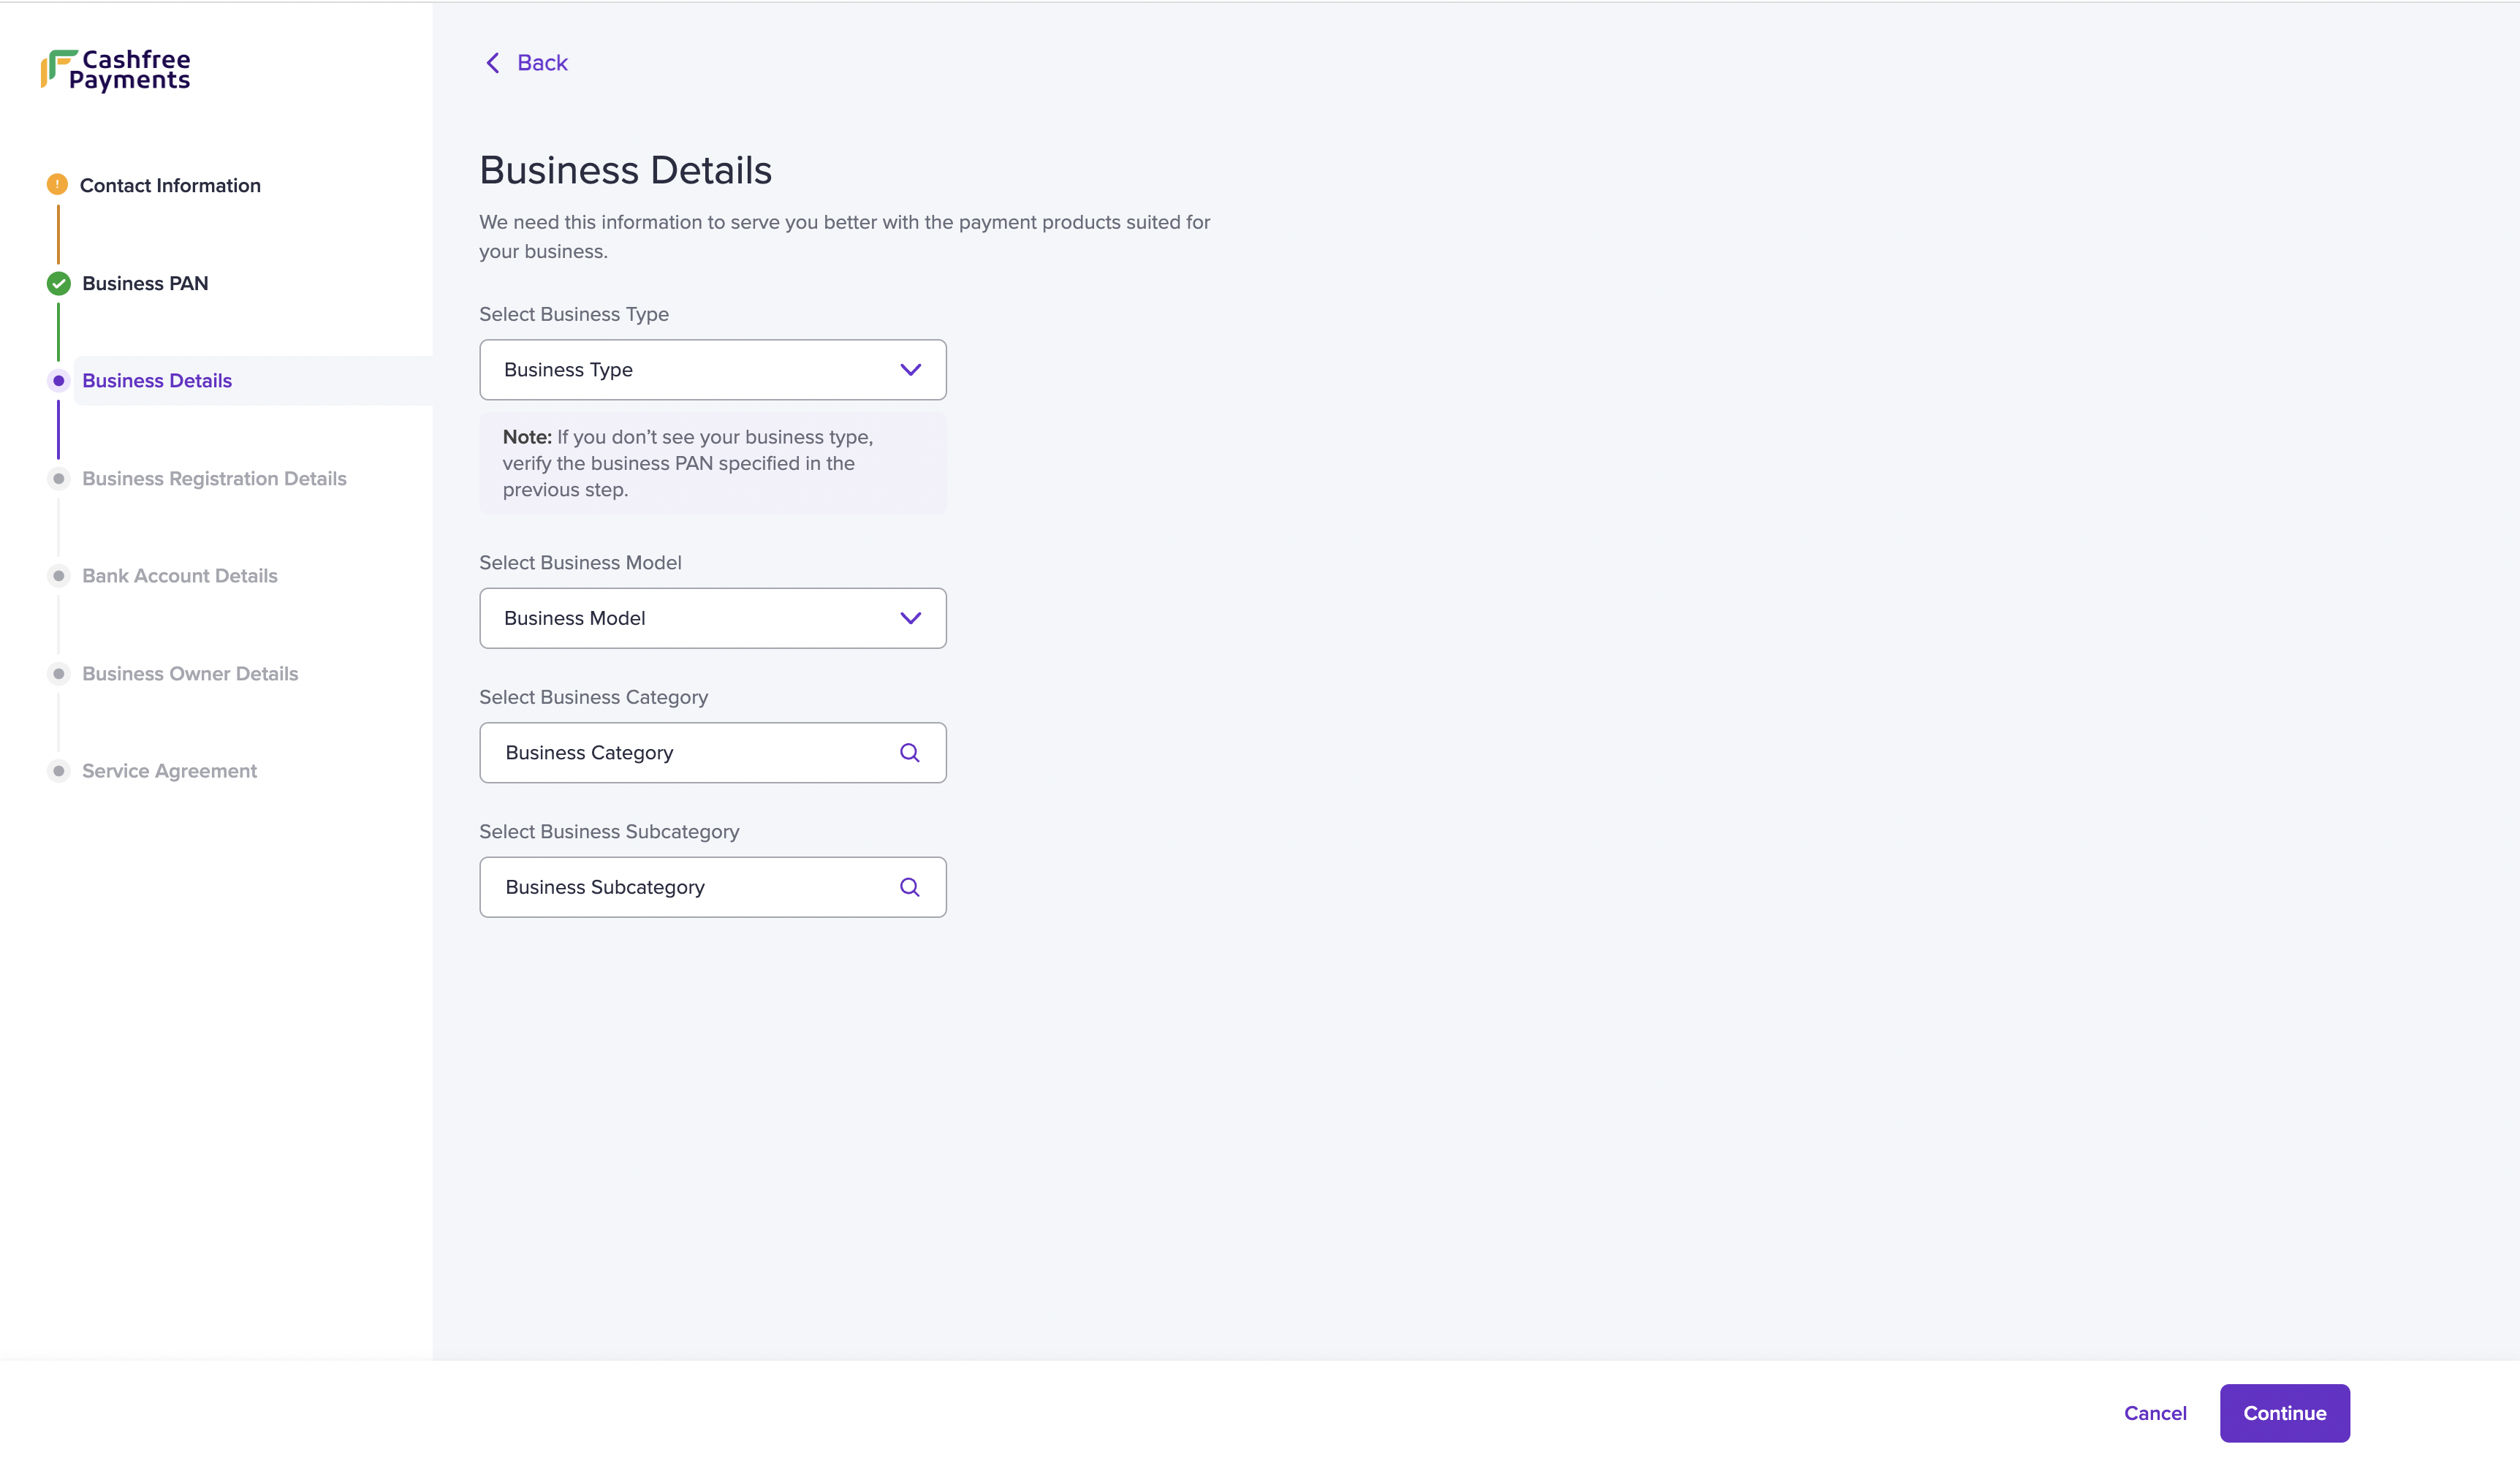
- Enter the following information:
- Select Business Type: Choose your business type from the dropdown menu. Check the list of documents required based on your business type.
- Select Business Model: Choose your business model from the dropdown menu.
- Select Business Category: Choose your business category from the dropdown menu.
- Select Business Subcategory: Choose your business subcategory from the dropdown menu. If you do not find your business subcategory, select Others and describe your business in the text box.
- Click Continue.
Ensure the selected options comply with our terms and conditions. Please read
them carefully.
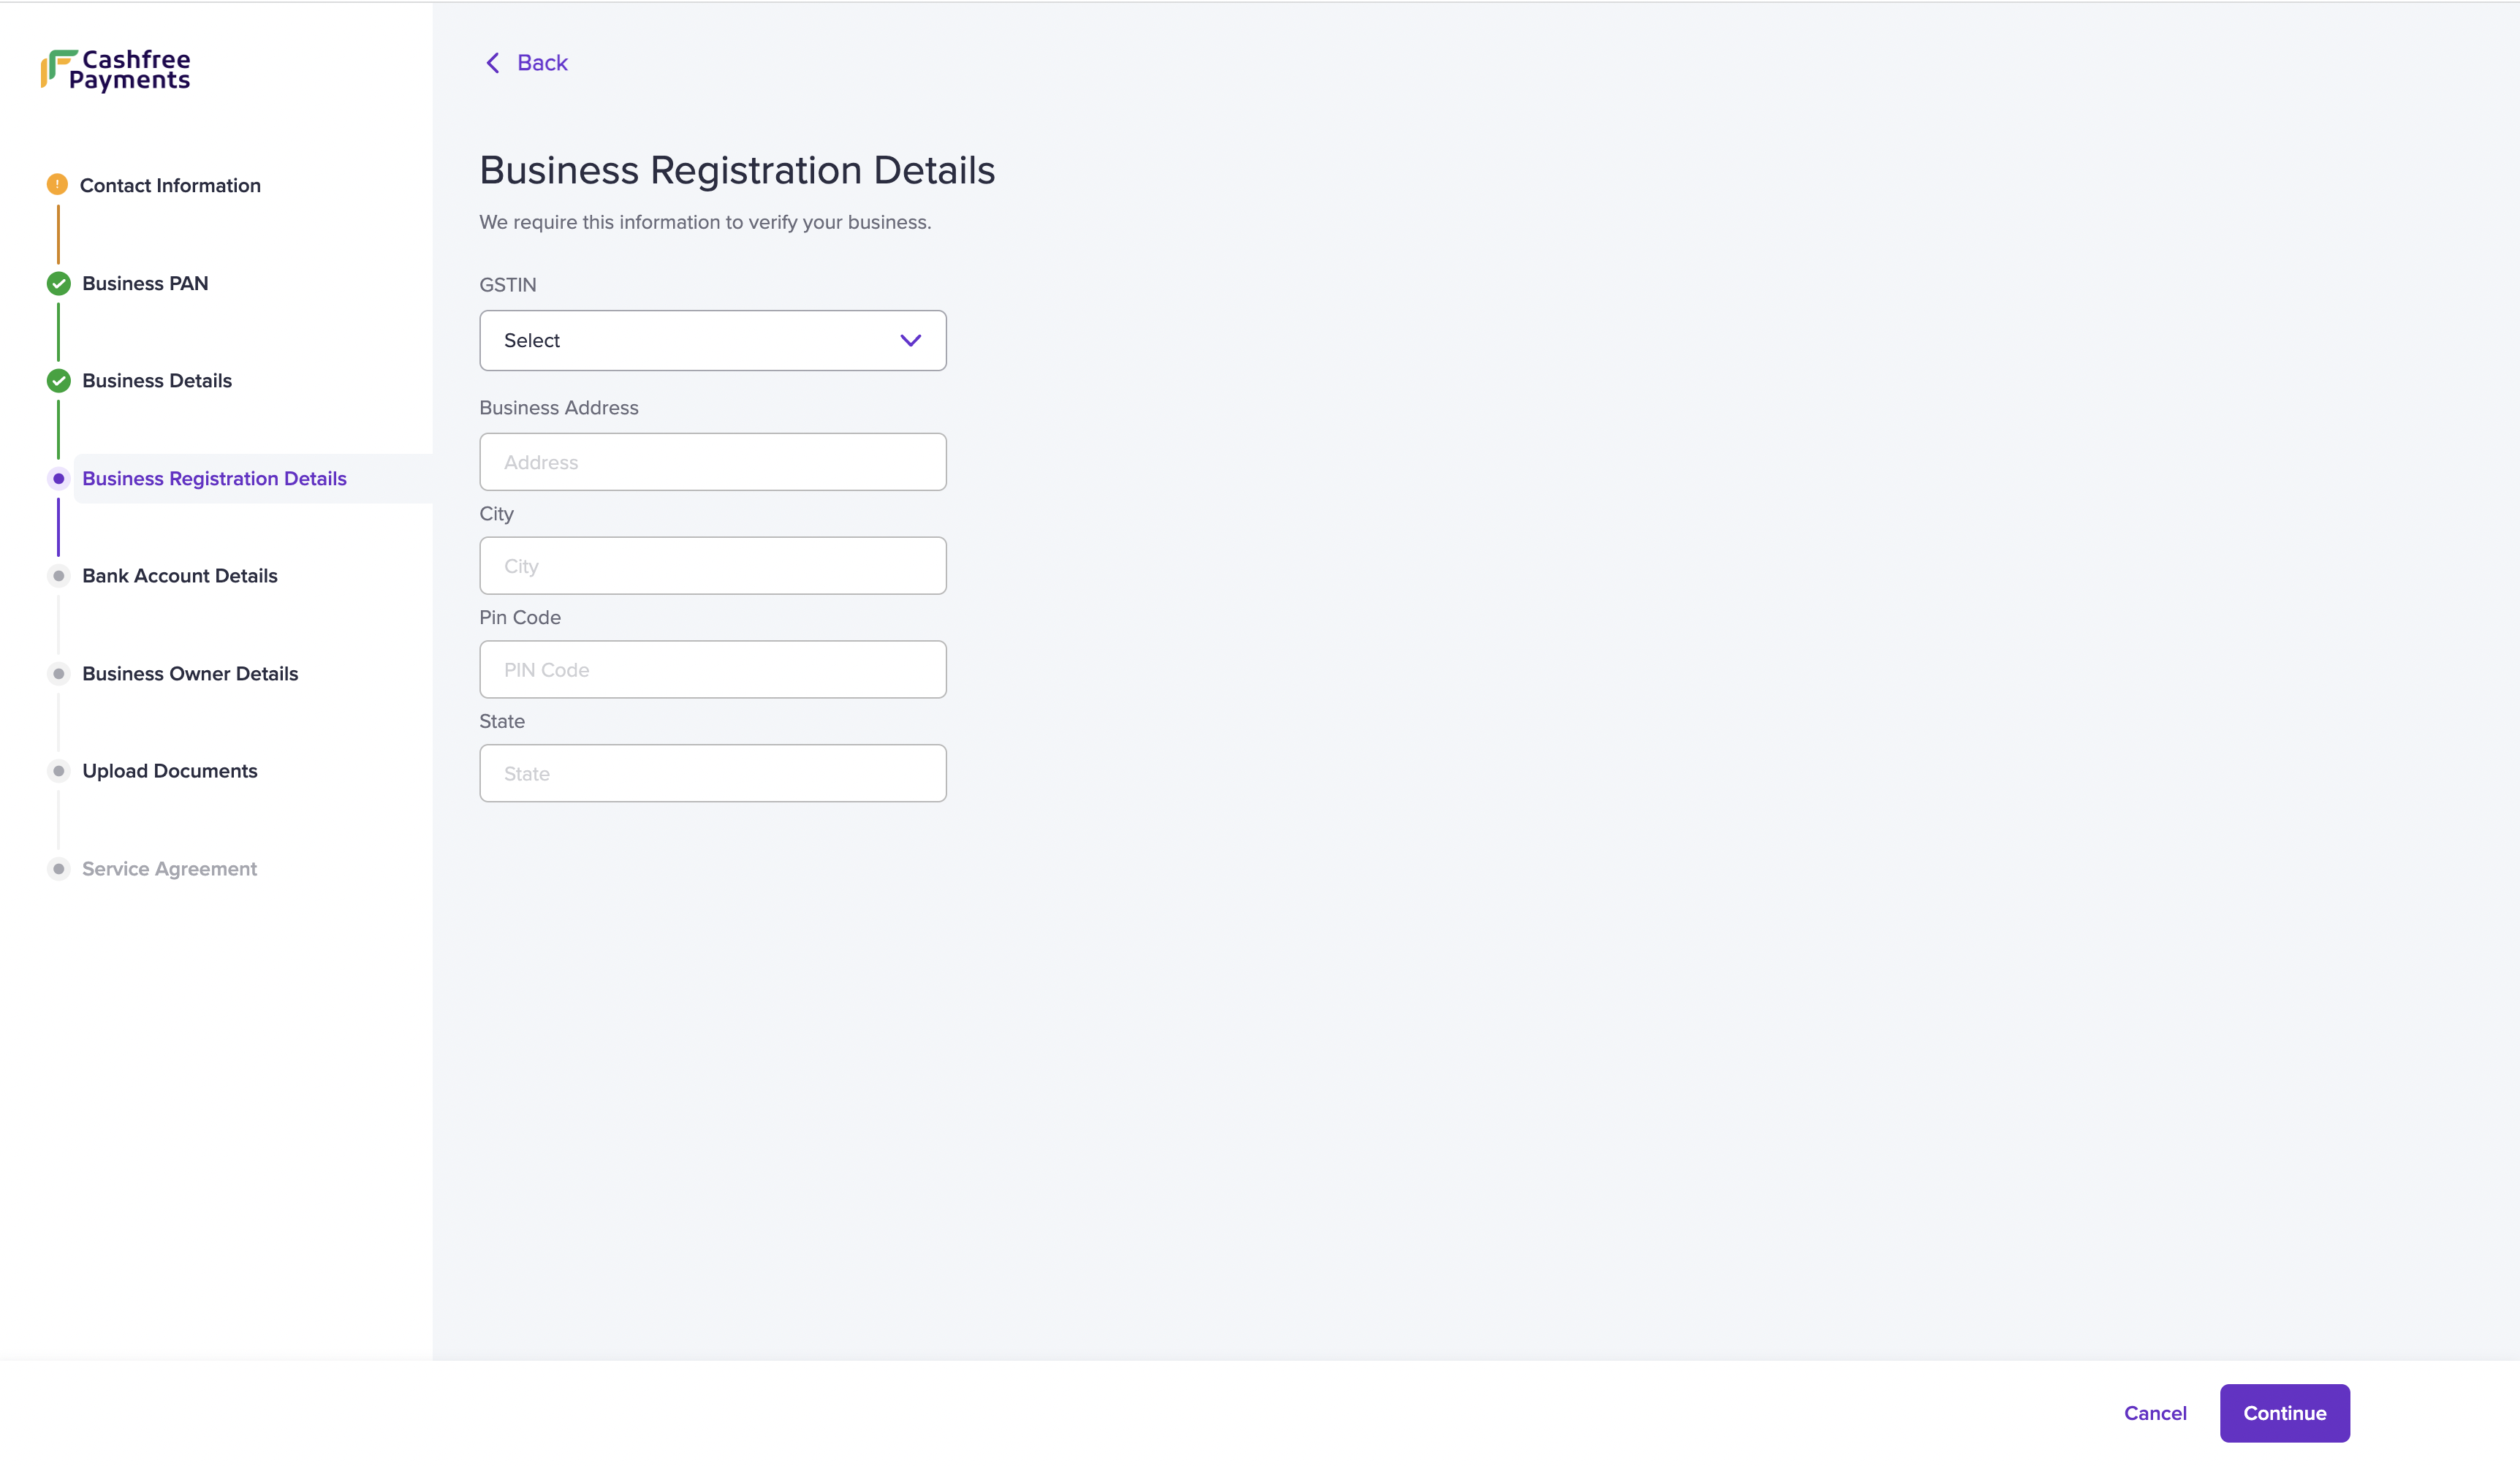
Business registration details
Based on the selected business type, we would require your business registration information. Refer to the table below to view the required information for each business type:| Business Type | Required Information |
|---|---|
| Individual (Unregistered) | Business Operating Address |
| Public Limited / Private Limited | CIN / GSTIN / Business Operating Address |
| LLPIN | LLPIN / GSTIN / Business Operating Address |
| Partnership / Proprietor / Society / Trust / NGO | GSTIN / Business Operating Address |
- Fill in the information for the following fields:
- GSTIN: Enter your GSTIN details if your business is GST registered. If not, choose I do not have GSTIN from the dropdown.
- CIN: Enter your corporate identification number (CIN).
- LLPIN: Enter your limited liability partnership identification number (LLPIN).
- Business Address: Enter the address of your business location in the respective fields.
- Same as GST Address: If the address of your business location is the same as the GST registration, check this box.
- Click Continue.
Bank account details
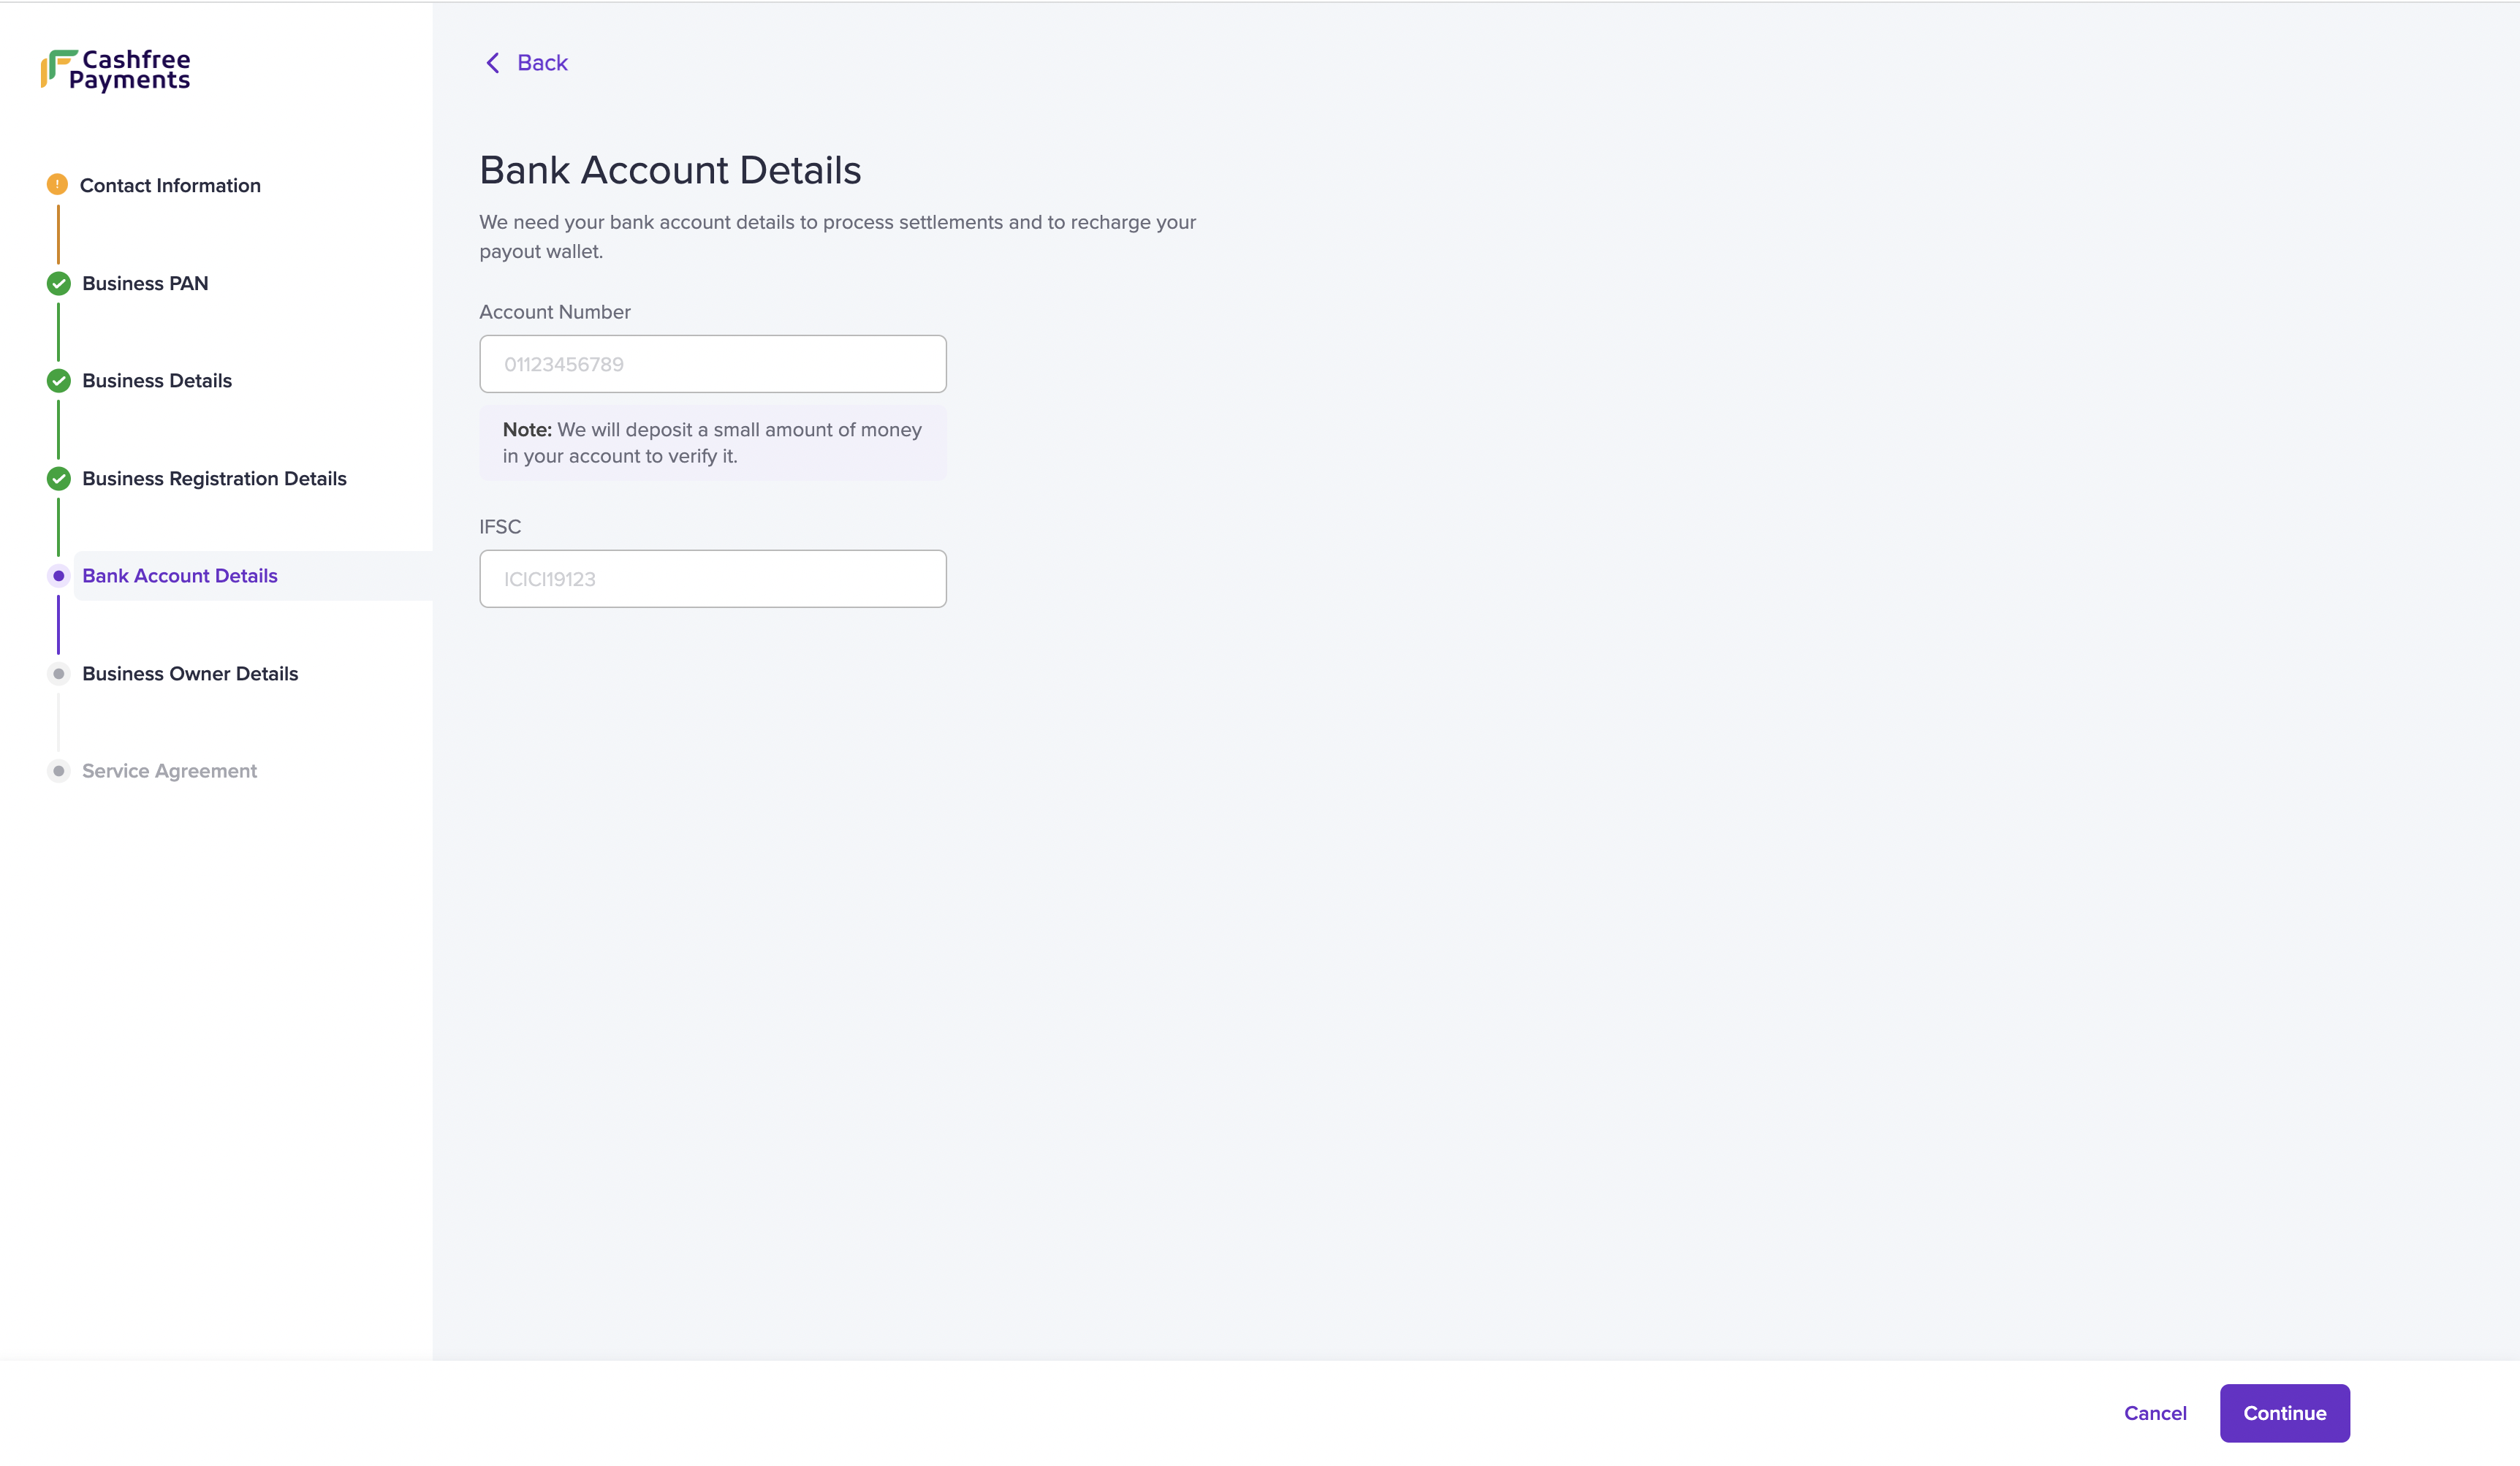
We require your bank account details to process settlements.- Enter the following information:
- Account Number: Enter your bank account number. Ensure the bank account holder name is the same as the name in the GST or PAN registration.
- IFSC: Enter the IFSC of the bank branch where the account is active.
- Upload: Alternatively, you can upload a cancelled cheque if you do not have your bank account information or due to an unsuccessful verification.
- Click Continue.
Website details
We require your website details to enable live API keys for your business. This enables you to accept payments.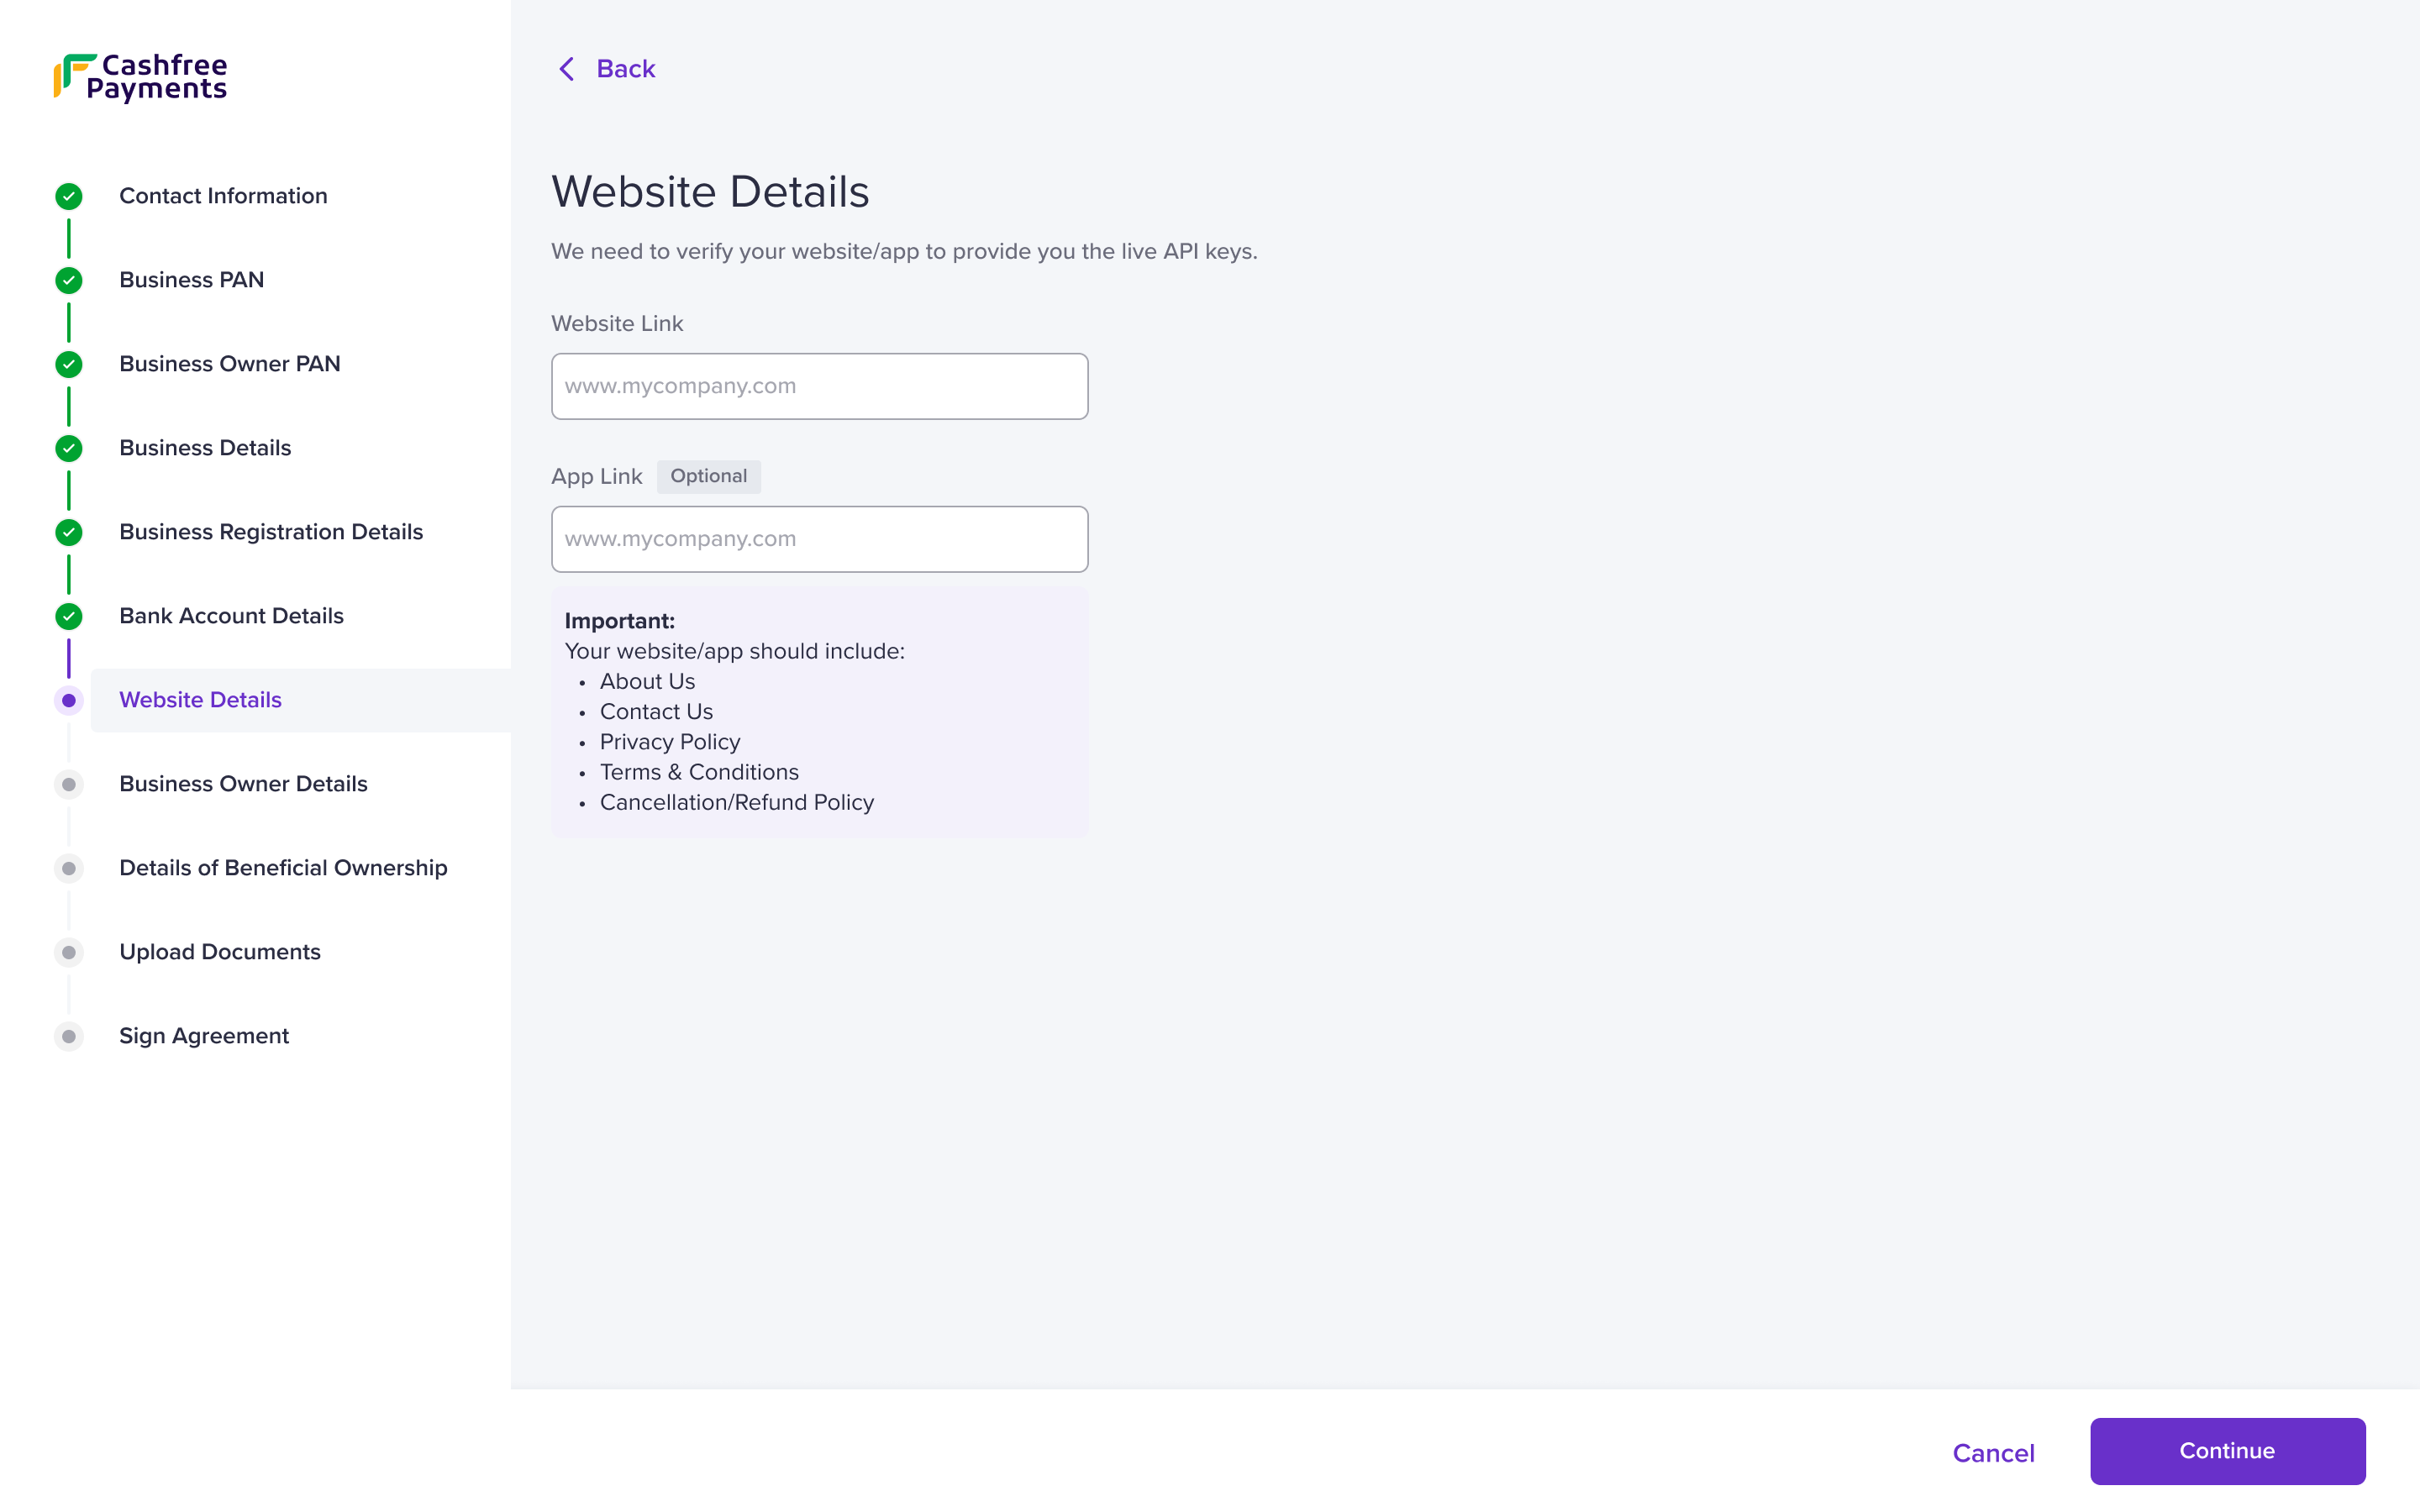
- Enter the information in the following fields:
- Website Link: Enter your website link in this field. This is a required field.
- App Link: Enter your app link. This is optional.
- Click Continue.
The following details must be on your website/app: nature of your business,
business contact information, privacy policy, terms and conditions, and
cancellation/refund policy.
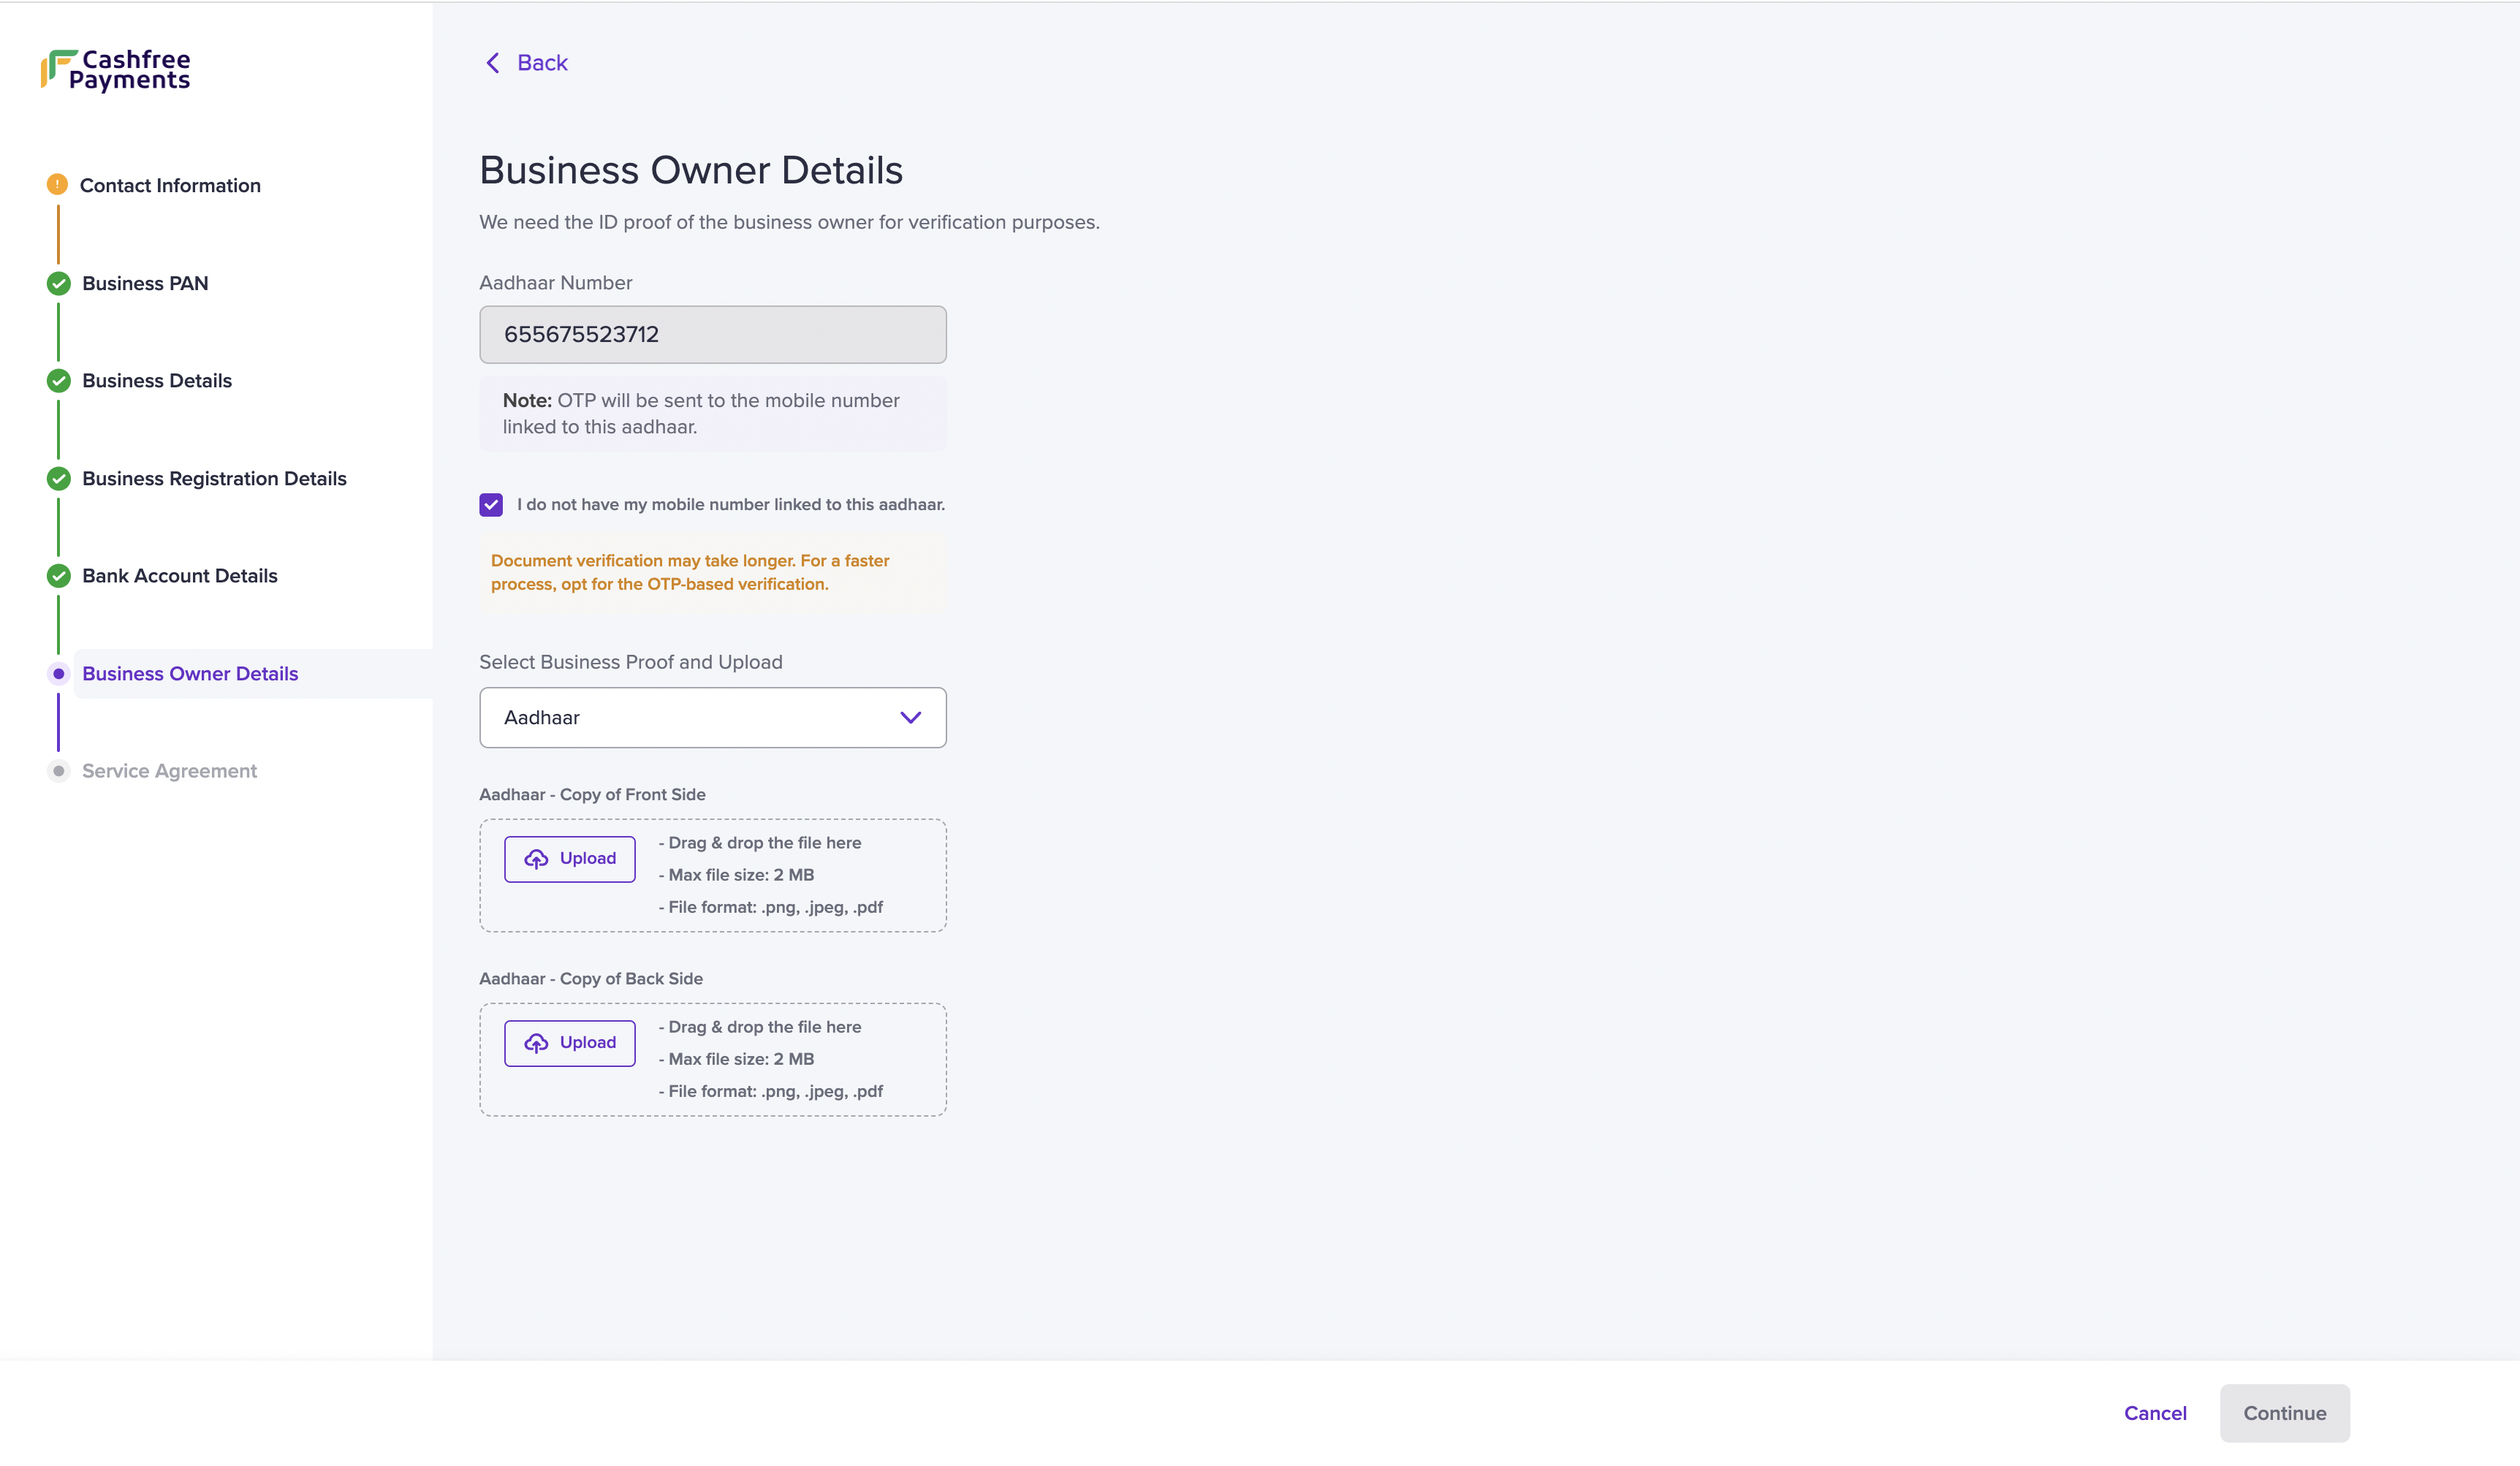
Business owner details
We require government ID information of the business owner to activate your Cashfree Payments account. Ensure that the details match the submitted owner PAN information.-
Fill in the following fields:
- Aadhaar Number - Enter your aadhaar number. Enter the OTP received on your mobile number in the One Time Password popup.
- I do not have my mobile number linked to this aadhaar. - In case the entered mobile number is not the registered mobile number for aadhaar, you can verify by uploading any of the government IDs: aadhaar, driving licence, voter ID, and passport.
- Select ID Proof and Upload - Use the dropdown menu to select an ID proof.
- Upload - Upload the selected document.
- Click Continue.
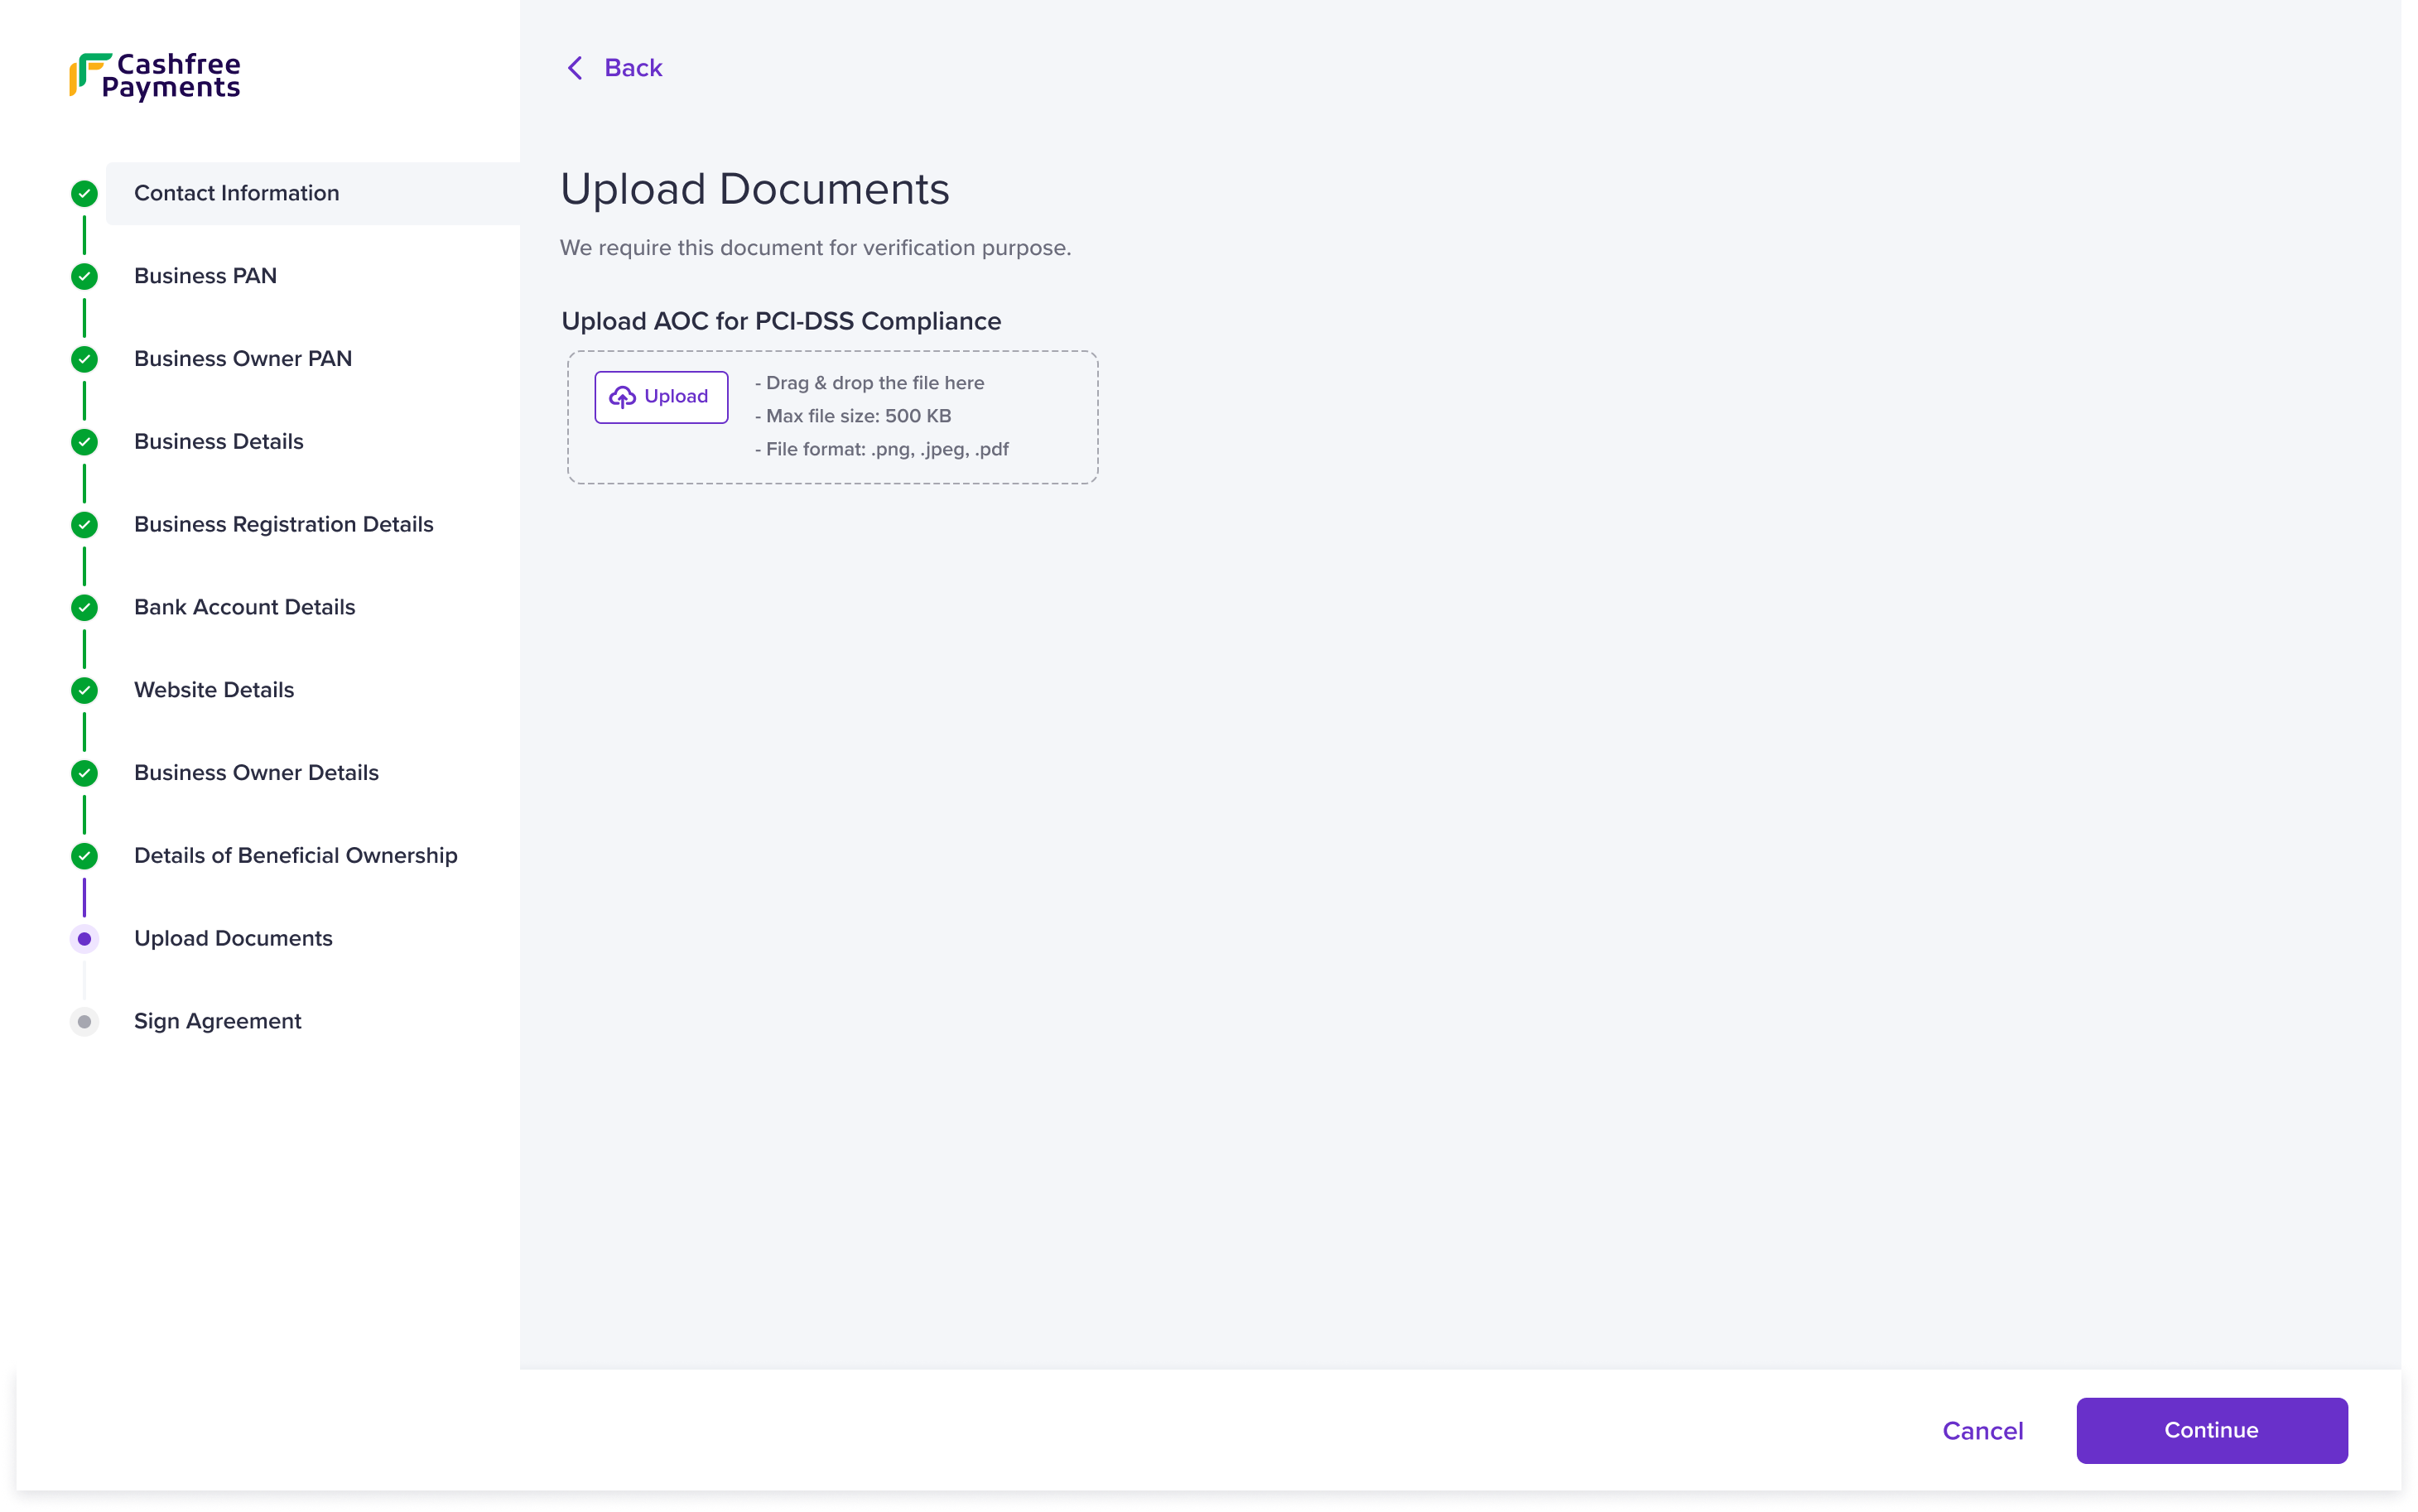
Upload documents
To verify your business, we need specific documents based on the provided information. Refer to the table below to view the required documents for each business type:| Business Type | Required Documents |
|---|---|
| Proprietor (Without GSTIN) | Any of the business proof below:
|
| Partnership | Any of the business proof below:
|
| Society / Trust / NGO | Any of the business proof below:
|
| Category | Sub Category | Documents |
|---|---|---|
| SaaS | Software as a service (SaaS) | AOC for PCI-DSS compliance |
| SaaS | Food, Health and Beauty Supplements | FSSAI |
| Education | Elementary and Secondary Schools, Colleges, Universities, Professional Schools, and Junior Colleges, Correspondence Schools, Business and Secretarial Schools, Trade and Vocational Schools, Schools and Educational Services - Not Elsewhere Classified, Child Care Services, Others | UGC certificate/ICSE/CBSE/AICTE |
| Finance | Forex | FEMA registration, FFMC certificate: FFMC state wise |
| Finance | Payment Service Provider | PA PG License, Nodal Account |
| Finance | Stock brokerage and trading | SEBI Certificate (Mandatory for Financial Advisors and Stock Brokers/Trading) |
| Finance | Lending | NBFCs / Service Level Agreements with RBI approved NBFCs / List of Nidhi limit companies |
| Open and Semi Open Wallet | Open and Semi Open Wallet | Bank PPI License / Non Bank PPI |
| Mutual Funds | Mutual Funds | AMFI Certificate |
| NBFC | NBFC | NBFCs / Service Level Agreements with RBI approved NBFCs |
| Insurance | Insurance | IRDA: Life insurance, General insurance, Health insurance or SLA with the insurer if this is being issued by a different party. |
| Government | Government-Owned Lotteries, Government-Licensed Casinos (Online Gambling), Government-Licensed Horse/Dog Racing, Government Services - Not Elsewhere Classified | Registration dependent on Sub LOB |
| Government | Nutritionist or dietitian | Ayush (Manufacturing license - Form 24D) |
| Jewellery | Jewellery, timepieces, gem stones, metals and gold biscuits, Jewellery, watches, Clock, and Silverware Stores | BIS Certificate /916 Hallmark/ 925 Hallmark / GII Certificate |
| Non-Profit | Charitable and Social Service Organisations | 1. Domestic: 80 G, 12 A 2. International: FCRA |
| Online Gaming | Digital Goods - Games | RNG Certificate (If Applicable), legal opinion |
| Pharmacy | Drugs, Drug Proprietary’s, and Druggists’ Sundries | Pharmacy License, Retail/wholesale Drug License, Undertaking of authorised signatory under Drugs G Cosmetics Act - 1940, Declaration (Form 20, Form 21, From 21B, Form 20B) |
| Pharmacy | Drug Stores and Pharmacies | Pharmacy License, Retail/wholesale Drug License, Undertaking of authorized signatory under Drugs G Cosmetics Act - 1940, Declaration (Form 20, Form 21, From 21B, Form 20B) |
| Utilities | Utilities-Electric, Gas, Water, and Sanitary | BBPS certificate |
| Travel and Hospitality | Tours and Travel Agencies, Transport | IATA Certificate / IRCTC agency certificate |
- Use the Upload button to upload the specific document.
- Click Continue to proceed.
Declaration of beneficial ownership
The declaration of beneficial ownership is to verify the individual or individuals who owns all or part of the business’ share capital.You can declare the beneficial ownership in two ways:
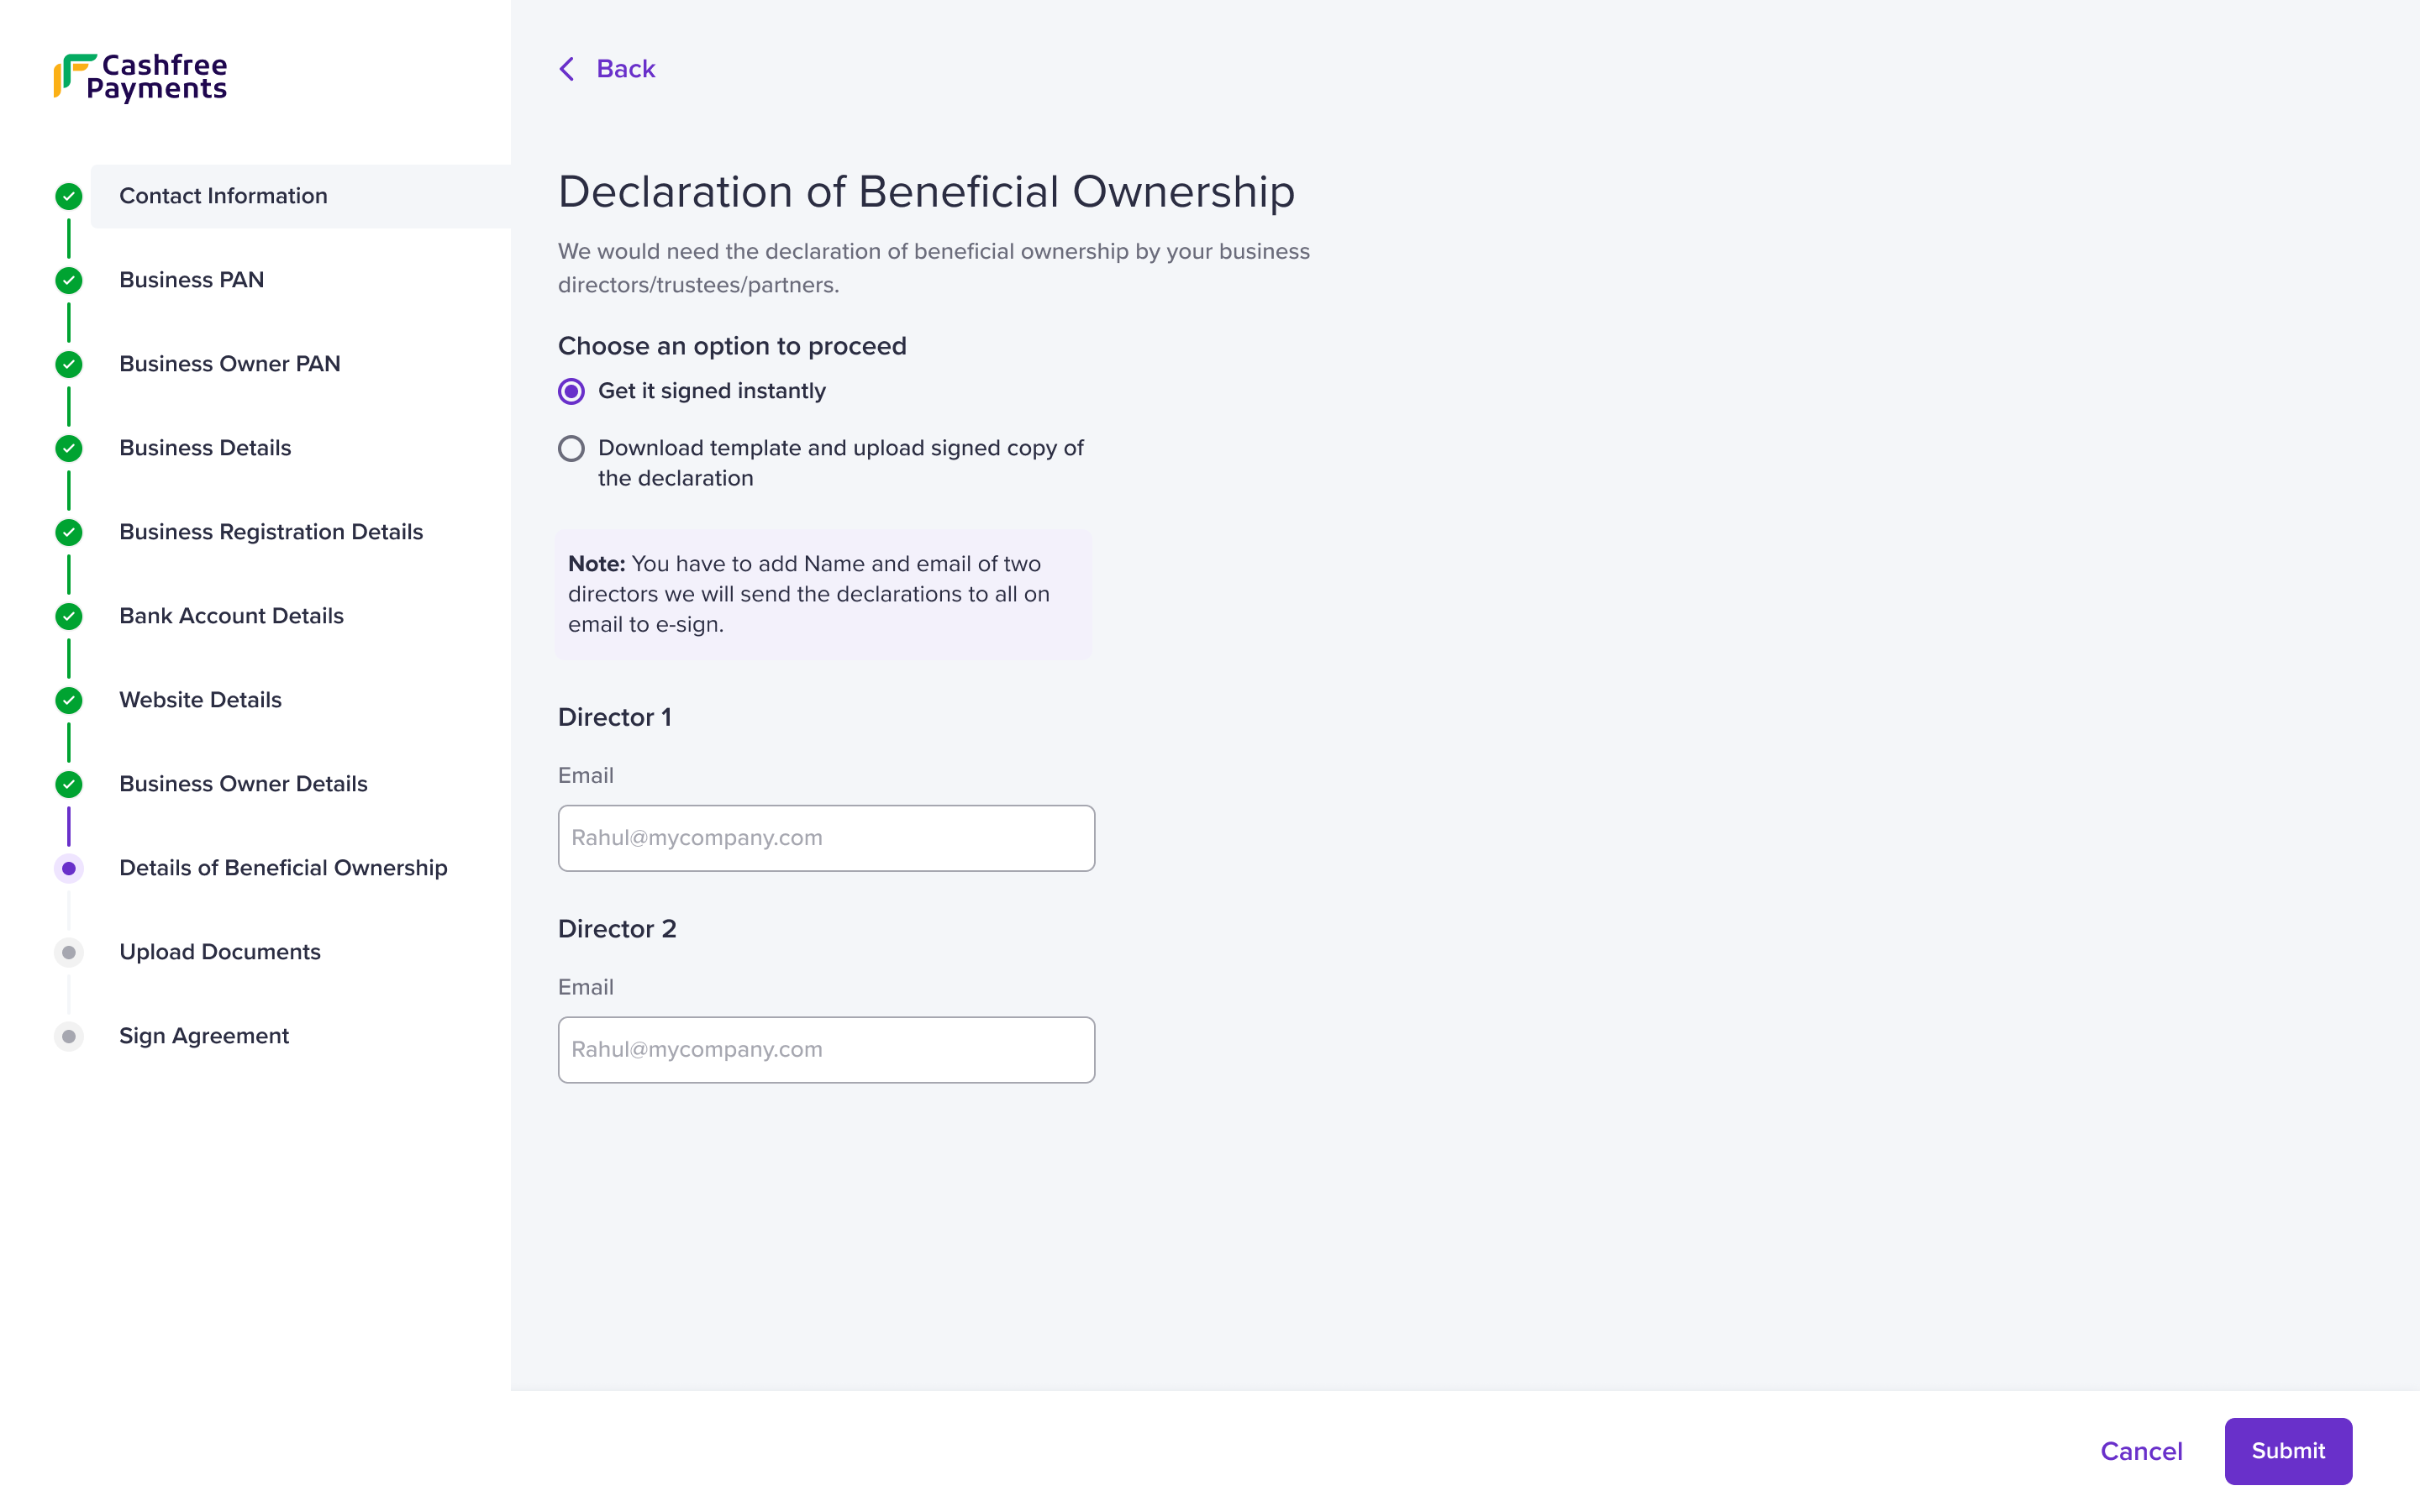 Get it signed instantly
- Enter the following information:
Director 1: Enter the name and email address of the director in the respective fields.
Director 2: Enter the name and email address of the director in the respective fields. - Click Submit.
You need to enter the information of two directors, but one director’s
signature is sufficient in the declaration of beneficial ownership.
- Click Download Document Template to download the template.
- Sign the document and use the Upload button to upload it.
- Click Submit.
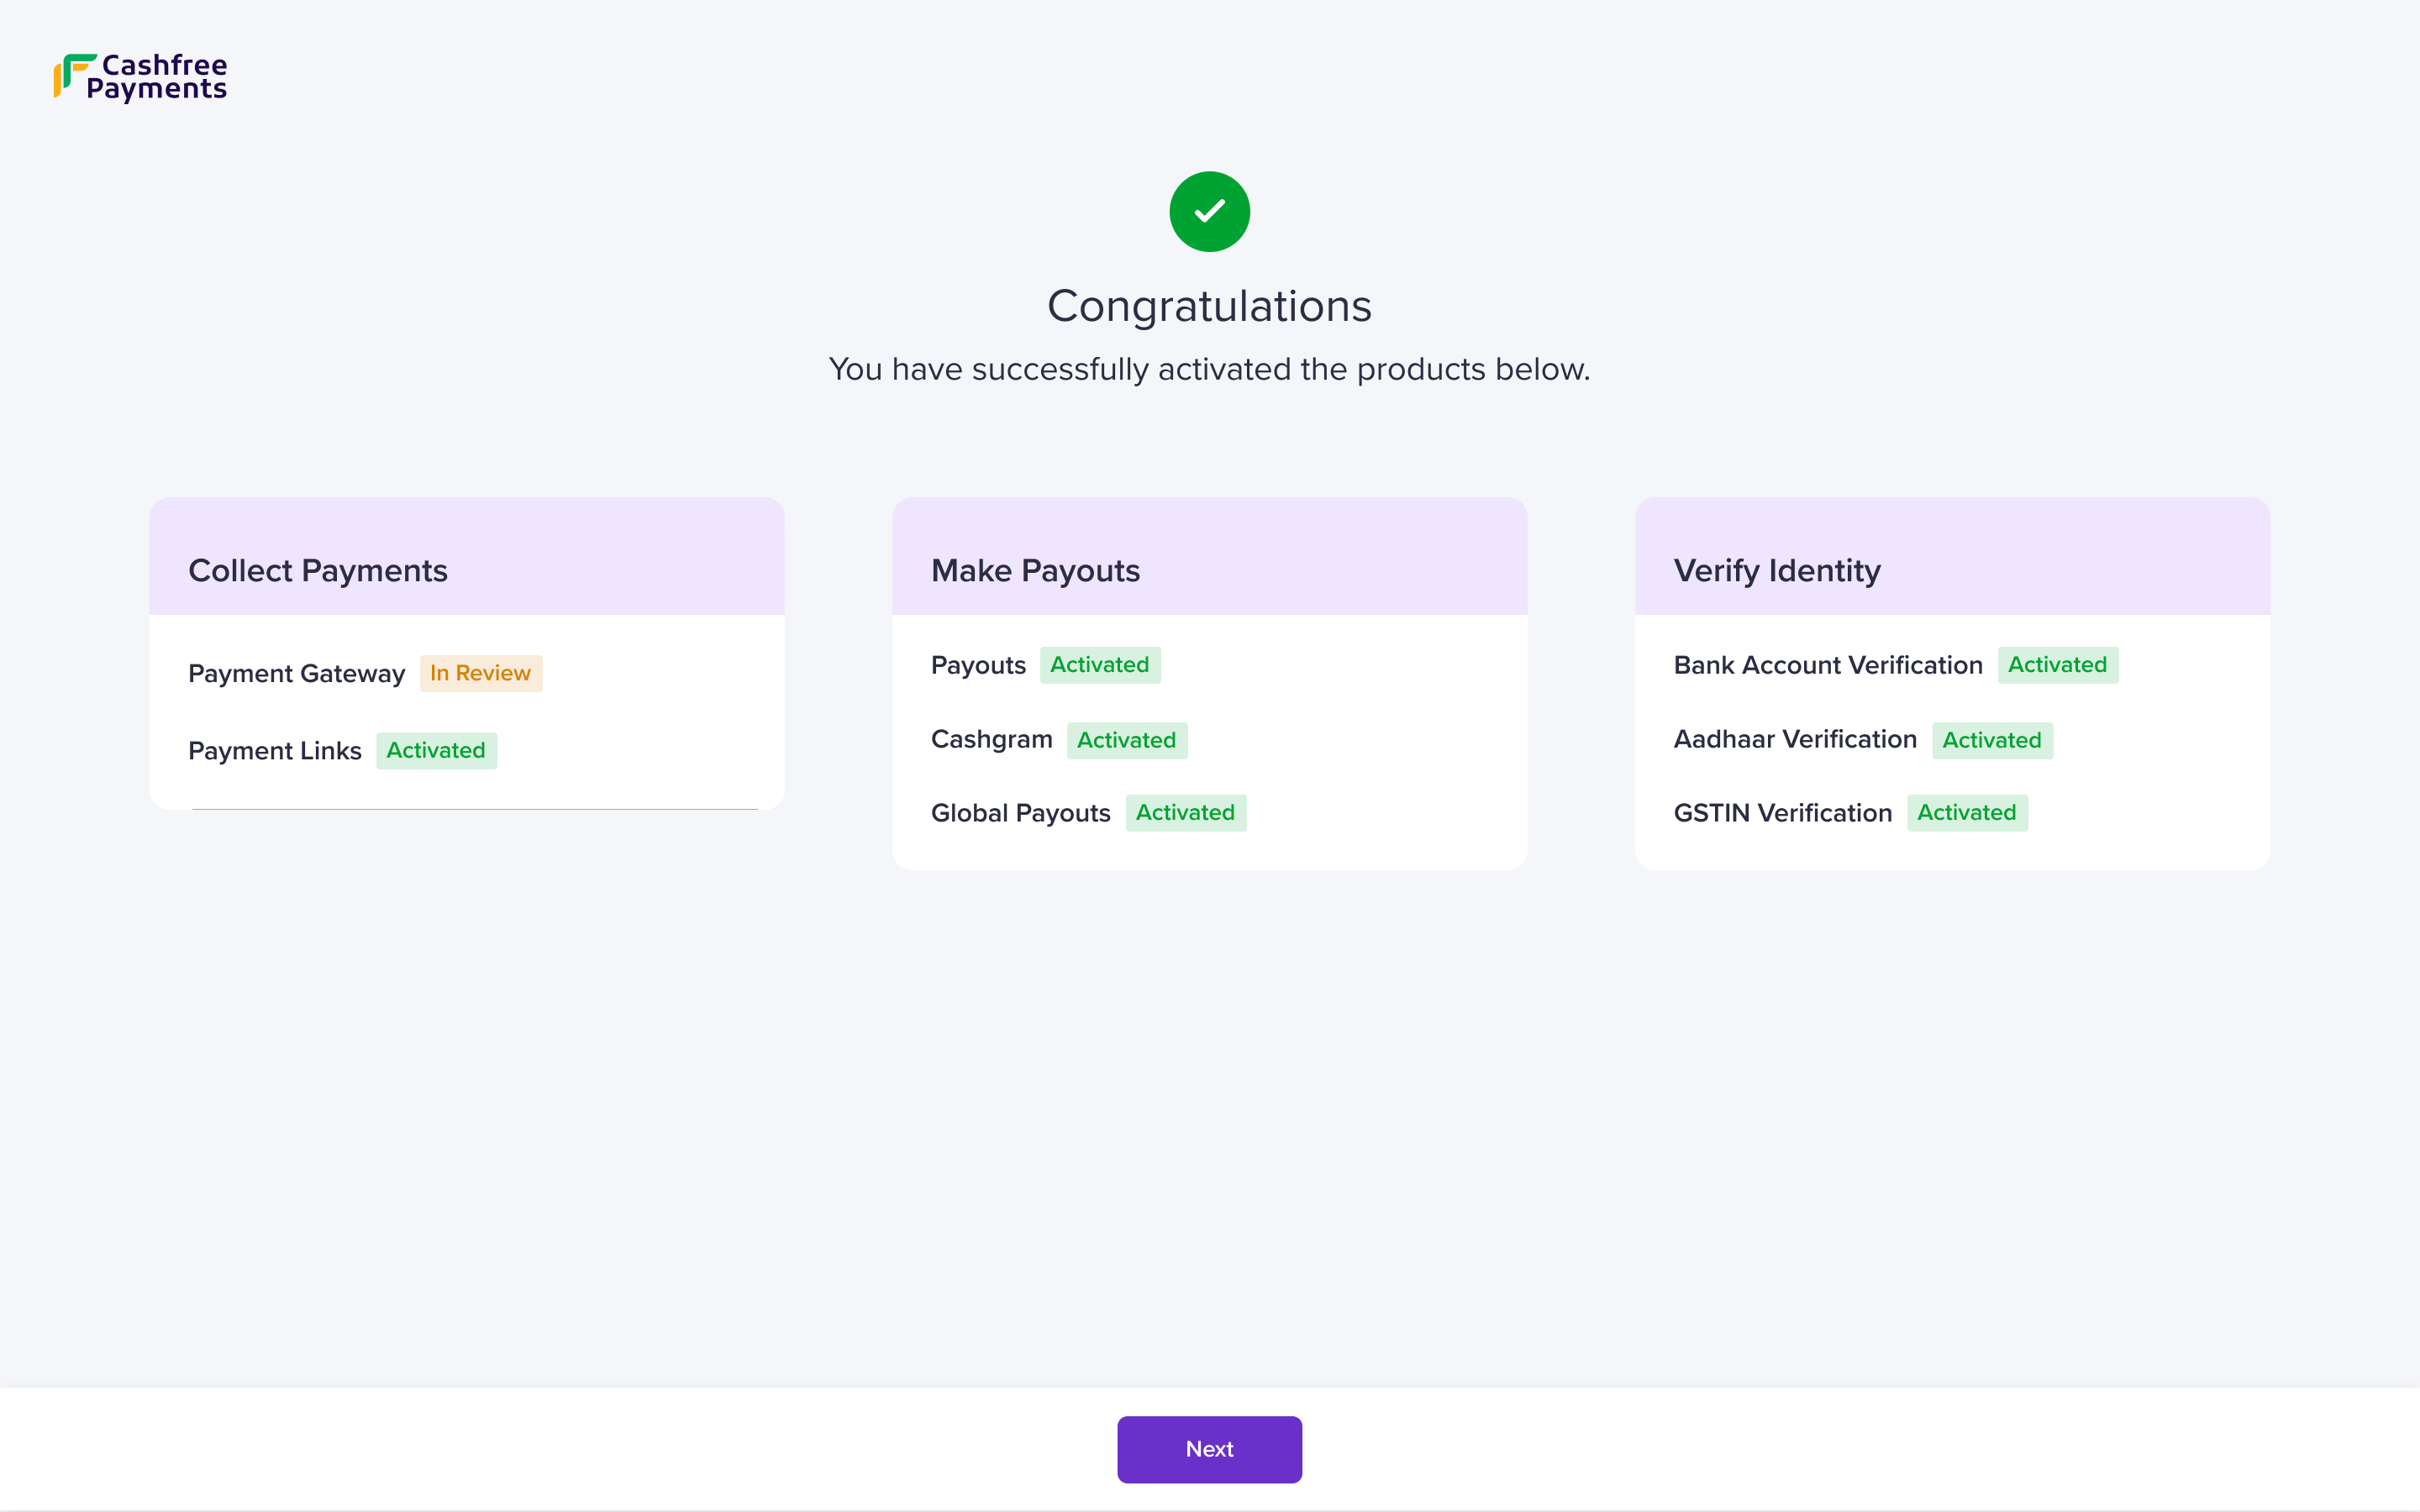 You can view the activated products on the Congratulations screen. You can transact up to ₹25,00,000. Click Next to sign the agreement and transact limit free.
Service agreement
The agreement is between you and Cashfree Payments. Read the document carefully before signing it.You can sign the agreement in two ways:
- Instant Agreement Signing
- Download Template and Upload
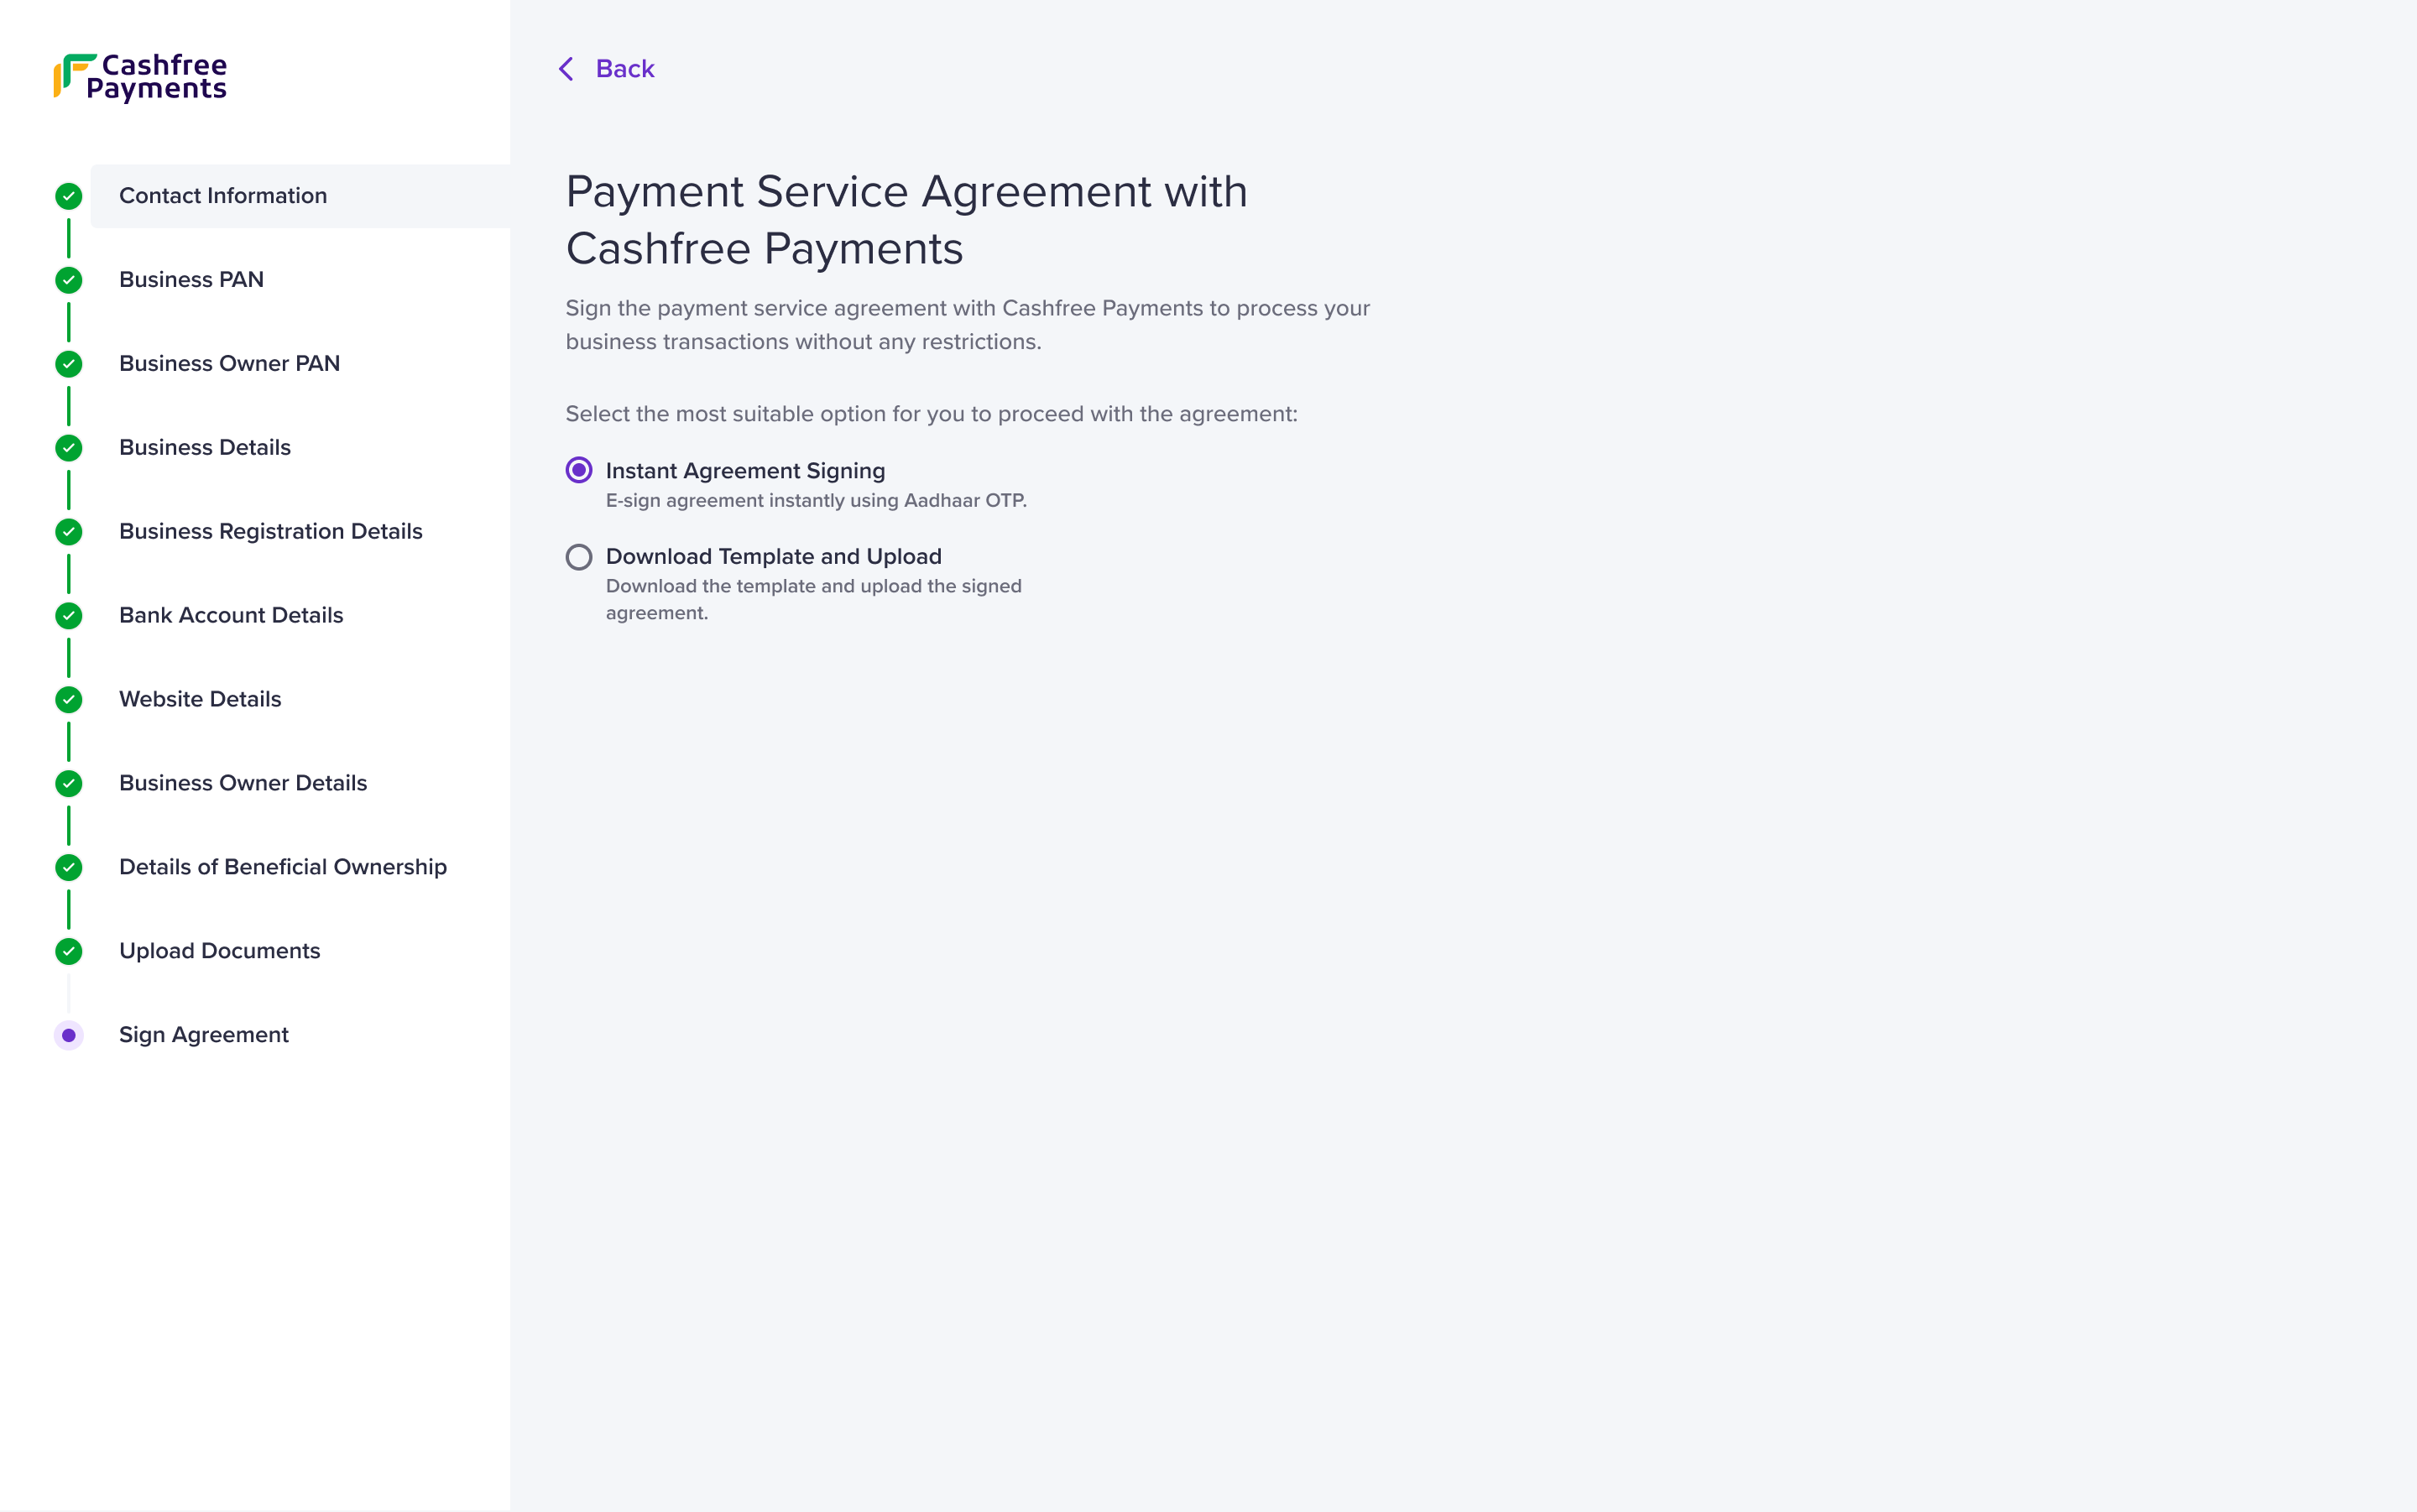 Instant Agreement Signing
- Enter either of the following details:
- Email ID: Enter the email address of the business owner.
- Mobile Number: Enter the mobile number of the business owner.
- Click Send Agreement.
- The email ID or the mobile number receives the link to the agreement details. You can use Aadhaar OTP to instantly sign the agreement.
- Click Generate and Download Agreement and sign the generated agreement.
- Upload the following files:
- Upload signed agreement: Use the Upload button to upload the signed agreement.
- Upload PAN card copy of the business owner: Use the Upload button to upload PAN of the business owner.
Account activation checklist
Individuals (Unregistered business)
If you run a business without any formal registration with the government, you have an unregistered business.- Business PAN (Your personal PAN that is linked to your business account)
- Bank account details or a cancelled cheque (The details should be in the business owner’s name)
- Aadhaar number of the business owner (Will be validated via OTP verification)
- Line of business(LOB) specific documents
Proprietorship
If you are the sole owner and operator of your business with no legal distinction between you and the business, you have a sole proprietorship.- Business PAN (Your personal PAN that is linked to your business account)
- Bank account details or a cancelled cheque (The details should be in the business owner’s name)
- Aadhaar number of the business owner (Will be validated via OTP verification)
- If you do not have GSTIN, then provide any of the following proof of business identity and existence:
- Municipal Certificate
- Shop Establishment Certificate
- Udyog Aadhaar
- Other Government-Issued Registration Proof
- Line of business(LOB) specific documents
Public/private limited
| Public Limited | Private Limited |
|---|---|
| A public limited company, also known as PLC, is a business structure that incorporates a large or publicly traded company. It is a legal entity separated from its owners and owned by several shareholders who hold shares of stock in the company. | A private limited company, also known as a limited liability company or LLC, is a business structure that incorporates a small or medium-sized business. It is a legal entity separated from its owners and owned by a few private shareholders. |
- Business PAN(COMPANY)
- CIN
- Bank account details or a cancelled cheque (The bank account details should be in the business name as per COMPANY PAN)
- PAN of the Authorised Signatory
- Aadhaar of the Authorised Signatory
- PAN of the Director
- Identity proof of the Director
- Board Resolution signed by the Director
- Line of business(LOB) specific documents
Limited Liability Partnership(LLP)
LLP is a type of business structure that combines elements of partnerships and corporations. They enable the protection of a corporation and allow the flexibility of a partnership.- Business PAN (COMPANY)
- LLPIN
- Bank account details or a cancelled cheque (The bank details should be in the name of the business as per PAN)
- PAN of the Authorised Signatory (Partner of the firm)
- Aadhaar of the Authorised Signatory (Partner of the firm)
- PAN of the Partner
- Identity proof of the Partner
- Board Resolution signed by the Partner
- Line of business(LOB) specific documents
Partnership
Partnership is a business type when two or more people own the business and share profits and losses.- Business PAN (FIRM)
- Bank account details or a cancelled cheque (The bank details should be in the name of the business as per PAN)
- PAN of the Authorised Signatory (Partner of the firm)
- Aadhaar of the Authorised Signatory (Partner of the firm)
- PAN of the Partner
- Identity proof of the Partner
- Board Resolution signed by the Partner
- Business registration proof
- Partnership Deed
- Registration Certificate from Registrar of Firms
- Line of business(LOB) specific documents
Hindu Undivided Family (HUF)
- The PAN information of the HUF
- The PAN information of the business owner
- Bank account details or a cancelled cheque
- Aadhaar number of the business owner (Will be validated via OTP verification)
- HUF Registration Proof - HUF Deed
- Line of business(LOB) specific documents
Society/Trust/NGO/Local Authority/Artificial Juridicial Person/Government
| Society | Trust | NGO |
|---|---|---|
| A society is a group of people who come together for a common purpose, such as a social, cultural, or charitable cause. They are often registered with the government and may have legal status as nonprofit organisations. | A trust is a legal arrangement in which one or more trustees manage assets on behalf of one or more beneficiaries. Trusts manage property assets, protect finances, serve as a charitable organisation, and perform estate planning. | NGO stands for Non-Governmental Organisation. They are a nonprofit organisation independent of government and focused on social or environmental causes. Often registered as charities or other nonprofit organisations, they may receive funds from governments, foundations, and individual donors. |
| Local Authority | Artificial Juridical Person | Government |
|---|---|---|
| A local authority is a government body at the municipal or regional level responsible for delivering local services and facilities, including education, housing, and public safety. | An artificial juridical person is a legal entity, like a corporation or organisation, recognized by law as having rights and responsibilities similar to those of a natural person, but it is not a human being. | A government is the system or group of people that governs an organised community, such as a state, and is responsible for creating and enforcing laws, policies, and public administration. |
- The Business PAN information of TRUST/Society/Local Authority/Artificial Juridical Person/Government.
- The PAN information of the Authorised Signatory (Trustee of the firm)
- Bank account details or a cancelled cheque
- Aadhaar number of the Authorised Signatory (Trustee of the firm)
- The PAN information of the Trustee
- Identity proof of the Trustee
- Board Resolution signed by the Trustee
- Business registration proof
- Trust Deed/Society/NGO Registration Certificate
- Certificate of registration number issued by charity commissioner or registrar of cooperative society or any other competent authority
- Letter of Intent/Authorisation (LOI)/(LOA)
- Society Certificate
- NGO Registration Certificate
- Line of business(LOB) specific documents
Manage account
Profile
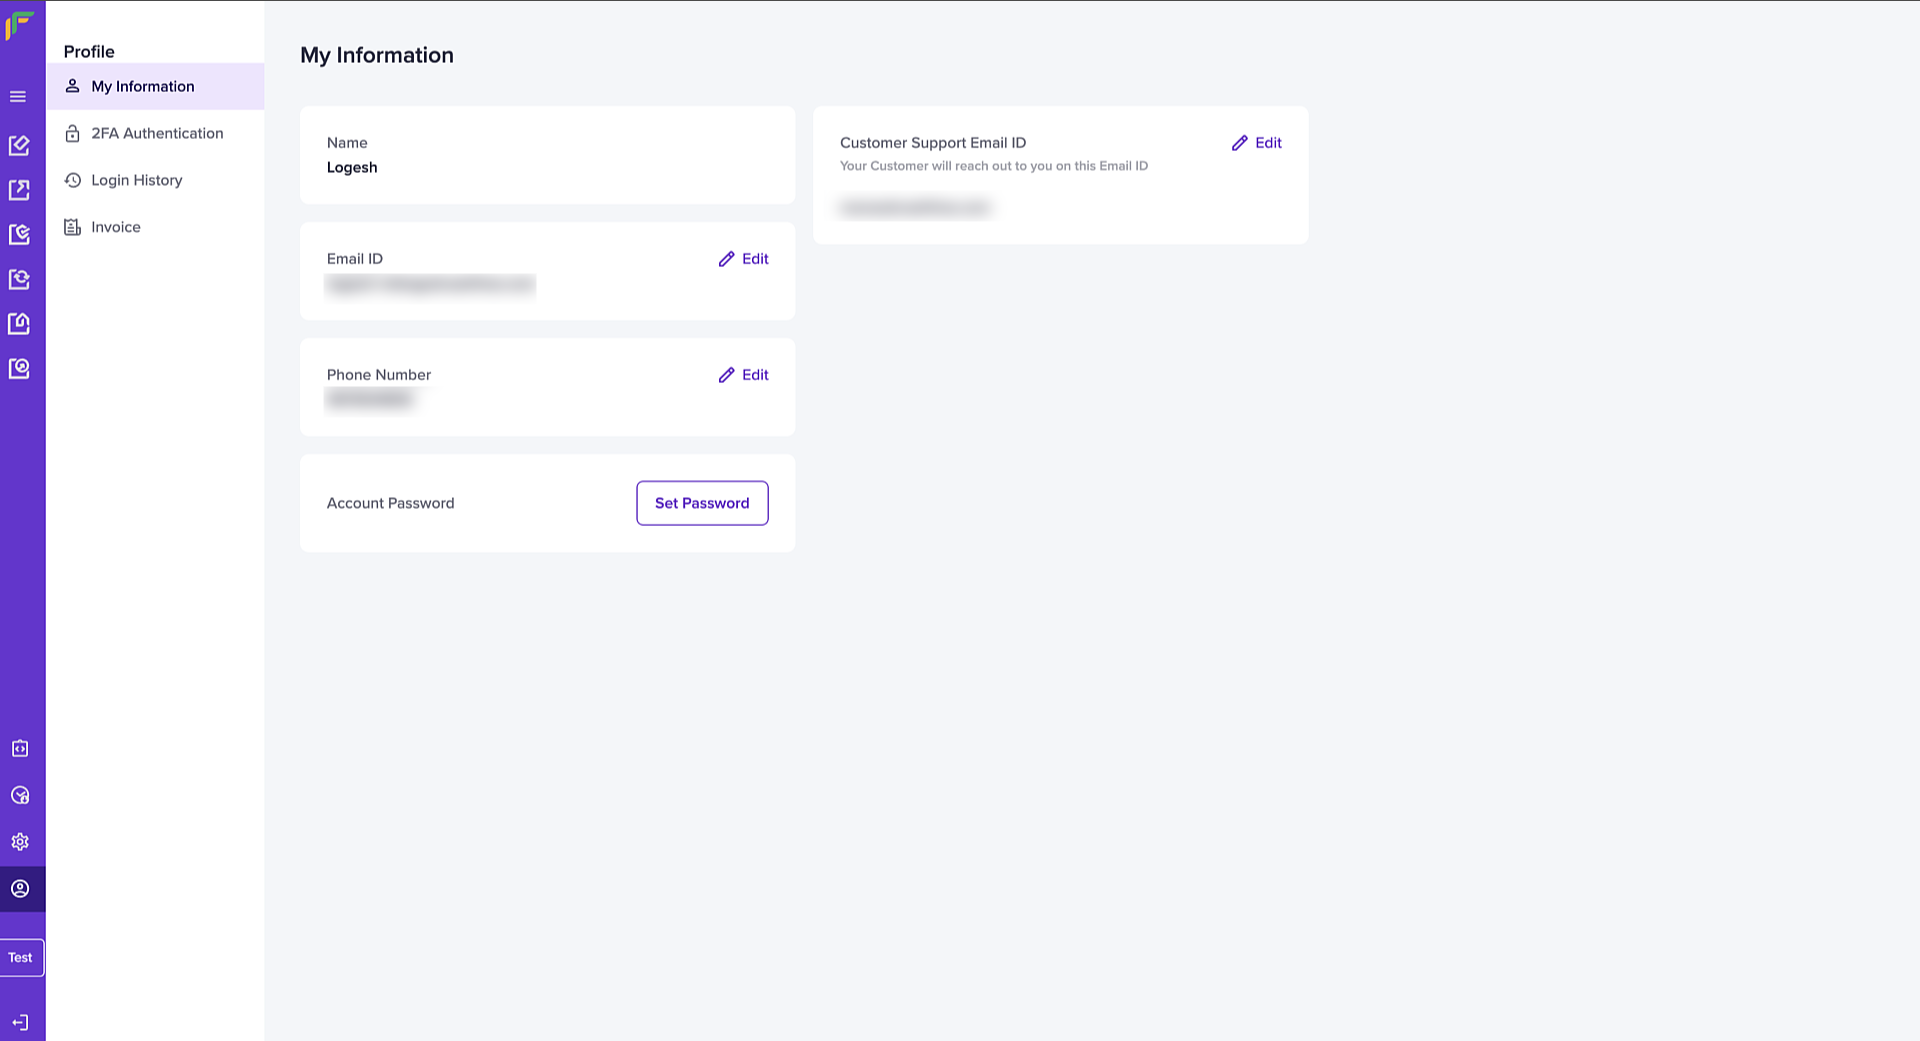
You can manage your account information and control overall activities in the Profile page. You can control basic account settings, configure two-factor authentication, monitor login history, and view your tax invoices.My information
My Information displays the following information under Personal Profile:- Name: The registered name of your Cashfree Payments account.
- Email ID: The registered email address of your Cashfree Payments account.
- Phone Number: The registered phone number of your Cashfree Payments account.
- Customer Support Email: Your customer support email address.
- Account Password: Click Set Password to change your account password
Update information
You can edit your details such as email ID, phone number, and customer support email ID using the features available on the dashboard. The Edit icon next to each information allows you to update the information after successful OTP authentication.Why Aadhaar Validation?
To confirm your identity and prevent fraudulent activities, we require an aadhaar validation to update your contact information.
To confirm your identity and prevent fraudulent activities, we require an aadhaar validation to update your contact information.
Update email ID
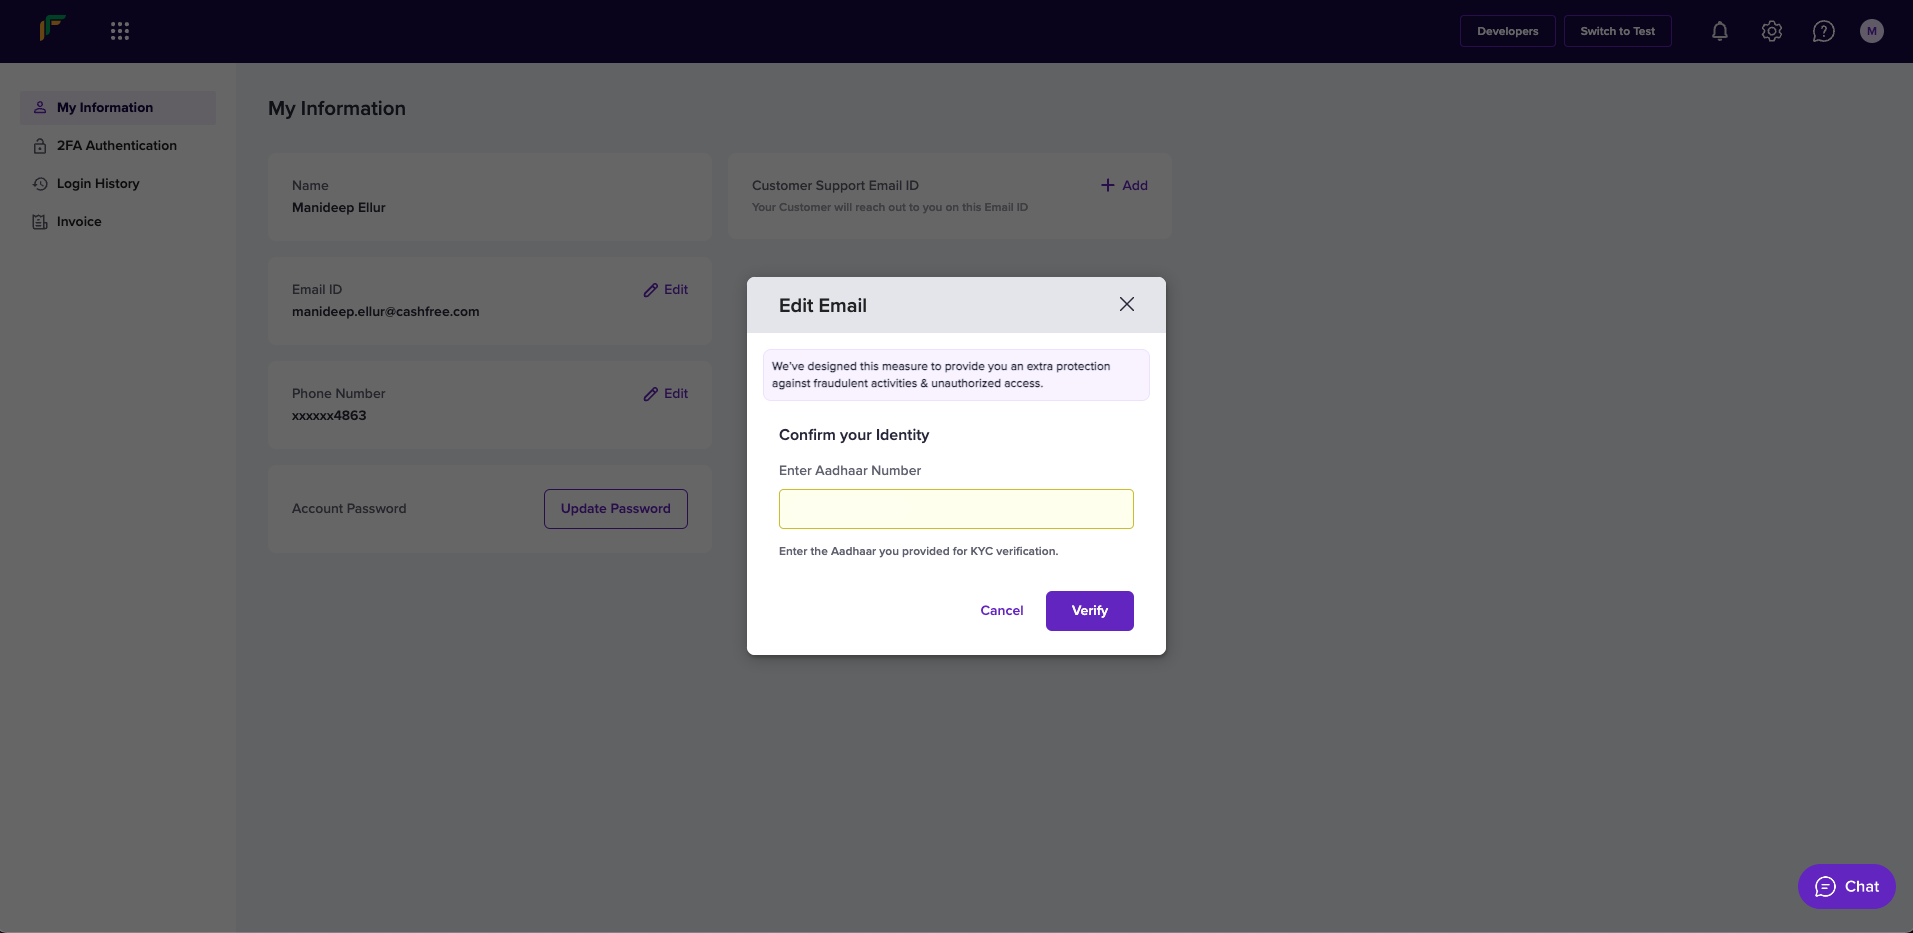
Follow the instructions below to update the email ID:- Click the Edit icon.
- In the Edit Email popup, enter the aadhaar number in the respective field, and click Verify.
- In the Enter OTP popup, enter the OTP received on your aadhaar registered mobile number and click Confirm.
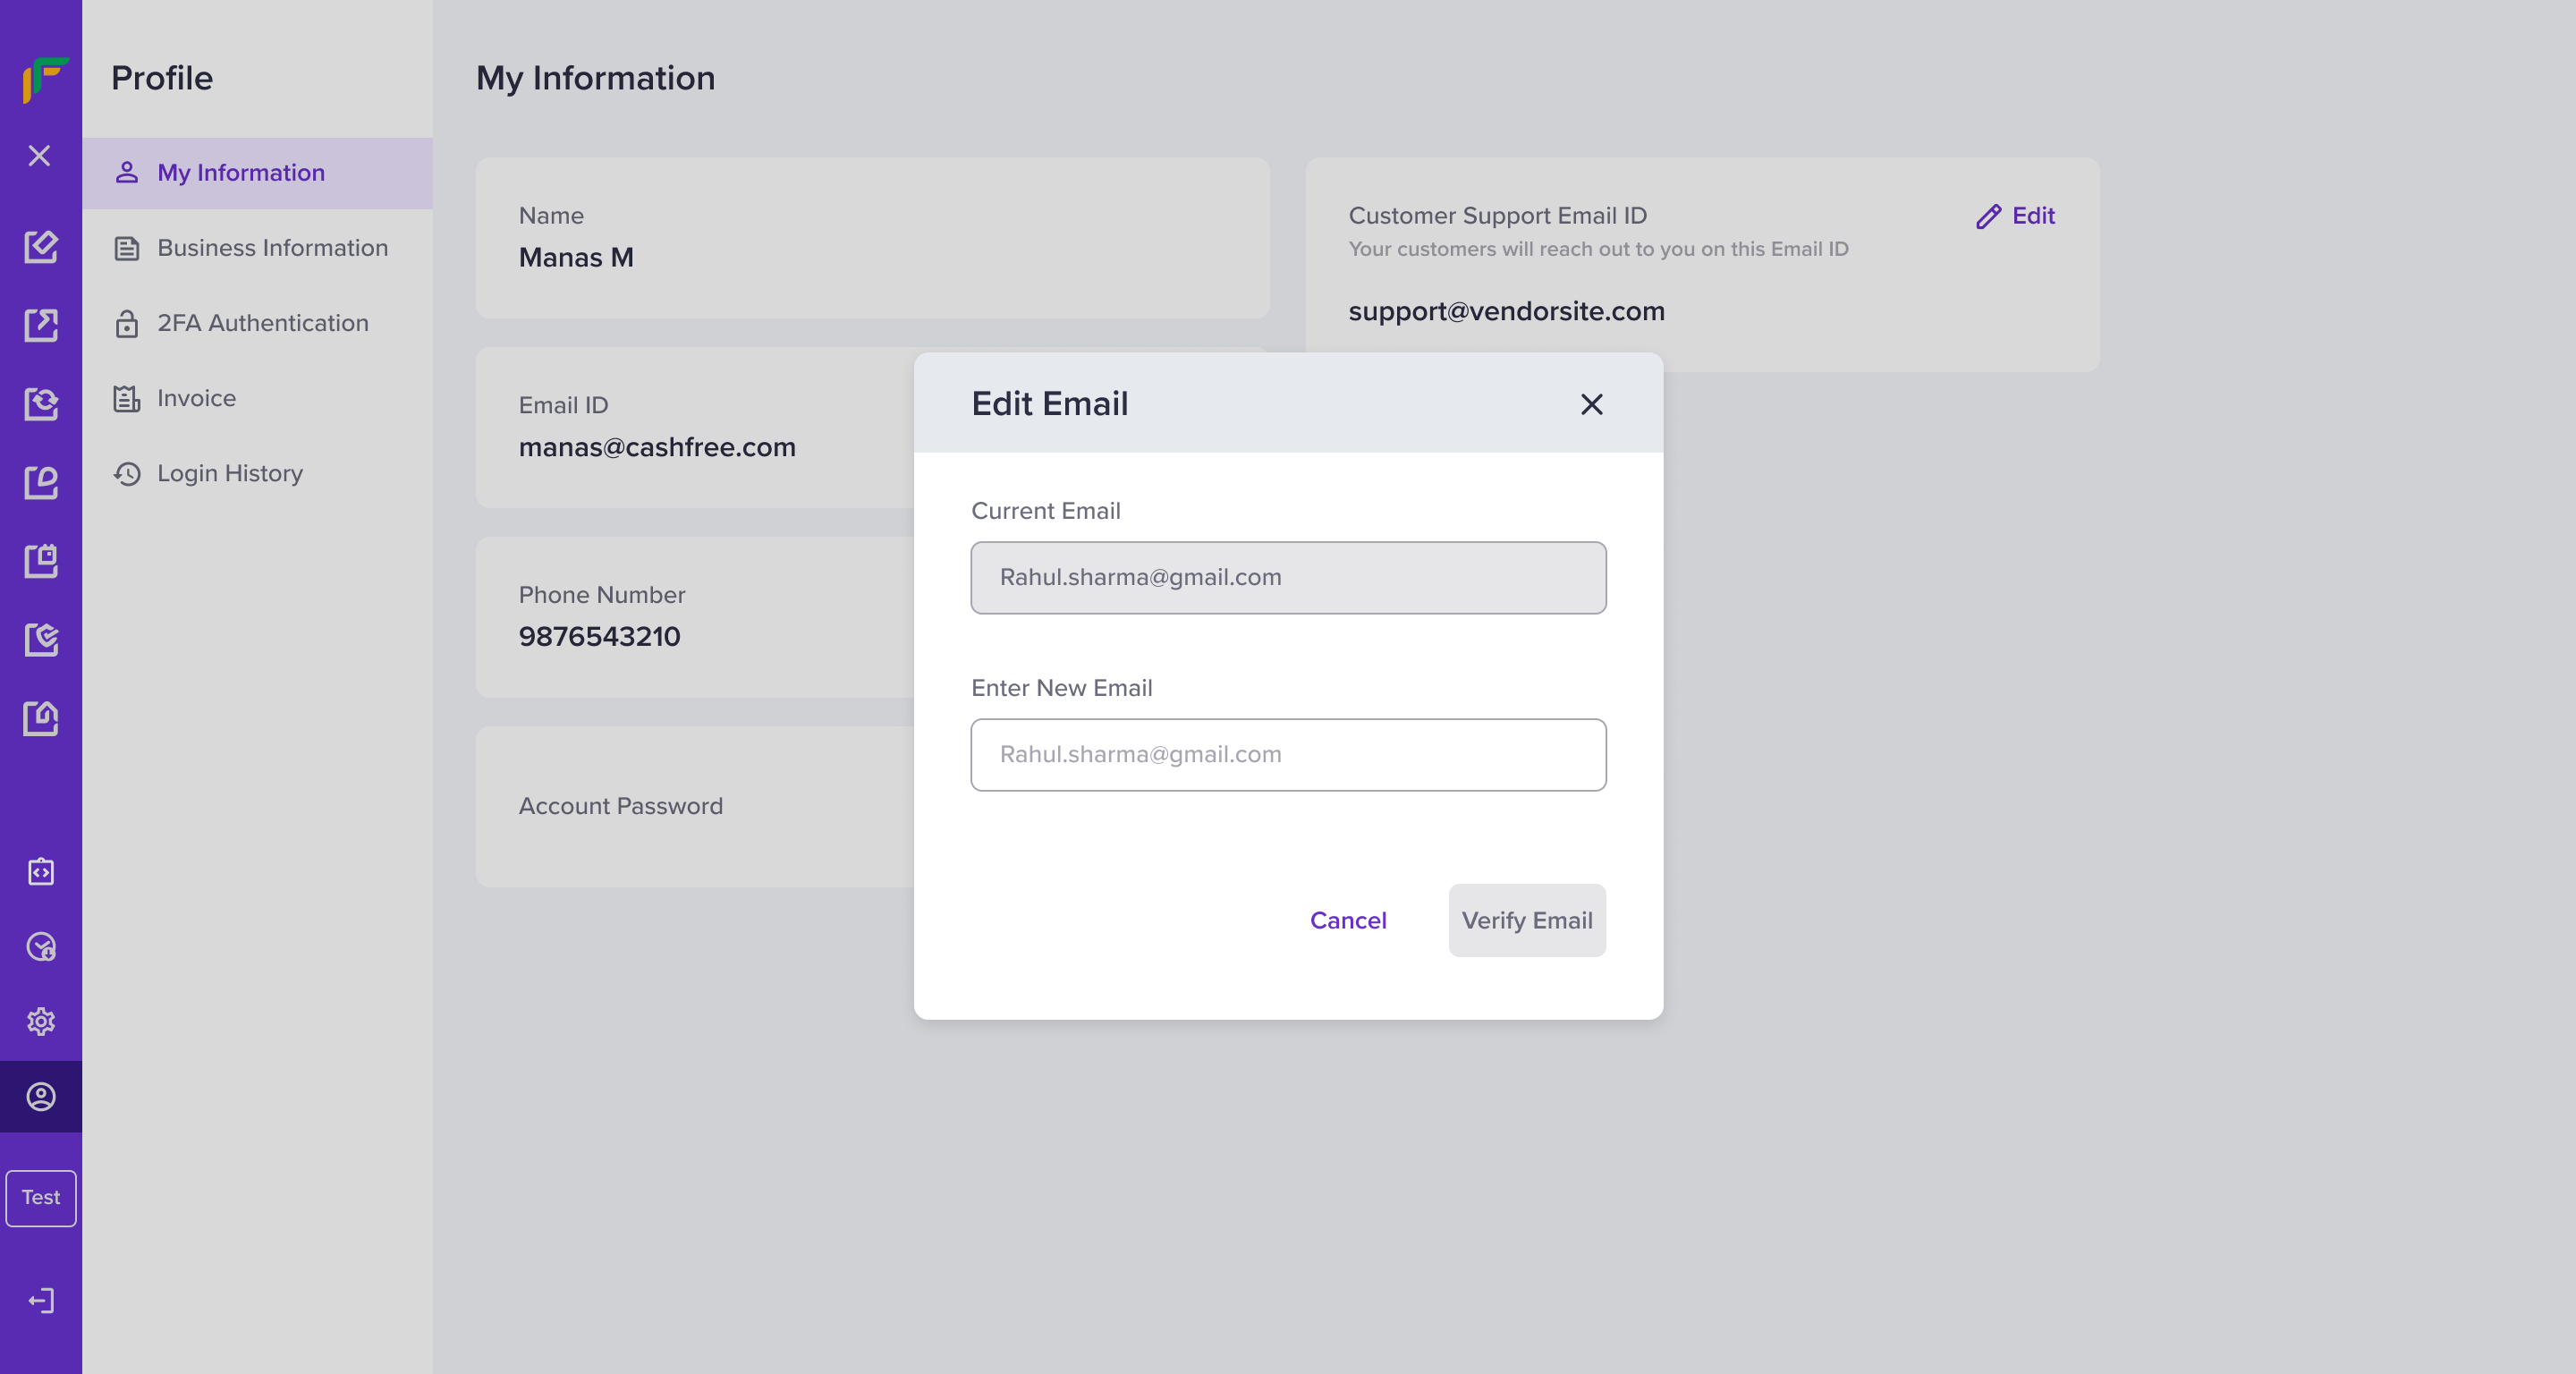
- Enter the new email address in the Enter New Email field, and click Verify Email.
- Another OTP is sent to the newly entered email address. Enter the OTP in the Verify Email popup and click Confirm.
- We will review the request and update the email ID for your account within 24-48 hours. You will be logged out of the session after email verification. Use your updated email address and the existing password to login.
Update phone number
Follow the instructions below to update phone number:- Click the Edit icon.
- In the Edit Phone Number popup, enter the aadhaar number in the respective field, and click Verify.
- In the Enter OTP popup, enter the OTP received on your aadhaar registered mobile number and click Confirm.
- Enter the new phone number in the Enter New Phone Number field and click Verify Phone.
- Another OTP is sent to your updated phone number. Enter the received OTP in the Verify Phone Number popup and click Confirm.
- We will review the request and update the phone number for your account within 24-48 hours.
Validation Process
You only have to go through the aadhaar validation process once when you try to update both the email and phone number information.
You only have to go through the aadhaar validation process once when you try to update both the email and phone number information.
Update customer support email ID
Follow the instructions below to update customer support email ID:- Click the Edit icon.
- An OTP is sent to your registered phone number or email address. Enter the received OTP in the Authenticate popup and click Confirm.
- The Customer Support Email ID field is now available to edit. Enter the new customer support email ID, and click Verify Changes.
- The customer support email ID is updated for your account.
2FA Authentication
2FA Authentication is a method to confirm secure login to your Cashfree Payments account and authenticate specific operations that occur in your account. It combines two different factors: sign-in password and OTP to confirm user identity. You receive an OTP to your registered phone number via SMS by default. You can configure it to receive the OTP on your email as well. Once the OTP is validated, the session is valid for 15 minutes. If you do not want to use the OTP-based authentication, click Use this Method Instead to configure your account authentication via Google’s Authenticator app. You can have another level of security to the login sequence for your Cashfree Payments account. Switch the toggle Enable 2FA for Login to enable two-factor authentication for every login attempt to the Merchant Dashboard for you and your team member account. This added layer of security reduces fraud and keeps your account secure.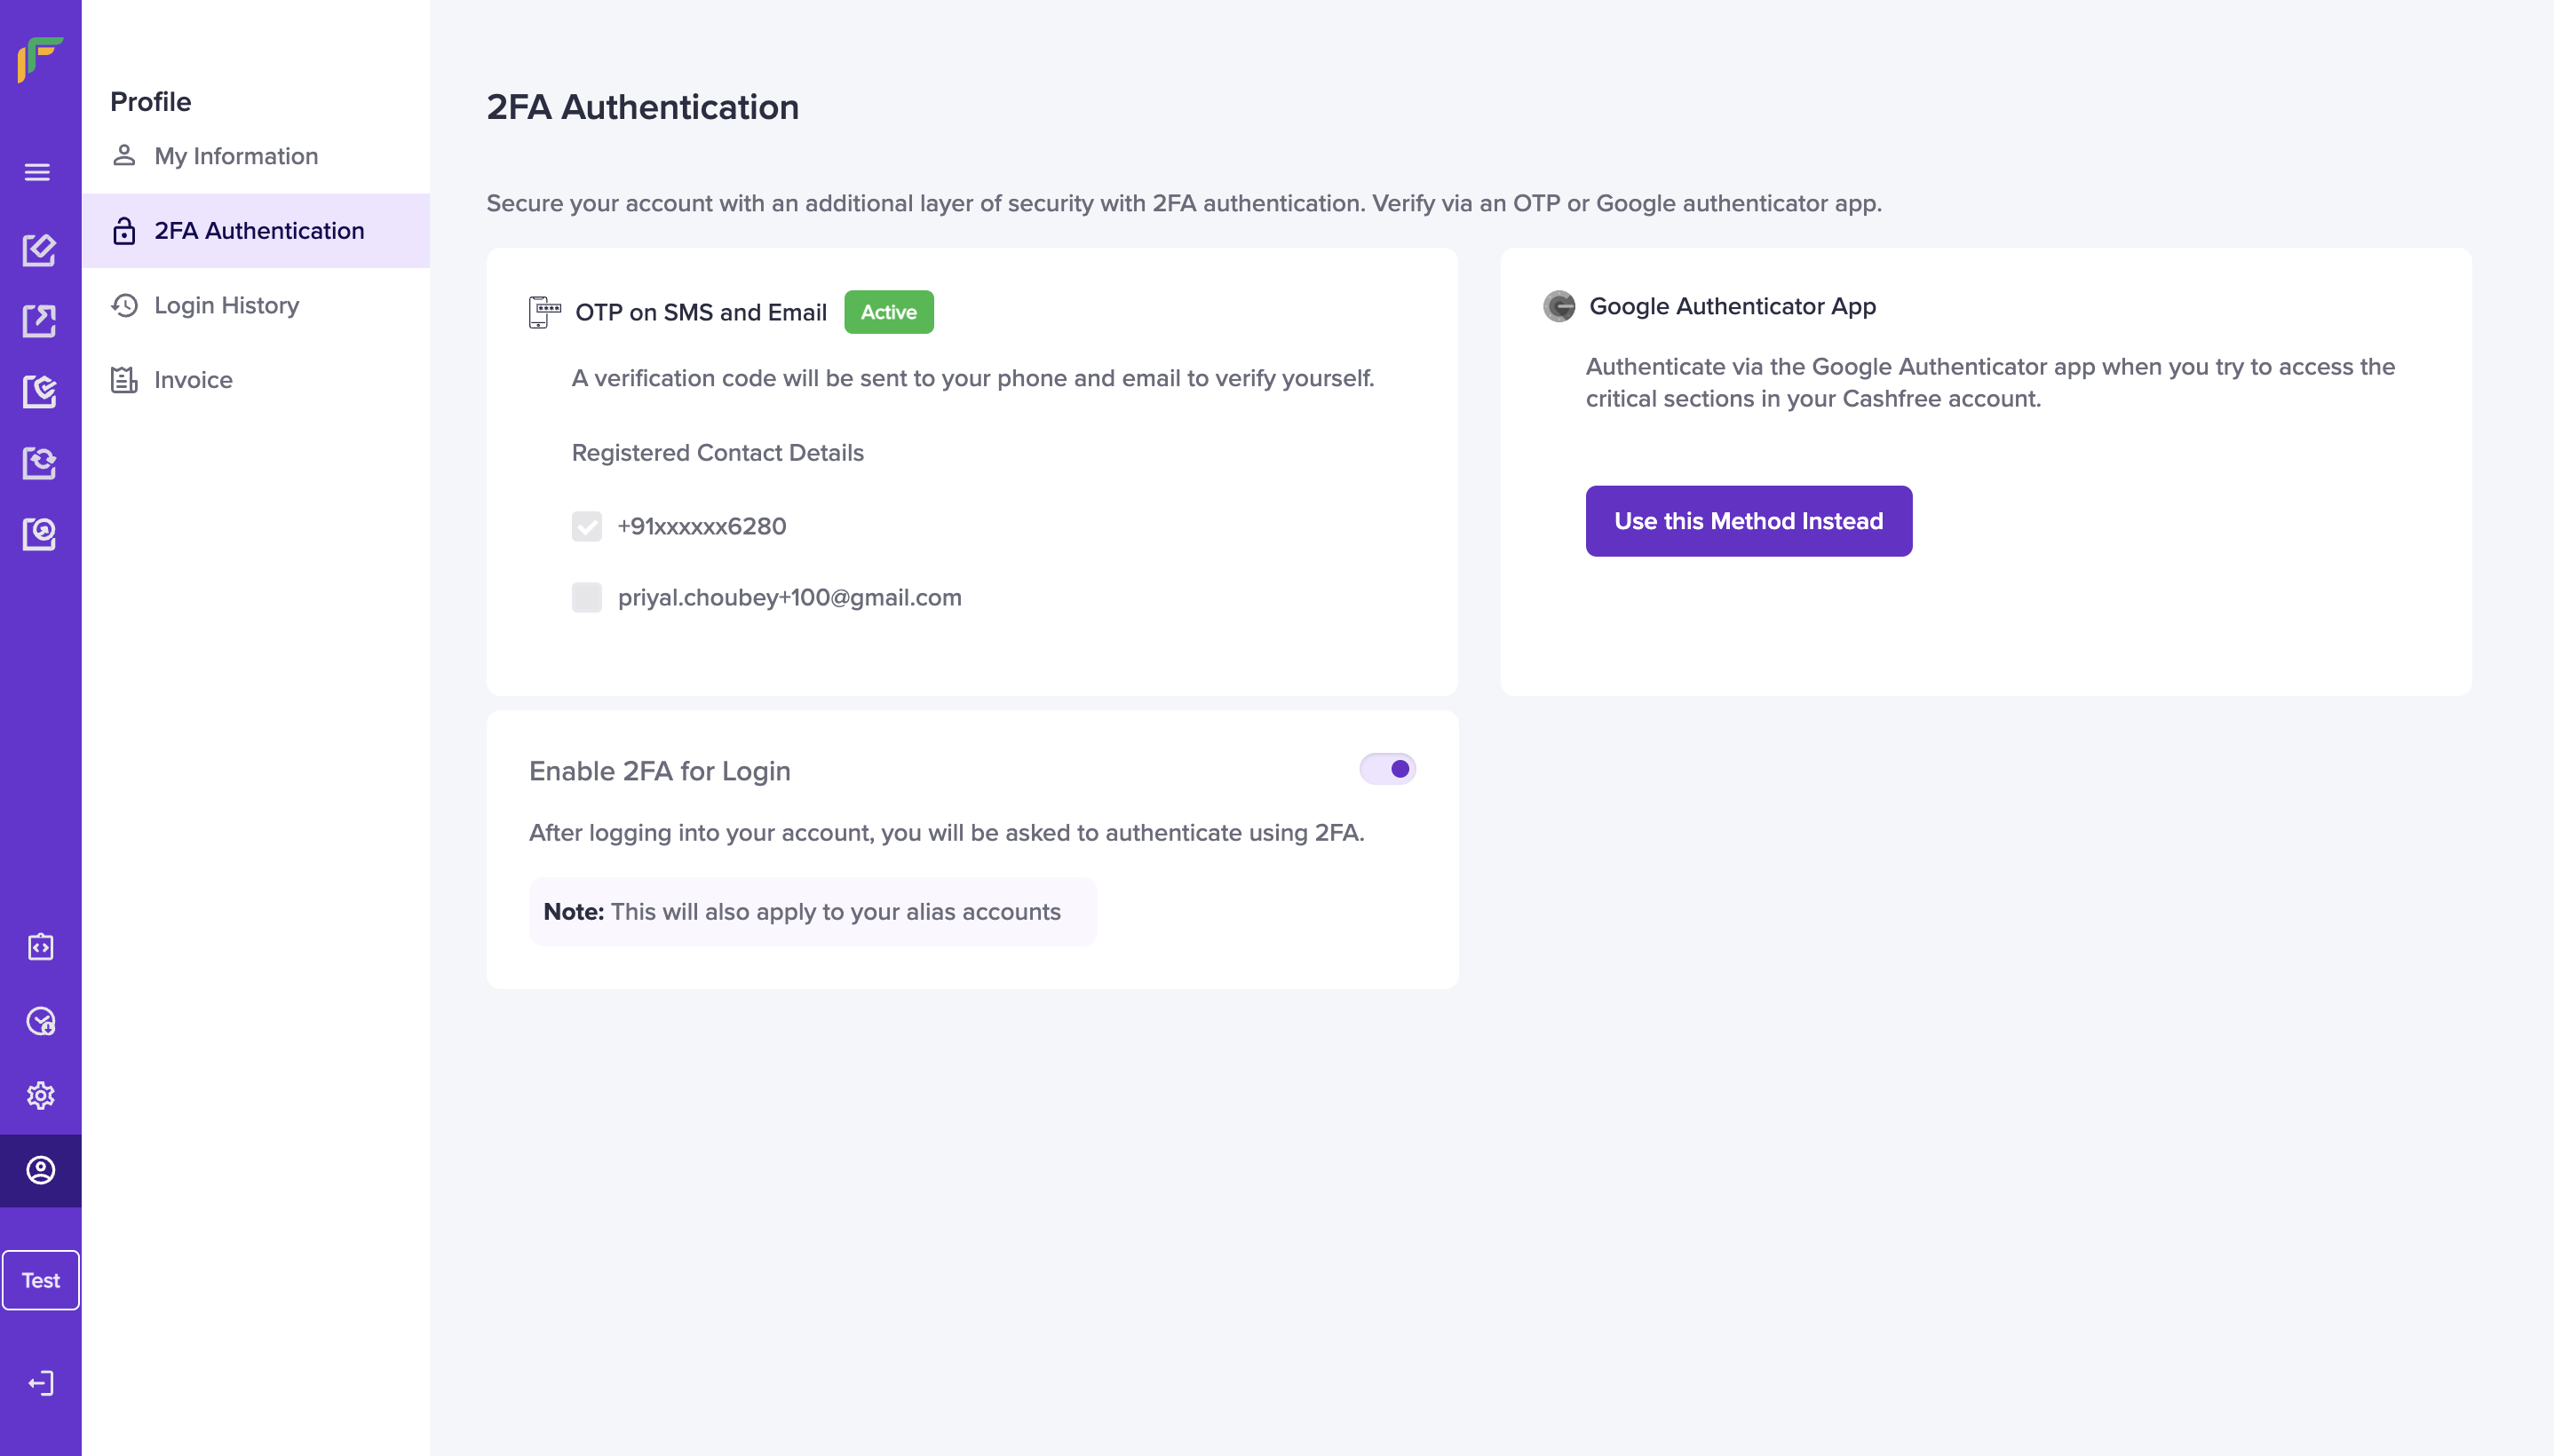
Communications
Communications lets you manage the notification preference for various events.Create/edit preference
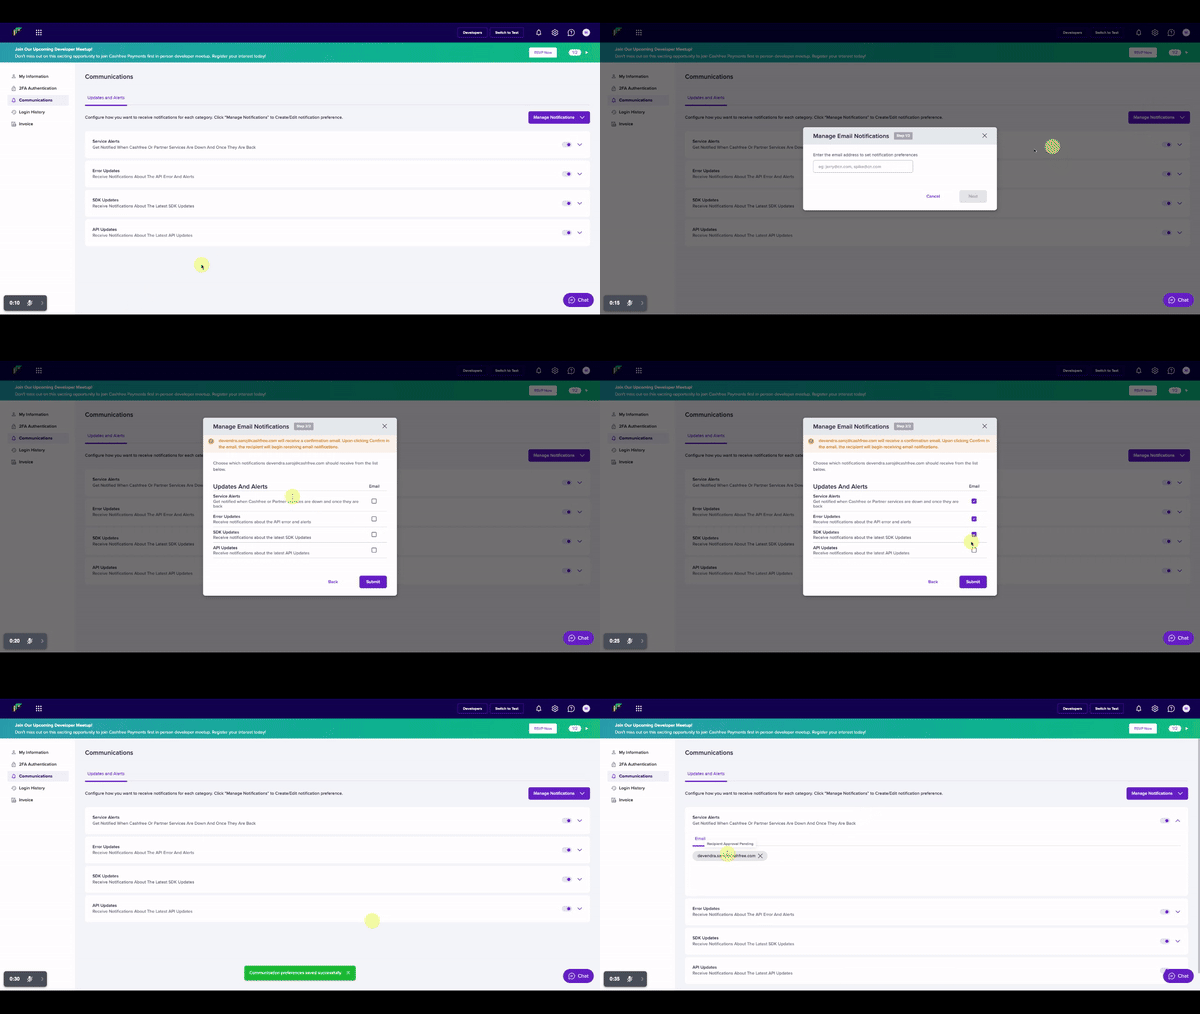
To set notification preference for new email or to edit the preference for existing email, follow the below instructions:- Click on Manage Notifications and select Email Notifications.
- Enter the email address to set notification preferences and click Next.
- Choose which notifications should be delivered to the entered email.
- Click Submit to save the preference.
Providing consent to receive notifications
Whenever an email is configured to receive notifications for particular event, e.g., API Updates, a confirmation email is sent to the recipient’s email address. Recipient can click on Confirm button to provide their consent. Once consent is provided, recipient will start getting notifications about those particular events.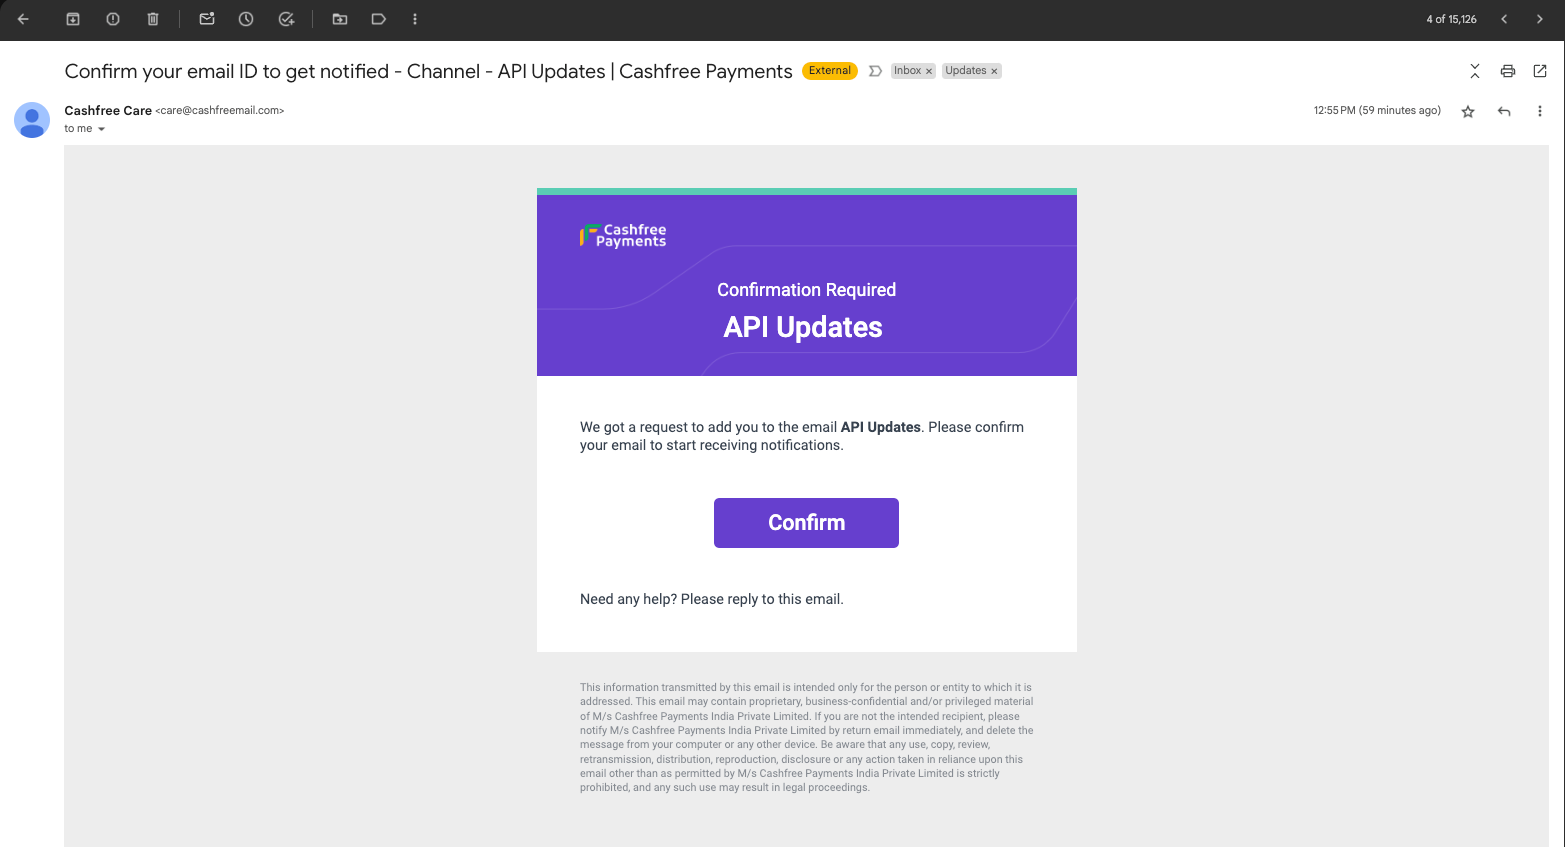
Checking recipient’s consent status in dashboard
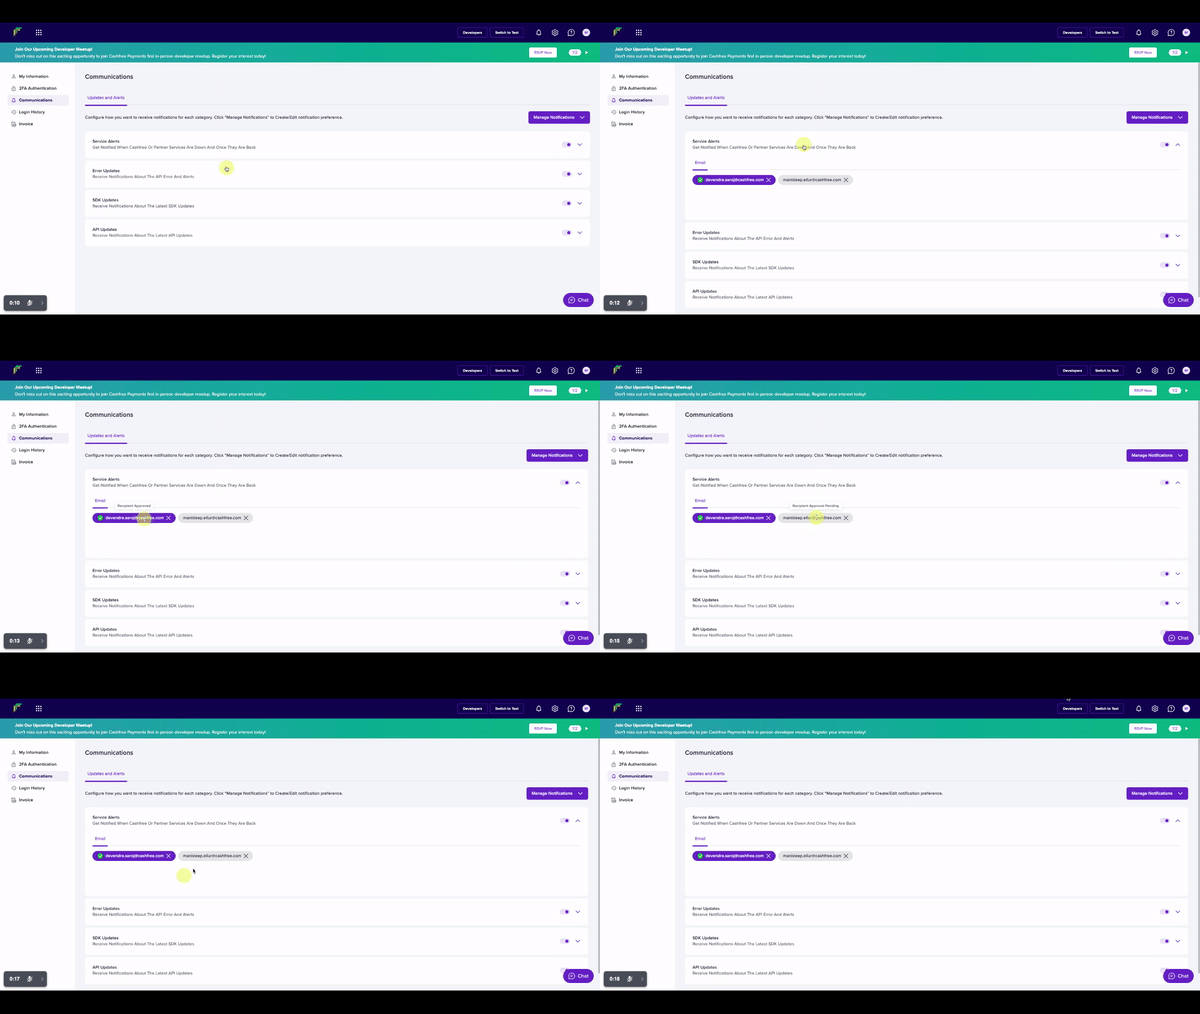
To check whether a recipient has provided their consent to receive notifications or not, follow these instructions:- Click on any particular category card
- Hover over any particular email to see the status.
Login history
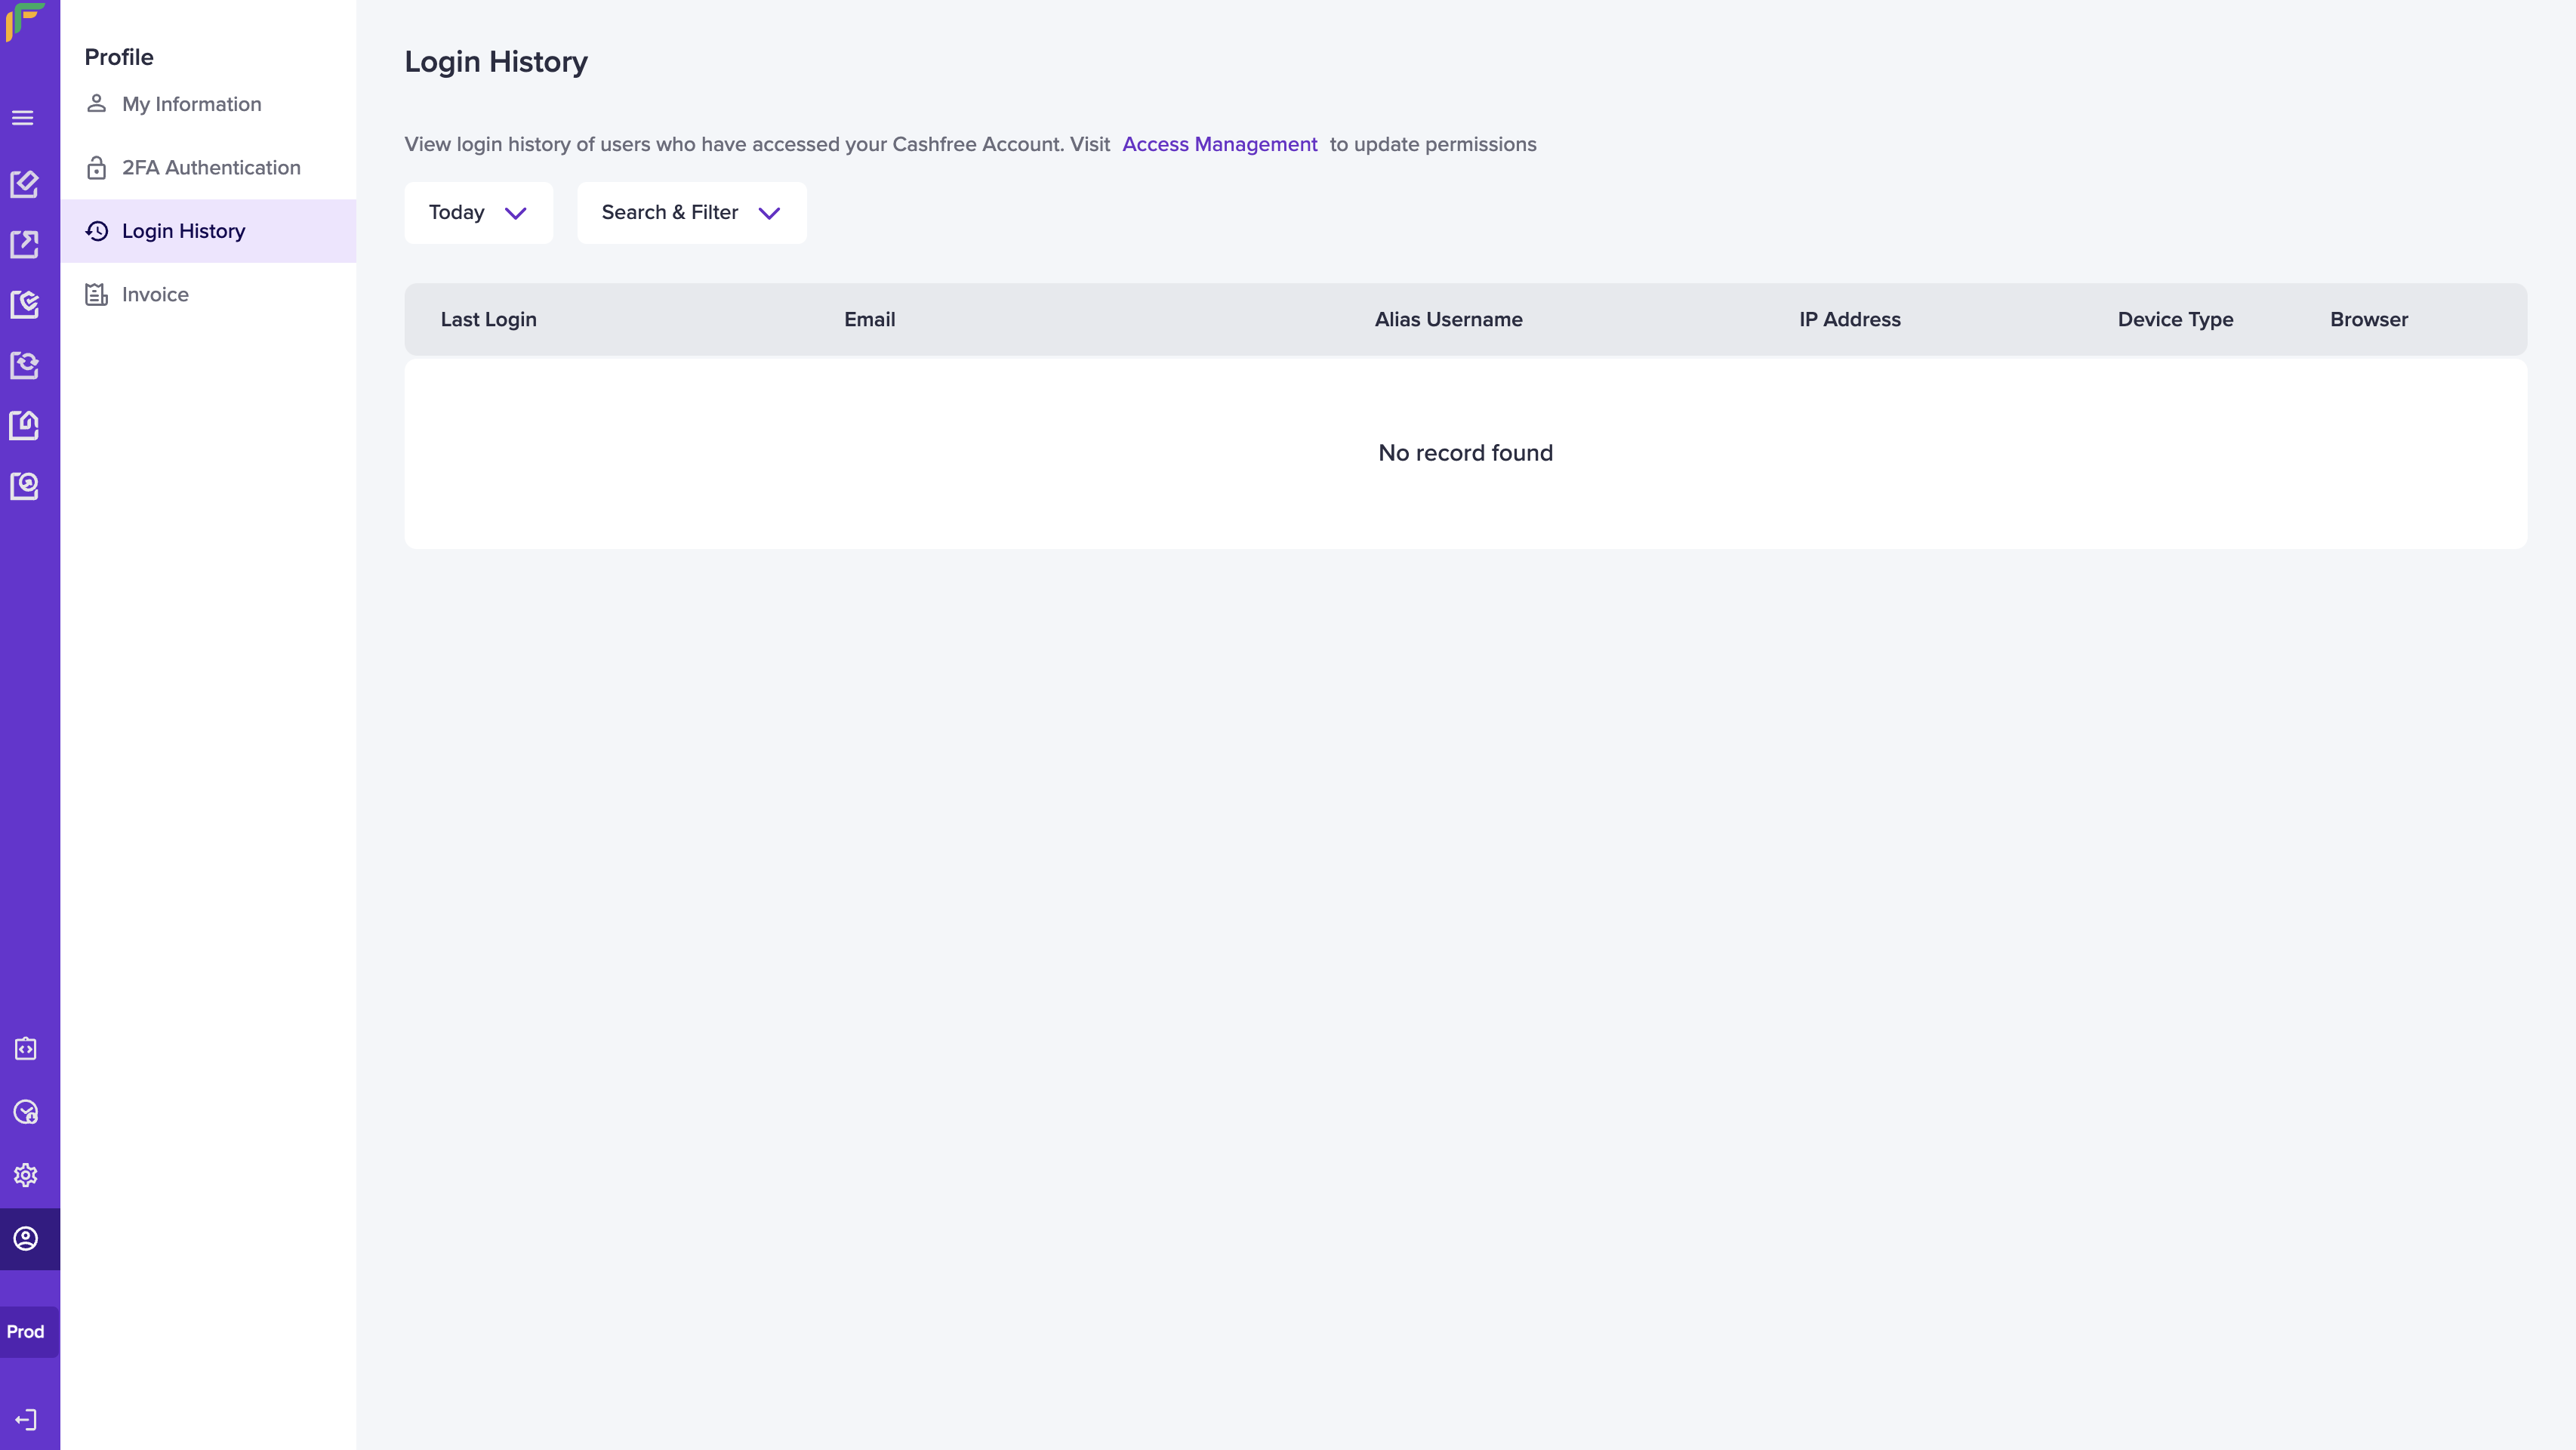
Login History displays information regarding successful logins by users added to your Cashfree Payments account. The search and filter options allow you to categorise and view specific login history by users as mentioned below. You can also filter the cards based on a specific period.- Use the follow filters to search for specific login history:
- All Time: Use this drop-down menu to set the date range.
- Search & Filter: Use this drop-down menu to set the search filter.
- Search: Use this drop-down menu to determine the search value and enter the value in the field. For example, if you choose Email ID, enter the specific email ID in the field.
- Select Apply.
- The results display in the form of a grid.
Invoice
The monthly invoices generated for your Cashfree Payments account is available in the Invoice section. You can download the invoices for your future reference.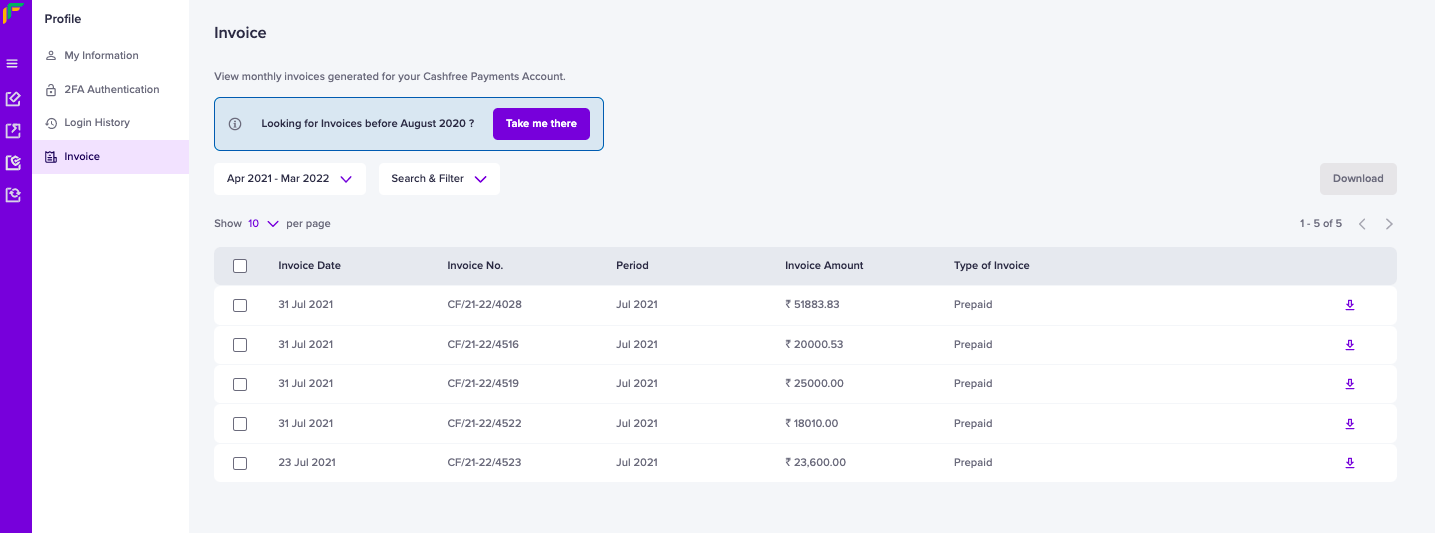
Access management
User management
To minimise risks and keep your system secure, you can assign the created role(s) to your users, or even enable specific permissions for a more granular approach.Invite a user and assign a role
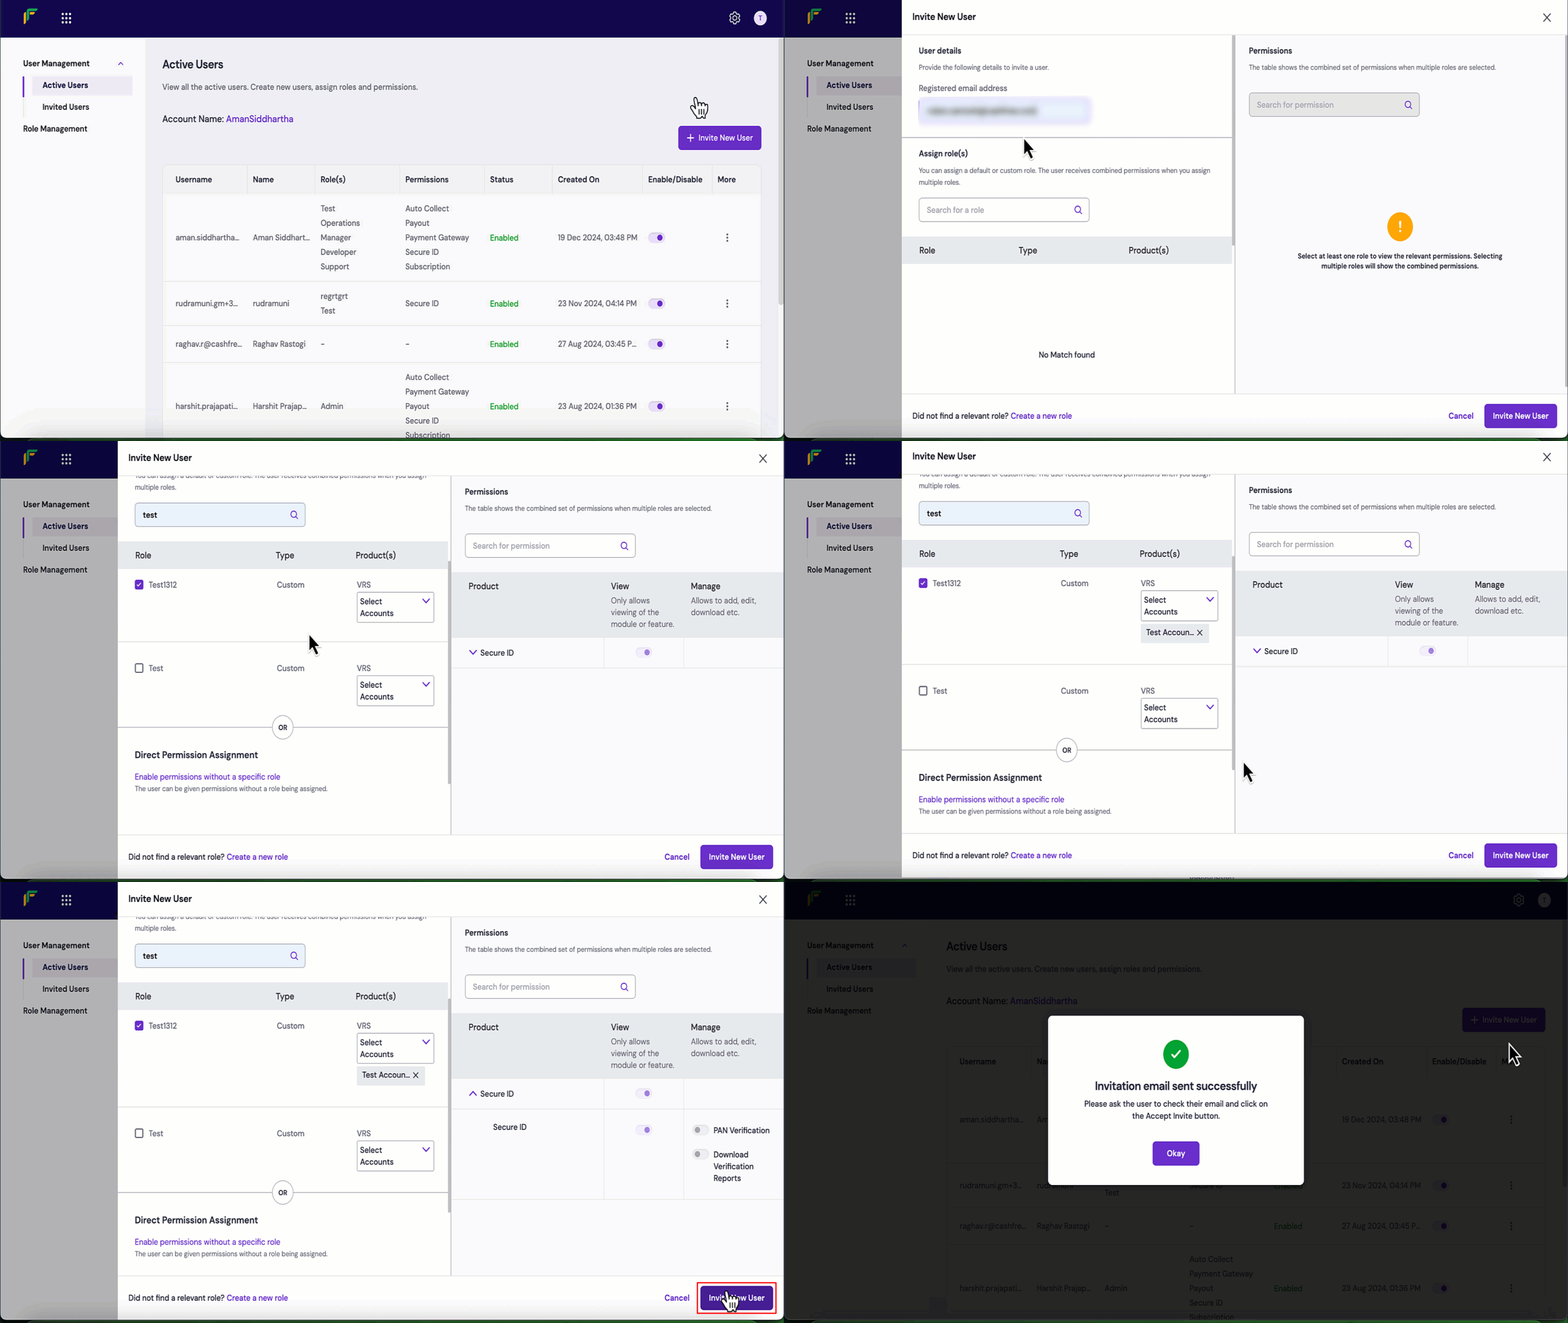
Follow the instructions below to invite a user and assign a default or custom role(s):- Log in to the dashboard using your credentials.
- From the product selection screen, click Settings from the top navigation pane.
- Click Access Management from the General card, and select User Management.
- Click Invite New User.
- Enter the following information in the User details section of the Invite New User popup:
- Registered email address: Enter the email address of the user.
- Check the box of the role that you want to assign for the user in the Assign role(s) section. You can view the permissions enabled for the particular role in the Permissions section.
- Custom: You can create a custom role in the Role Management screen and assign it to your users.
- Default: You can select a default role created by Cashfree Payments and assign it to your users. Find the list of default roles that are readily available for you below:
| Developer | Description |
|---|---|
| Developer | Develops and maintains integrations, access API secrets, webhooks and can access all API resources. |
| Operations | Manages daily payment processing, ensure payouts, refund payments, handle disputes and export data. |
| Manager | Manages overall business cash flow including settlements, payment methods, and reports. |
| Admin | Oversees all system functions and has access similar to account owner. |
| Support | Provides technical assistance to customers and has view only access to transactions, refunds, and transfers. |
- Click Invite New User.
- A user is invited successfully. You can view the invited user(s) in the User Management > Invited Users screen.
Invite a user and enable permissions without a specific role
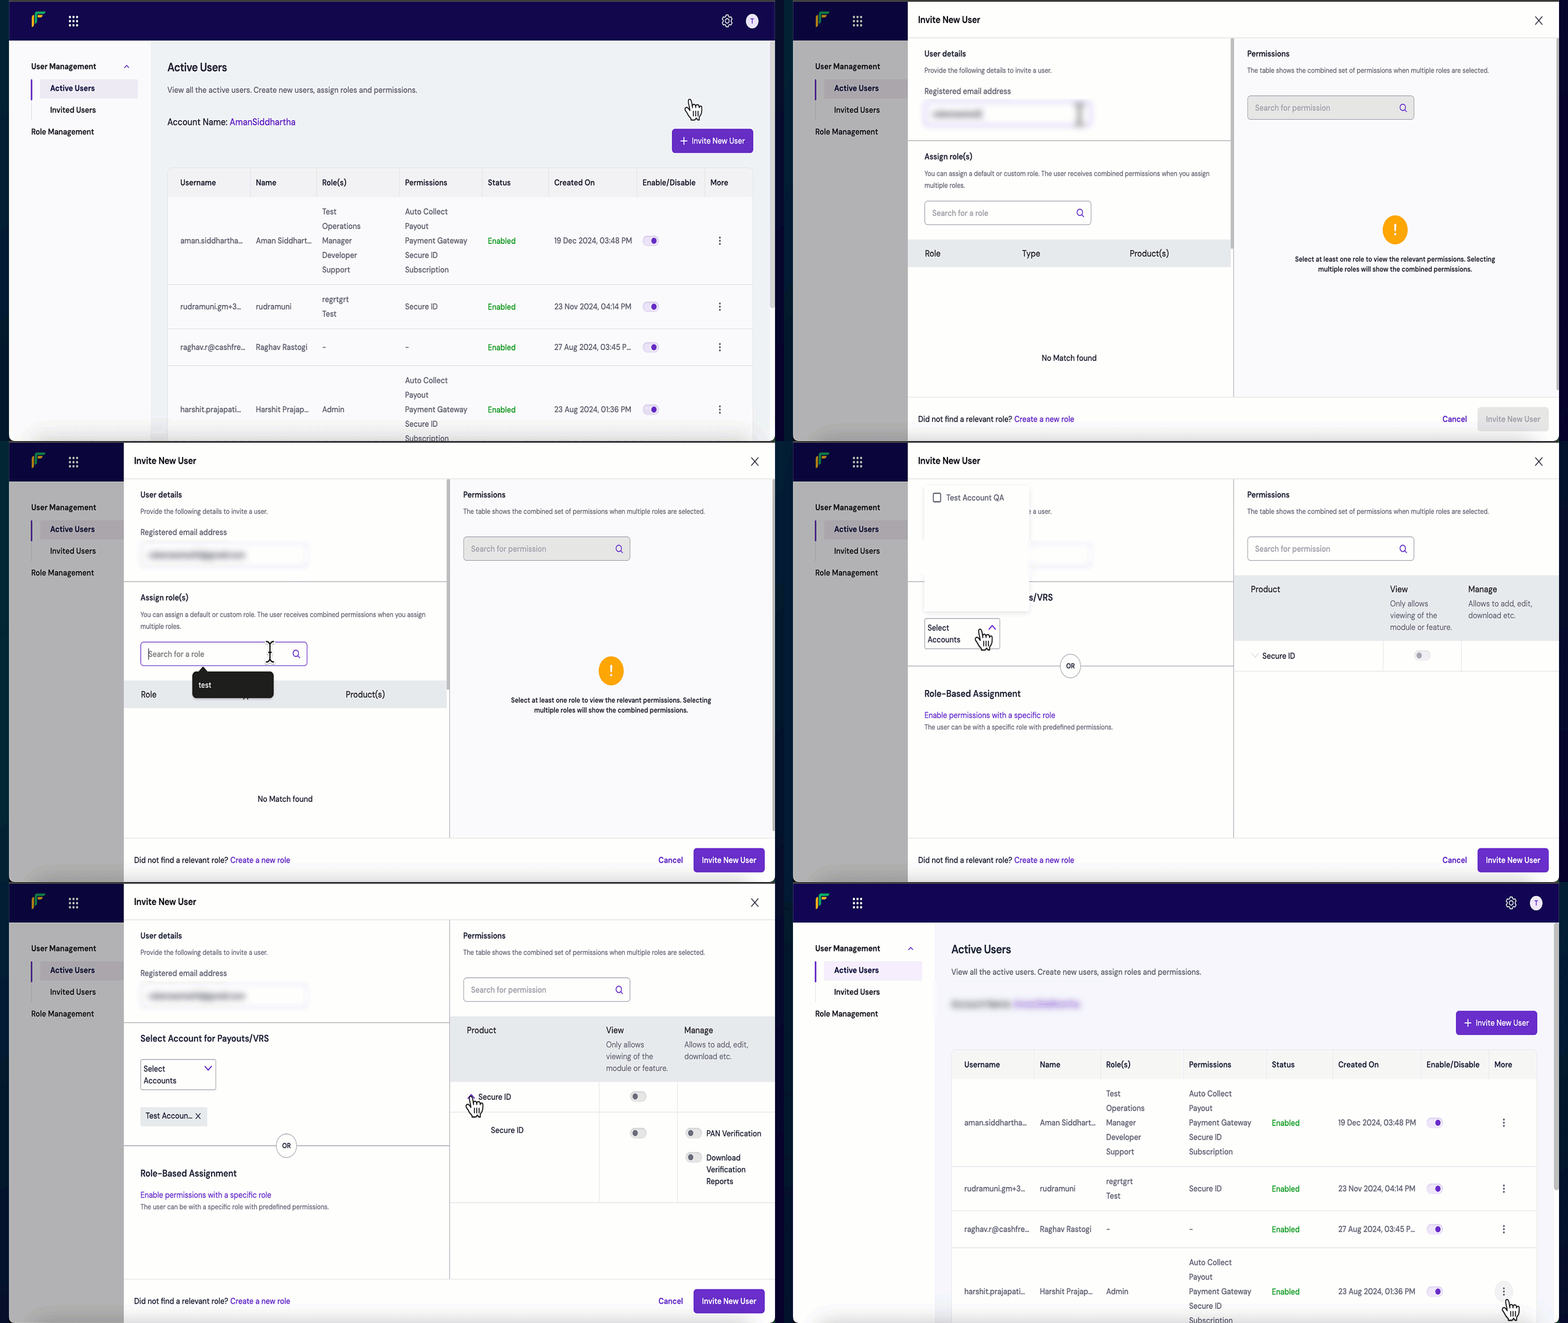
You can also invite a user and enable specific permission without assigning a specific role. You can use this to provide temporary access to a specific dashboard without having to redefine the entire role within your organisation. Follow the instructions below to invite a user and enable permission:- After you enter the required information of the user in the User details section of the Invite New User popup, scroll down to see Direct Permission Assignment.
- Click Enable permissions without a specific role.
- The Select Account for Payouts/VRS dropdown appears; use it to select the account(s) that the user can access.
- Follow the instructions in the Permissions section, and click Invite New User:
- Search for a permission: Use this search bar to search for a permission.
- Table
- Product: Use the dropdown to navigate through each product’s features.
- View: Use the toggle to enable or disable a permission that allows to only view the module or feature.
- Manage: Use the toggle to enable or disable a permission that allows to add, edit, download etc.
- A user is invited successfully. You can view the invited user(s) in the User Management > Invited Users screen.
Manage users
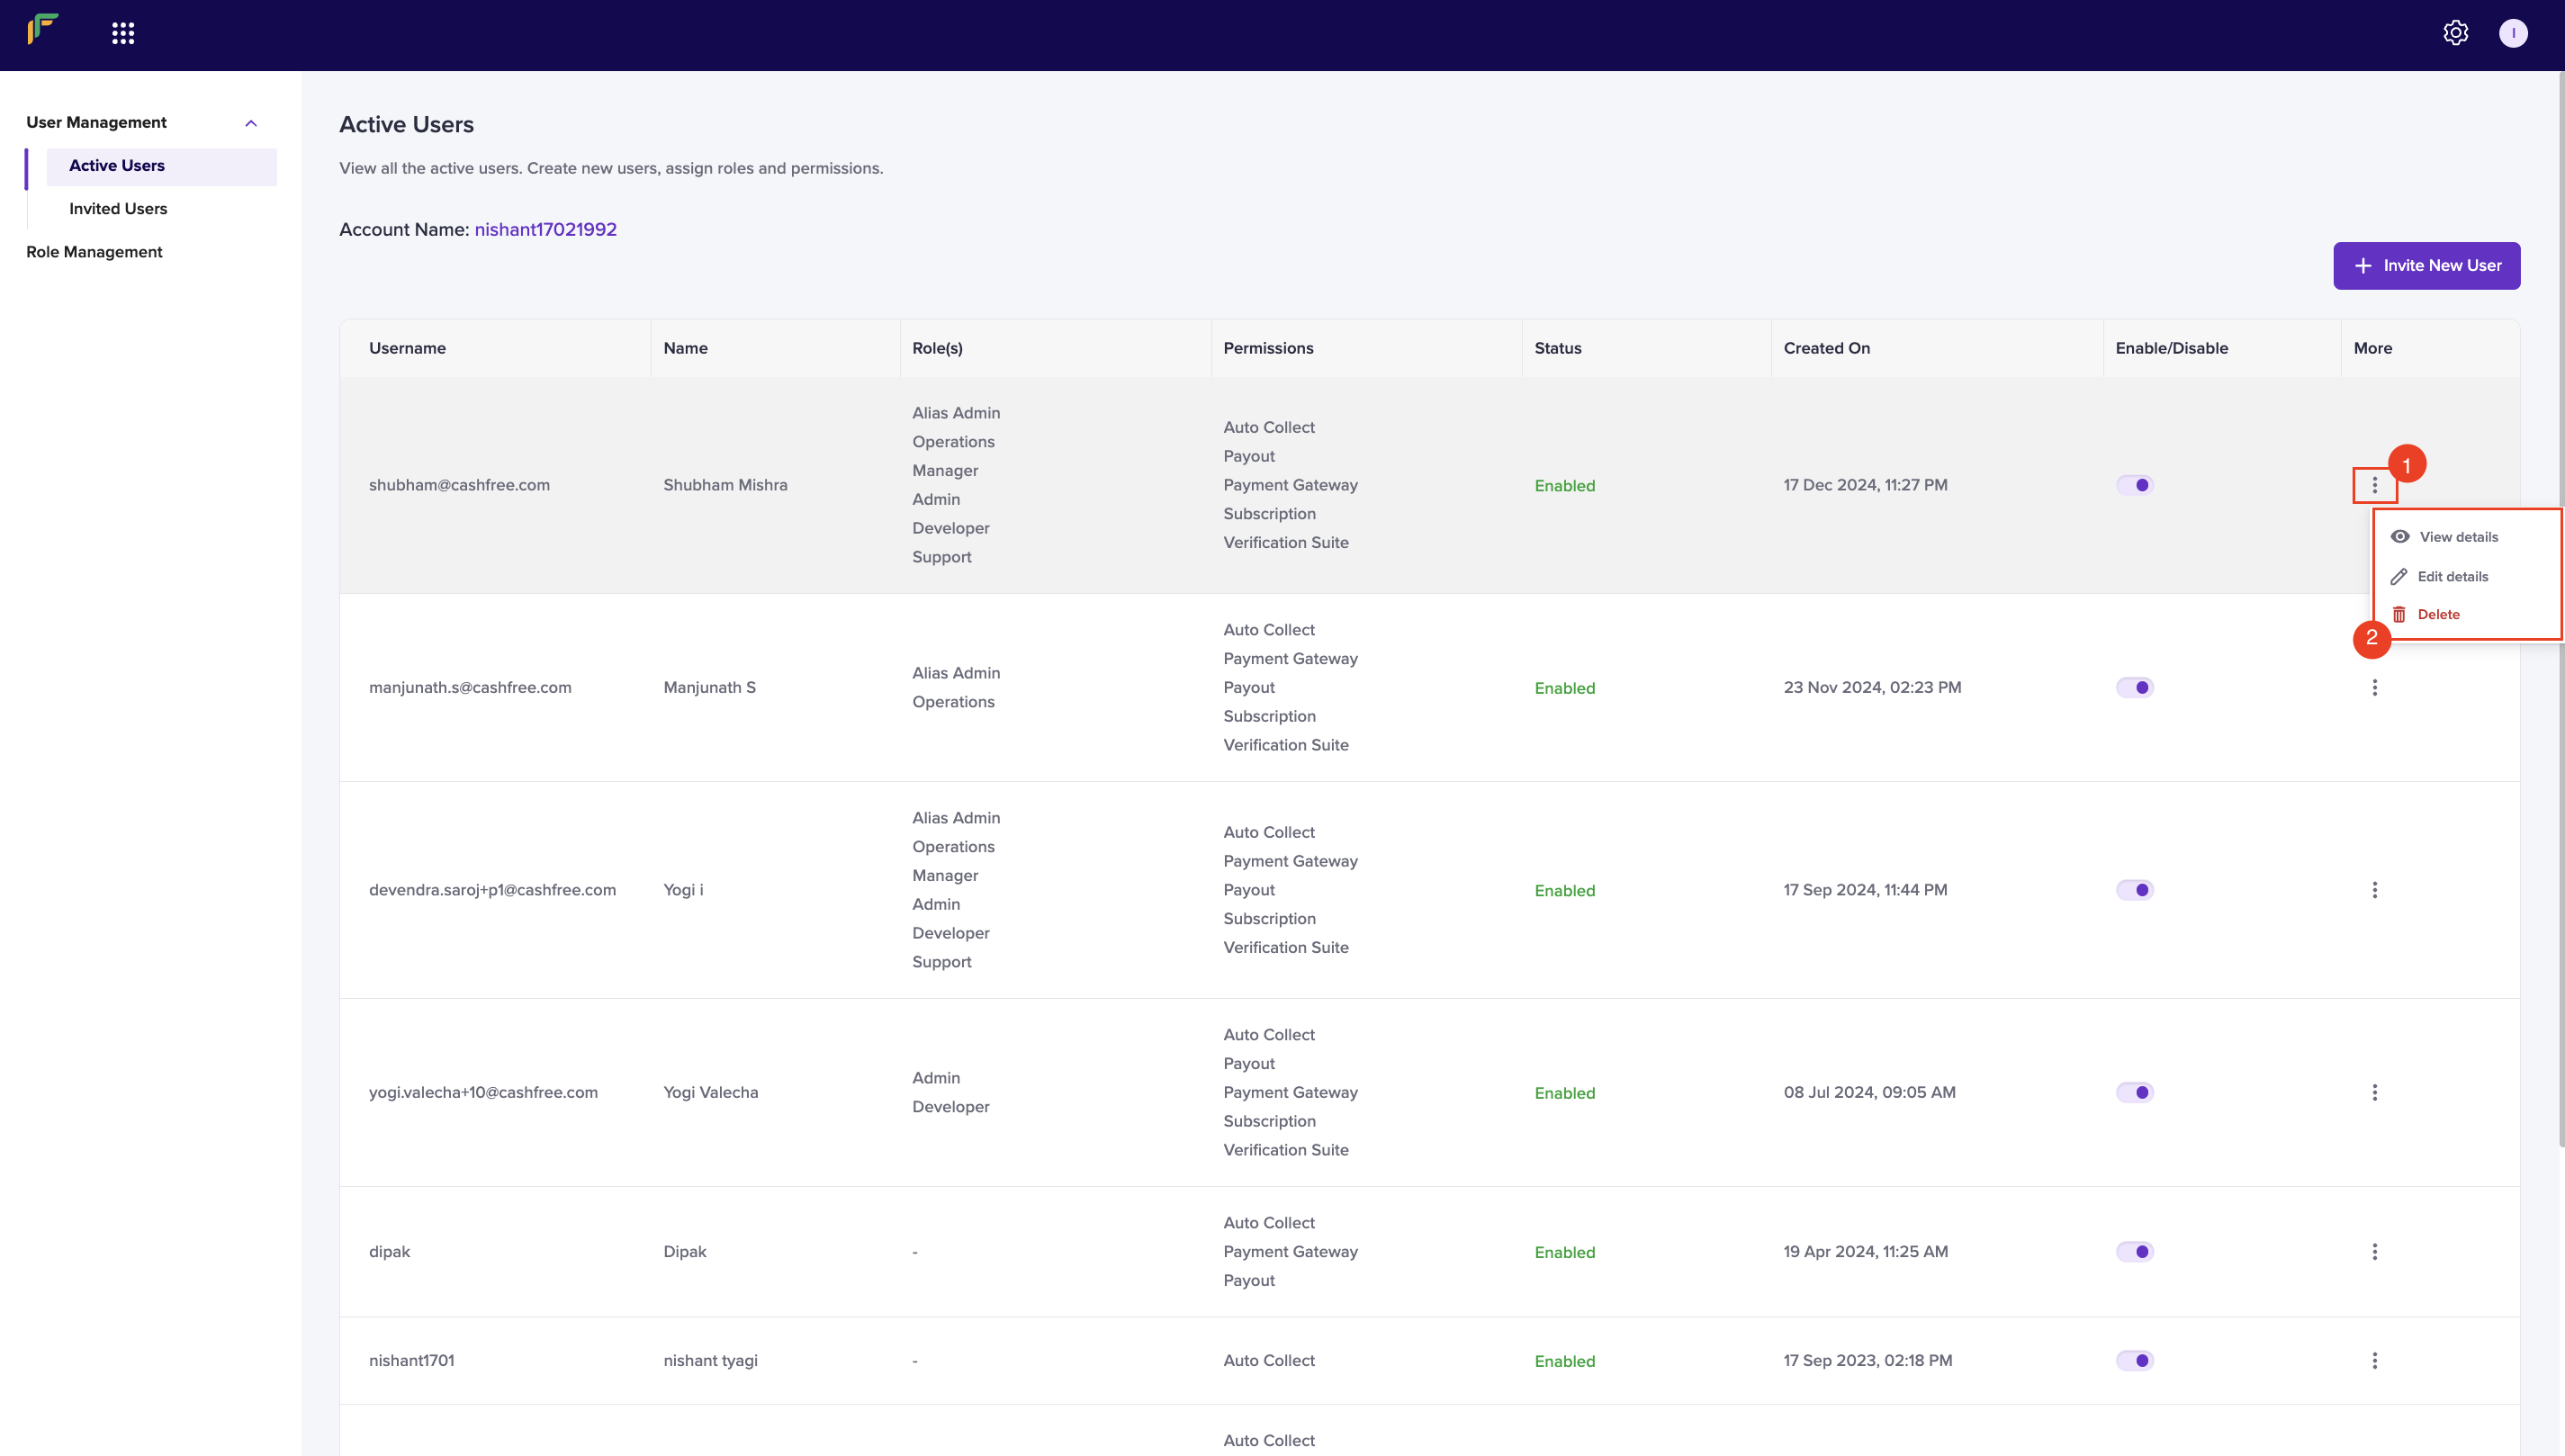
Follow the instructions below to manage existing users:- The table in the User Management screen lists the created users.
- Enable/Disable: Use this toggle to enable or disable a user.
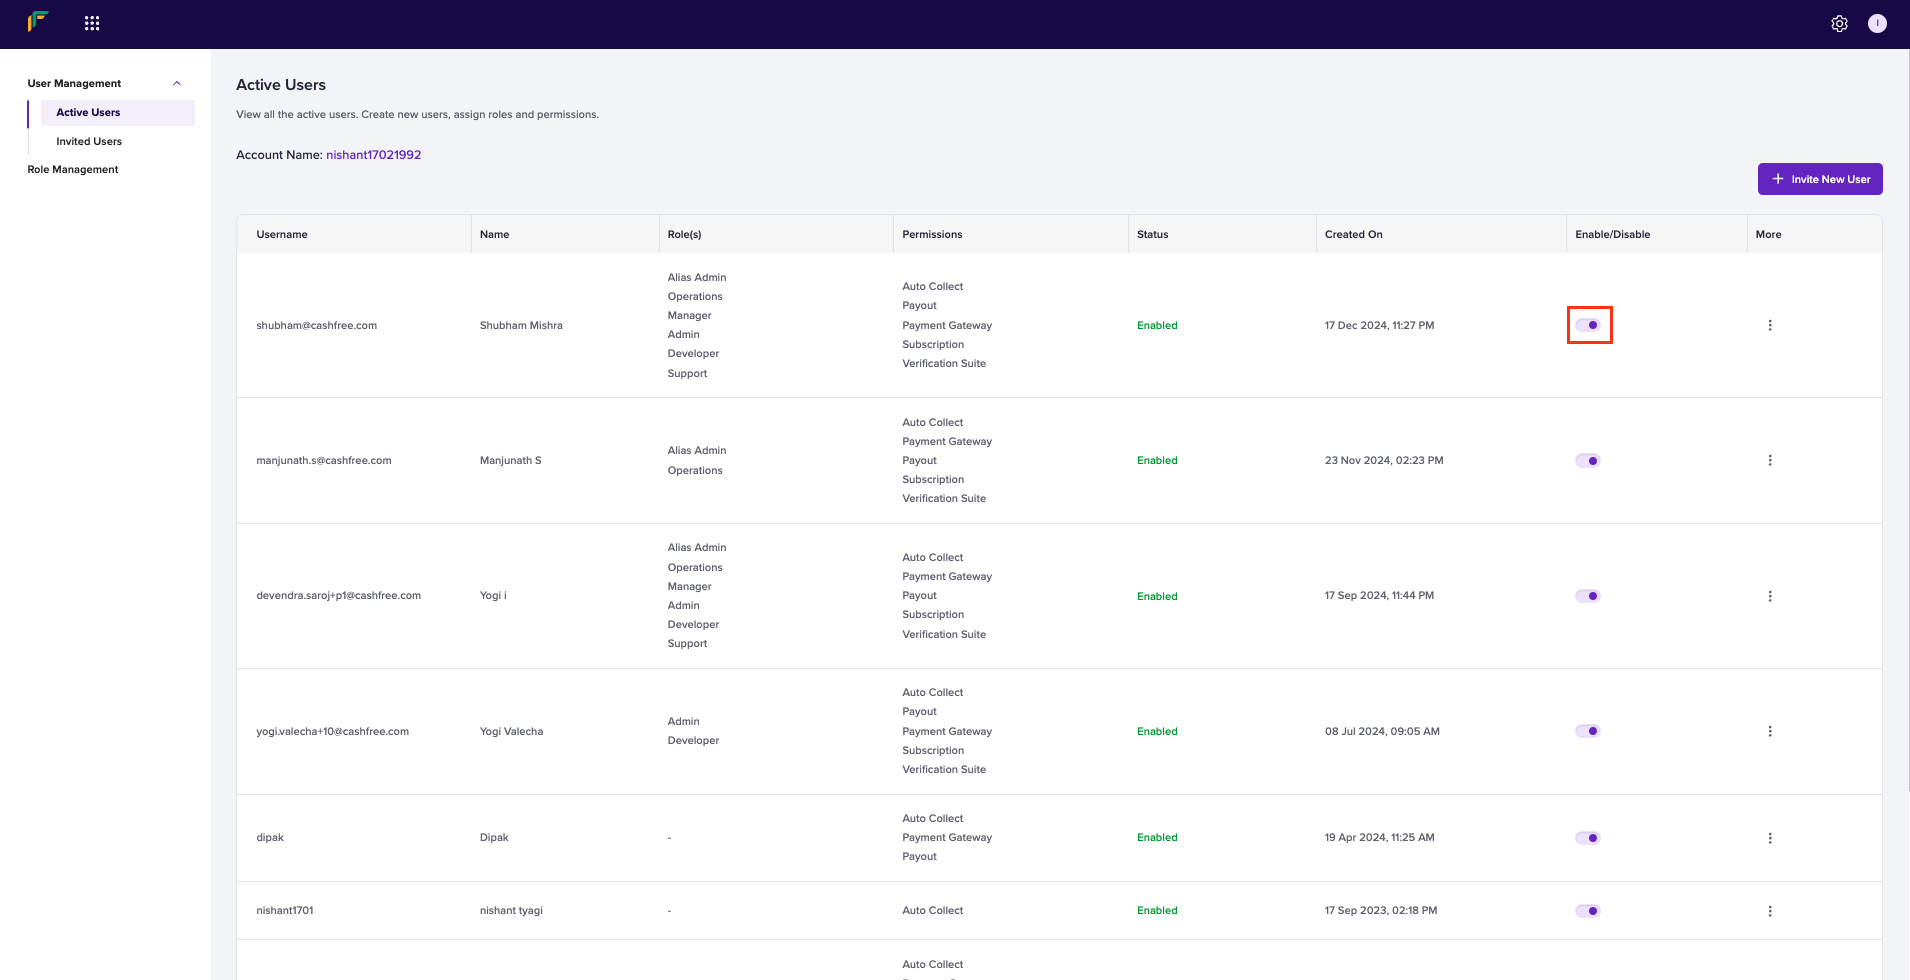
- Click the ellipses icon of the user that you want to manage.
-
Select an option:
- View details: It allows you to view the user details.
- Edit details: It allows you to edit the user’s permission/role in the Update Details popup. Click Update User when done.
- Delete: It allows you to delete the user.
Role management
This dashboard feature allows you to create and define the access levels and permissions for different roles within the system. The cornerstone of this system is its enhanced flexibility and control through the creation of different roles with specific permissions for each role.Create role
You can now create roles tailored to the exact needs of your team members. For example, you can define a role for a user that allows only to view Payment Gateway’s orders and nothing beyond that. Follow the instructions below to create a role:- Log in to the dashboard using your credentials.
- From the product selection screen, click Settings from the top navigation pane.
- Click Access Management from the General card, and click Role Management.
- Click New Role.
- Enter the following information in the Create New Role popup, and click Create New Role:
- Role: Enter the name of the role in this field.
- Description: Enter the description for the role.
- Search for a permission: Use this search bar to search for a permission.
- Table
- Product: Use the dropdown to navigate through each product’s features.
- View: Use the toggle to enable or disable a permission that allows to only view the module or feature.
- Manage: Use the toggle to enable or disable a permission that allows to add, edit, download etc.
- A role is successfully created. You can view the created role(s) in the Role Management screen.
Manage role
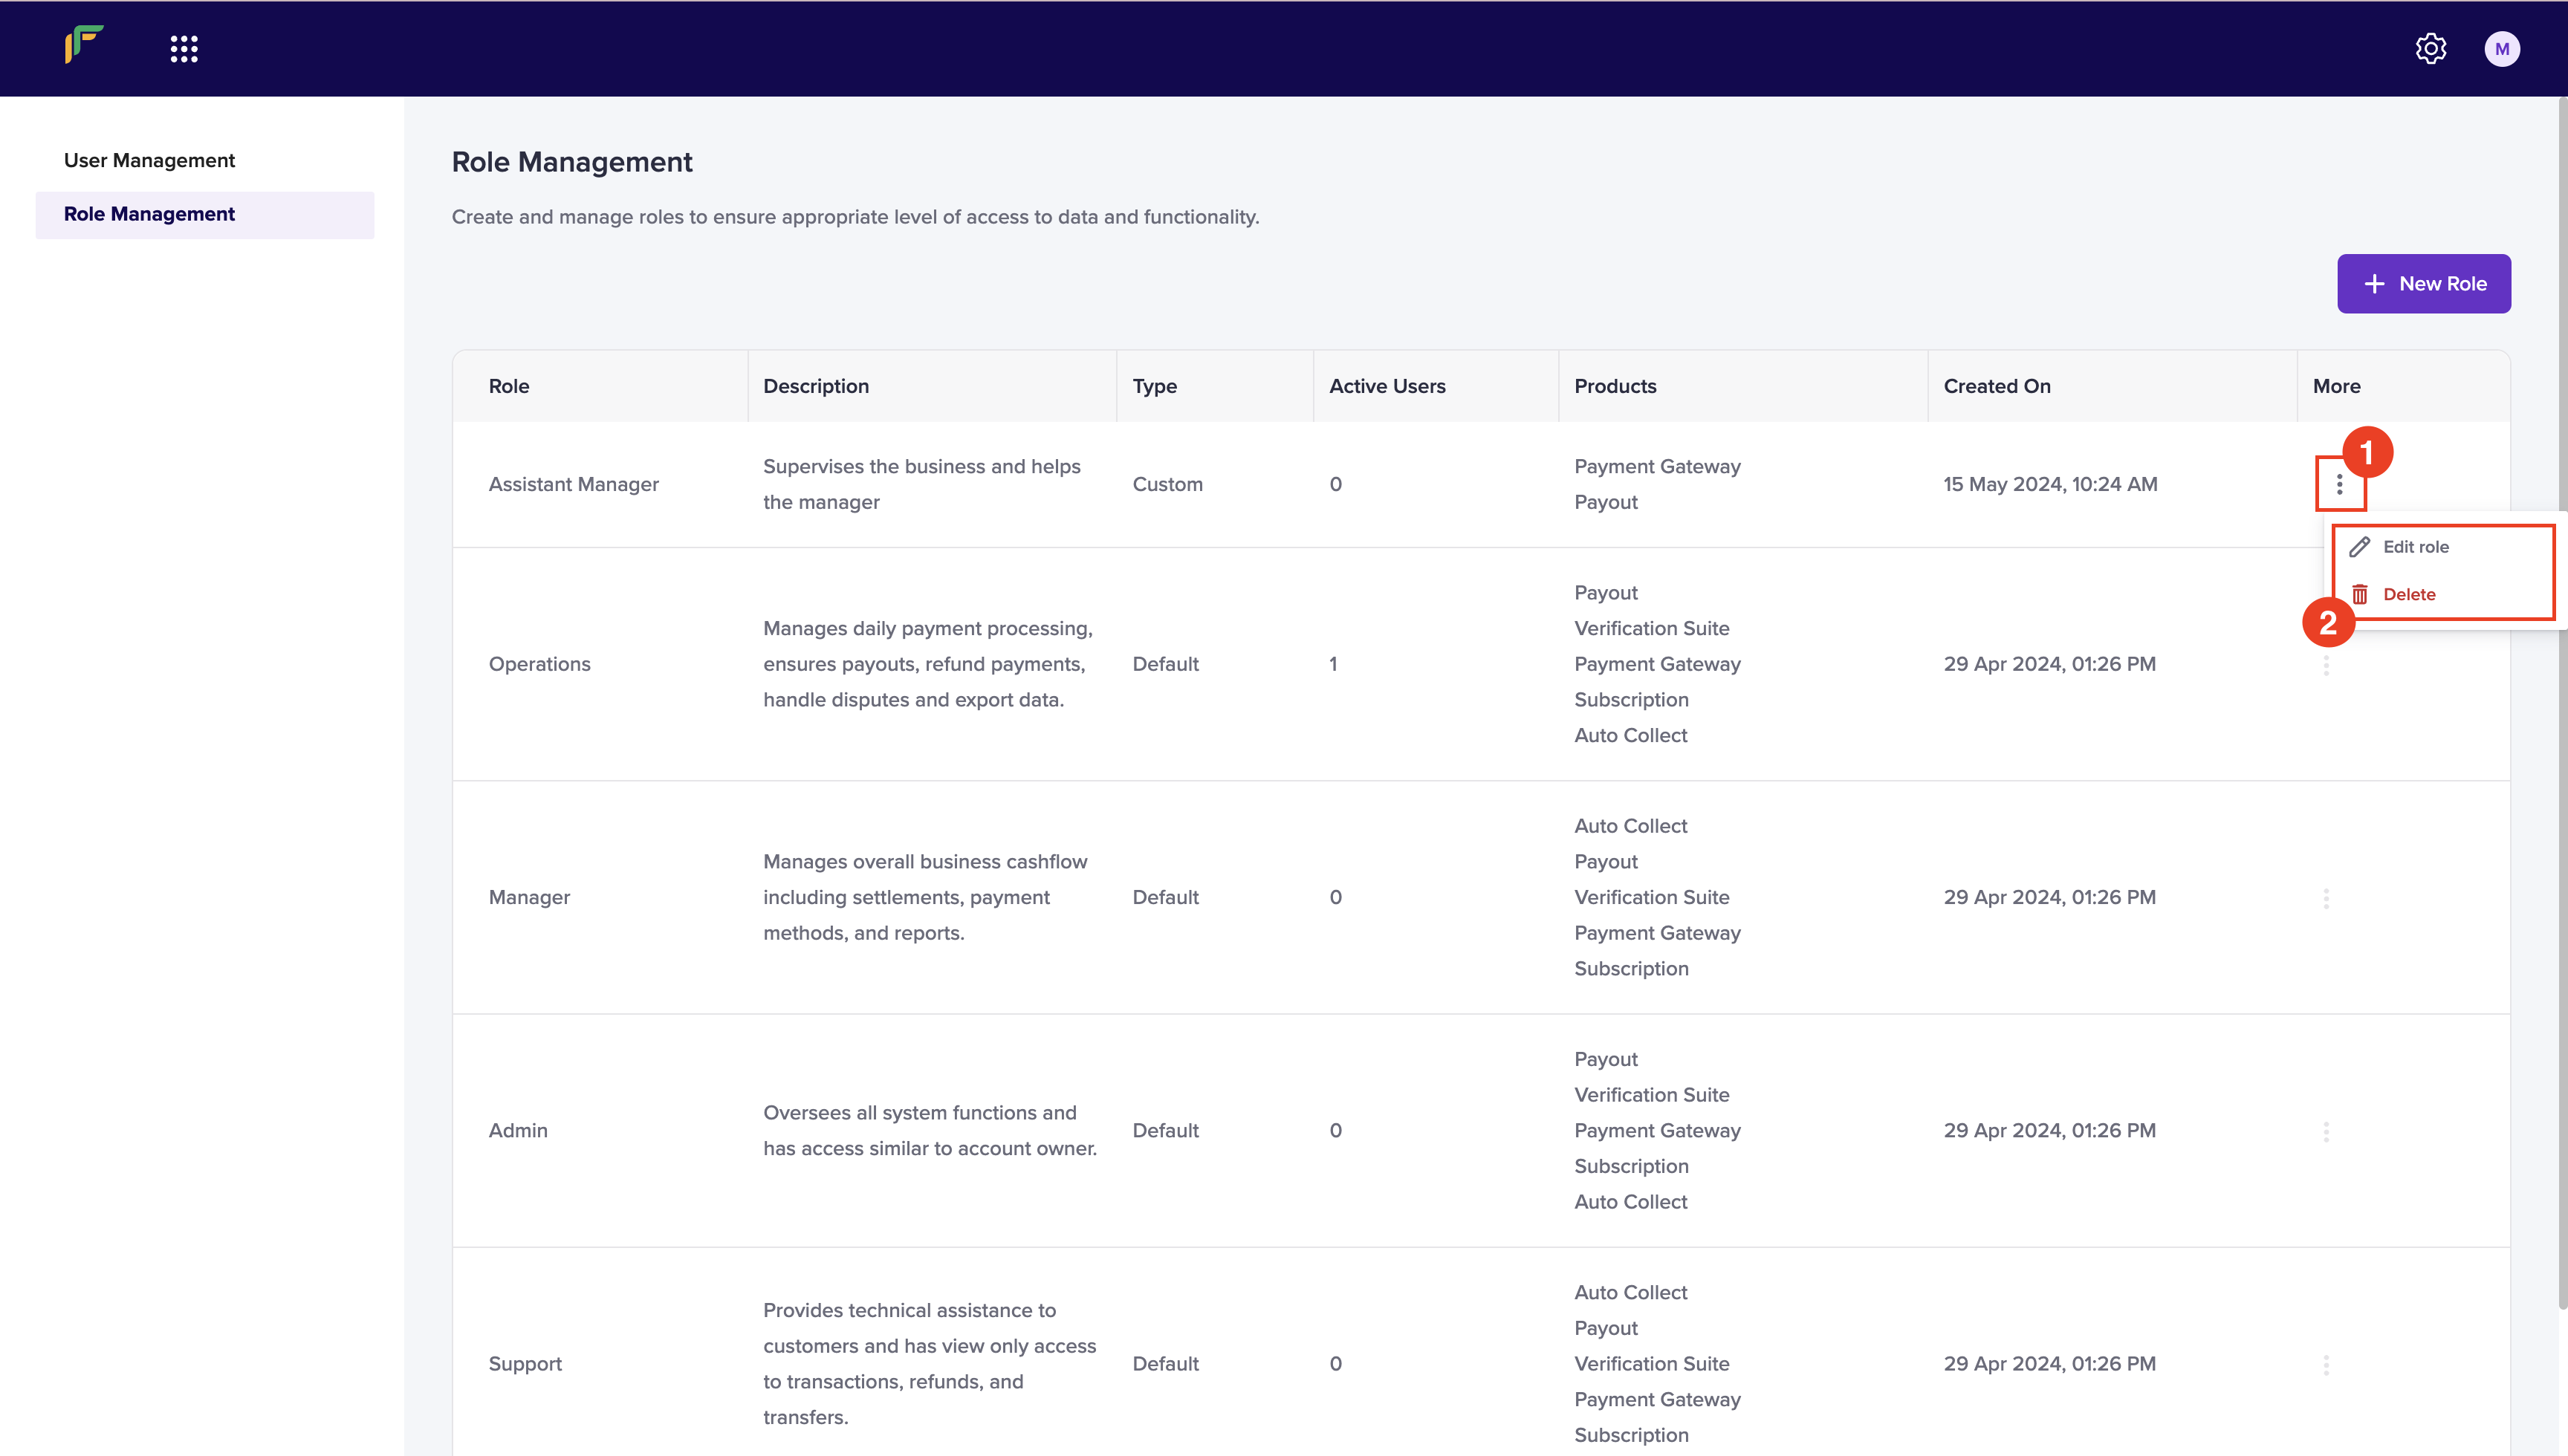
To maintain security and proper governance, we allows you to manage the created roles. Follow the instructions below to manage:- From the Role Management screen, click the ellipses icon of the role.
- A dropdown box appears with the following options:
- Edit role: It allows you to edit the role. Click Edit Role > update the details > and click Update Role.
- Delete: It allows you to delete the role.
